
Installation guide


Installation
Instructions
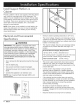
WARNING
Installing
the
Chassis
«To
avoid
personal
injury
caused
bythe
appliance
4
falling
forward
when
the
drawer
is
opened,
secure
,
the
chassis
to
the
cabinet-and
support
platiorm
as
instructed.
Grasp
the
warming
drawer
chassis
on
opposite
sides
and
slide
it
partially
into
the
cabinet
opening.
Temporarily
support
the
chassis
in
place
so
that
it
will
not
tilt
or
fall.
°Be-certain
that
the
power
plug
is
disconnected
from
2
the
electrical
outlet
before
installation.
From
an
adjoining
cabinet,
reach
in
behind
the
drawer
and
pull
the
power
cord
until
the
plug
is
next
to
the
*.
Verify
that
the
electrical
supply.
matches
the
ratings
electrical
outlet.
Do
not
plug
in
the
power
cord
at
this
found-on:the
appliance
data
plate
and
the
installation
time.
specifications
before
proceeding.
3.
After
positioning
the
power
cord
and
plug,
slide
the
R
h
D
chassis
completely
into
the
cabinet
until
the
front
frame
emove
t
e
rawer
is
positioned
flush
against
the
cabinet
face.
Remove
the
drawer
from
the
appliance
to
allow
access
4.
Use
the
screws
provided
to
secure
the
warming
drawer
to
the
mounting
holes
during
installation,
and
to
reduce
chassis
to
the
cabinet
and
support
platform,
insert
them
weight:
into
the
mounting
holes and
tighten
into
place.
You
may
want
to
drill
pilot
holes
prior
to
installing
the
mounting
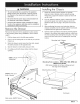
1.
Pull
the
drawer
out
to
the
fully
open
position.
Screws.
2.
Pushin
on
the
locking
tab
on
one
side
as
you
pull
the
drawer
up.
Mounting
hole,
9
places
3.
When
the
drawer
comes
loose
from
the
slide,
repeat
the
same
process
on
the
opposite
side.
Grip
the
drawer
on
both
sides
and
pull
it
free.
5.
For
safety,
push
both
drawer
slides
into
the
drawer
opening.
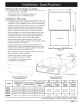
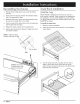
STEP
2:
Push
locking
tab
Mounting
Hole
Locations
-
ERW,
EWD,
IWD,
MRW
and
MWD
Series
Models
(IWD
series
models
do
not
have
a
flange
around
the
edge
of
the
faceplate)
Mounting
hole,
4
places
STEP
3:
Pull
up
on
front
of
““
f
Mounting
Hole
Locations
-
OWD24
Continued...
Style
varies,
EWD27
shown
dacor
7