
Installation guide


5
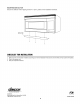
TOOLS
RECOMMENDED
FOR
INSTALLATION
«
Phillips
Screwdriver
«
Saw
to
cut
exhaust
opening
«
Pencil
«
Electric
Drill
(ifneeded)
+
Measure
»
1/2”,
5/8”
and
3/32”
Drill
Bits
+
Protective
Drop
Cloth
for
product
and
-
Tape
range
-
you
may
also
use
carton
for
«
1-1/2”
Wood
Bit
or
Metal
Hole
Cutter
(if
protection
metal
cabinet
is
used)
Scissors
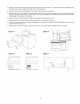
6
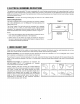
INSTALLATION
HARDWARE
The
INSTALLATION
HARDWARE
(items
@D
-
@))
packed
with
the
oven
should
contain
the
following:
ITEM
NAME
QUANTITY
—_
PART
CODE
@)
Wood
Screw
5
X
30
mm
6
XTSSD50P35000
(2)
Toggle
Bolt
3/16
inch
LX-BZ0195WREO
4
@
Top
Cabinet
Screw
5
X
60
mm
2
XBRSD50P60000
(@)
Flat
Washer
30
mm
diameter
2
XWHSD50-16300
©)
Power
Cord
Hanger
1
LX-MZBO001MREO
©)
Grommet
1
LBSHCO040MREO
@
Tapping
Screw
4
x
12
mm
4
XOTSD40P12000
1
Exhaust
Damper
Assembly
FFTA-BOO2MRKO
Figure
4
Parts
shown
not
to
common
scale.
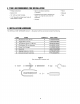
©
>»
®O
oCu=
Use
with
metal cabinets.
Surround
the
power
cord
opening.
Cut
to
fit.
®
Cc
_—~*”W
\
@
@)
EEE
TD