
Installation guide


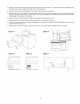

Figure
8
db
Figure
9
_
y
d
fa
(LI
°
a.
Exhaust
Damper
Assembly
(C)
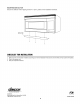
RECIRCULATING:
Non-Vented,
Ductless
Operation
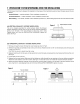
1.
Remove
and
save
6
screws
and
fan
cover
bracket
as
shown
in
Fig.
6.
2.
Withdrawn
hood
fan
unit.
See
Fig.
7.
.
Rotate
hood
fan
unit/end-over-end,
then
rotate
it
90°
(1/4
turn)
so
that
exhaust
ports
faces
toward
front
of
oven
unit.
The
fan
blades
should
be
visible
through
the
openings
facing
toward
the
front
of
the
oven.
4.
Replace
hood
fan
unit into
oven
unit
as
shown
in
Fig.
11.
.
Put
the
lead wire
into
the
box.
.
Replace
the
fan
cover
bracket.
If
the
cover
does
not
fit
prop-
erly,
the
hood
fan
unit
is
improperly
placed.
Check
steps
3
and
4
again.
.
Attach
the fan
cover
bracket
to
the
oven
unit
with
6
screws
as
shown
in
Fig.
9.
NOTE:
1.The
Exhaust
Damper
Assembly
is
not
required
for
recirculating
exhaust.
2.
Charcoal
Filter
sold
as
an
accessory,
is
required
for
recirculating
exhaust.
Figure
11
/
[Le
LN