Use & Care Manual Over The Range Convection Microwave Oven Models PCOR30B, PCOR30R, PCOR30S IMPORTANT INFORMATION Operation Instructions Cooking Guides Specifications Oven e v a w Micro r u o Y Using e r o f e ad B e R e s Plea TINSEB317MRR1
F O R C U S T O M E R A S S I S TA N C E To aid in reporting this microwave oven in case of loss or theft, please record below the model number and serial number located on the unit. We also suggest you record all the information listed and retain for future reference. MODEL NUMBER ____________________________ DATE OF PURCHASE __________________________ DEALER _________________________________ SERVICER ________________________________ TO PHONE: 1(800)793-0093 TO WRITE: DACOR INC.
CONTENTS Sensor Cook Chart ................................... 17 Sensor Cook Recipes ............................... 18-19 Manual Convection /Automatic Mix Operation .................................................... 20-24 Convection Cooking .................................. 20 To Cook with Convection .......................... 20 To Preheat and Cook with Convection ..... 20 To Broil ...................................................... 20 To Slow Cook ............................................
PRODUCT WARRANTY WHAT IS COVERED CERTIFICATE OF WARRANTIES DACOR MICROWAVE OVEN WITHIN THE FIFTY STATES OF THE U.S.A., THE DISTRICT OF COLUMBIA AND CANADA*: FULL ONE YEAR WARRANTY If your DACOR product fails to function within one year of the original date of purchase, due to a defect in material or workmanship, DACOR will remedy the defect without charge to you or subsequent users. The owner must provide proof of purchase upon request and have the appliance accessible for service.
I M P O R TA N T S A F E T Y I N S T R U C T I O N S When using electrical appliances basic safety precautions should be followed, including the following: WARNING - To reduce the risk of burns, electric shock, fire, injury to persons or exposure to excessive microwave energy: 1. Read all instructions before using the appliance. combustible materials are placed inside the oven to facilitate cooking. b. Remove wire twist-ties from paper or plastic bags before placing bag in oven. c.
UNPACKING INSTRUCTIONS Unpacking and Examining Your Oven Carefully remove oven from carton. SAVE THE CARTON AS IT MAY MAKE INSTALLATION EASIER. Remove: 1. all packing materials from inside the oven cavity; however, DO NOT REMOVE THE WAVEGUIDE COVER, which is located on the ceiling in the oven cavity. Check to see that there are Installation Instructions, Wall Template and Top Template. Read enclosures and SAVE the Operation Manual. 2. the feature sticker from the outside of the door, if there is one.
I N F O R M AT I O N Y O U N E E D T O K N O W ABOUT YOUR OVEN The fan will automatically start when heat rises from range surface units or burners and when convection, high mix, low mix or the broil settings are used. This Operation Manual is valuable: read it carefully and always save it for reference. A good microwave cookbook is a valuable asset. Check it for microwave cooking principles, techniques, hints and recipes. Condensation is a normal part of microwave cooking.
INFORMATION YOU NEED TO KNOW ABOUT MICROWAVE COOKING • Arrange food carefully. Place thickest areas towards outside of dish. • Rearrange foods such as meatballs halfway through cooking both from top to bottom and from the center of the dish to the outside. • Watch cooking time. Cook for the shortest amount of time indicated and add more as needed. Food severely overcooked can smoke or ignite. • Add standing time. Remove food from oven and stir, if possible.
INFORMATION YOU NEED TO KNOW ABOUT UTENSILS AND COVERINGS It is not necessary to buy all new cookware. Many pieces already in your kitchen can be used successfully in your new microwave convection oven. The chart below will help you decide what utensils and coverings should be used in each mode.
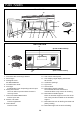
PART NAMES FRONT VIEW 12 11 15 10 16 6 1 2 4 3 6 5 7 8 9 BOTTOM VIEW 13 (Front of Microwave) 17 18 (Rear of Microwave) 14 1. Oven door with see-through window. 2. Door hinges. 3. Waveguide cover DO NOT REMOVE. 4. Turntable motor shaft. 5. Oven light. It will light when oven is operating or door is open. 6. Safety door latches. The oven will not operate unless the door is securely closed. 7. One touch DOOR OPEN button. Push to open door. 8. FAN HI / LO button. Push for high/low/off. 9.
CONTROL PANEL INTERACTIVE DISPLAY Words will light in the display to indicate features and cooking instructions. 16 25 16 14 15 - 17 20 20 22 21 23 21 20 21 24 12 13 25 26 26 13 13 12 12 Number next to the control panel illustration indicates page on which there are feature descriptions and usage information.
B E F O R E O P E R AT I N G • Before operating your new microwave oven make sure you read and understand this operation manual completely. 3 CLOCK 12:30000 TURNTABLE ON • Before the oven can be used, follow these procedures: Touch CLOCK pad. 1. Plug in the oven. Close the door. The oven display will show WELCOME PRESS CLEAR AND PRESS CLOCK . This is a 12 hour clock. If you attempt to enter an incorrect clock time, ERROR will appear in the display. Touch the STOP/CLEAR pad and re-enter the time. 2.
MANUAL MICROWAVE OPERATION HOOD LIGHT/ HOOD FAN TO SET POWER LEVEL Your oven is equipped with a Hood Light and a Hood Fan which can be used whether the door is open or closed. There are eleven preset power levels. Using lower power levels increases the cooking time which is recommended for foods such as cheese, milk and long slow cooking of meats. Consult cookbook or recipes for specific recommendations. To turn the Hood Light on, touch the LIGHT pad once.
M I C R O WAV E F E AT U R E S AUTO DEFROST Auto Defrost automatically defrosts ground meat, steaks, chicken pieces. 4 • Suppose you want to defrost a 2.0 pound steak. PROCEDURE After the 1st stage, open the door. Turn steak over and shield any warm portions. Close the door. START INSTANT ON D I S P L AY MIX COV DEFROST SENSOR TURNTABLE ON OFF COOK LBS OZ KG HELP 44.35000 Touch START/INSTANT ON pad. 1 STEAK AUTO DEFROST x 3 ENTER After the 2nd stage, open the door. Shield any warm portions.
MICROWAVE FEATURES cycle. The measurement of vapor will be interrupted. If this occurs, ERROR will appear and sensor cooking will be interrupted. To continue cooking, touch the STOP/CLEAR pad and select cooking time and power. When sensor detects the vapor emitted from the food, remainder of cooking time will appear. Door may be opened when remaining cooking time appears on display. At this time, you may stir or season food, as desired.
MICROWAVE FEATURES INSTANT SENSORS INSTANT SENSOR POPCORN Your oven has Instant Sensor Popcorn and Instant Sensor Reheat. To use any of the Instant Sensors, simply touch the chosen pad. The oven will start automatically. Any sensor setting can be programmed with More/Less Time Adjustment. See page 25. • Suppose you want to pop a 3.5 oz bag of popcorn. PROCEDURE POPCORN INSTANT SENSOR REHEAT Turntable on: SENSOR You can reheat many foods by touching just one pad.
MICROWAVE FEATURES SENSOR COOK • Suppose you want to cook a baked potato. PROCEDURE 1 SENSOR COOK Touch SENSOR COOK pad. 2 1 Select desired sensor setting. Touch 1 to cook baked potatoes. D I S P L AY SELECT 3 FOOD NUMBER BAKED POTATO PRESS START Touch START/INSTANT ON pad. When sensor detects LET the vapor emitted from the food, the remainder COVER of cooking time will appear. STAND Open oven door or touch STOP/CLEAR pad. The time of day will appear in the display.
MICROWAVE FEATURES SENSOR COOK RECIPES Cranberry Fluff 2 1 3/4 1 Makes 6 to 8 servings cups fresh cranberries cup water cup sugar carton (3 ounces) orange flavored gelatin 1/2 pint whipping cream, whipped or 1 carton (8 ounces) non-dairy whipped topping 1 Combine cranberries, water and sugar in a 2-quart casserole. Cover with wax paper. Microwave using SENSOR COOK for Fresh Vegetables-soft. Drain cranberries and save liquid. 2 Add enough hot water to saved liquid to make 2 cups.
MICROWAVE FEATURES SENSOR COOK RECIPES (CONTINUED) Mexican Seasoned Potatoes 4 1/4 1 1/2 Makes 6 to 8 servings medium baking potatoes (8 ounces each) cup olive oil tablespoon instant minced onion teaspoon chili powder 1/2 teaspoon oregano leaves 1/4 teaspoon ground cumin 1/2 teaspoon salt 1 Cut each potato lengthwise into 4 equal wedges. Place potato wedges into 10-inch square casserole. Toss potatoes with oil to coat well. 2 In small bowl, combine remaining ingredients. Sprinkle over potatoes.
M A N U A L C O N V E C T I O N / A U T O M AT I C M I X O P E R AT I O N This section of the Operation Manual gives you specific cooking instructions and procedures. Please consult your Dacor Convection Microwave Cookbook for helpful hints for convection and combination cooking. 2 The oven should not be used without the turntable in place, and it should never be restricted so that it cannot rotate.
MANUAL CONVECTION/AUTOMATIC MIX OPERATION TO SLOW COOK TO COOK WITH AUTOMATIC MIX Slow Cook is a preset at 300˚F. Slow Cook is programmed for 4 hours. Oven temperature can be changed to temperature below 300˚F. Simply touch the SLOW COOK pad and touch the desired numbered pad with temperature below 300˚F. • Suppose you want to bake a cake at low mix for 20 minutes. PROCEDURE 1 300F 4 HOURS PRESS START SLOW COOK START INSTANT ON 1 D I S P L AY Touch SLOW COOK pad.
C O N V E C T I O N A U T O M AT I C M I X F E AT U R E S This section of the operation manual offers instructions for preparing 12 popular foods using Auto Broil, Auto Roast and Auto Bake. 4 AUTO BROIL Auto Broil automatically broils hamburgers, chicken pieces, steaks and fish steaks. After broil cycle ends, 1 long tone will sound and will be displayed. END • Suppose you want to broil 2 hamburgers. D I S P L AY NOTE: AUTO BROIL SELECT 1. Auto Broil can be programmed with More/Less Time Adjustment.
CONVECTION AUTOMATIC MIX FEATURES AUTO ROAST 4 Auto Roast automatically roasts chicken, turkey, turkey breast or pork. 1 D I S P L AY SELECT AUTO ROAST FOOD NOTE: NUMBER 1. Auto Roast can be programmed with More/Less Time Adjustment. See page 25. Touch AUTO ROAST pad. 2 1 Touch number pad. (Ex: for chicken touch 1.) CHICKEN USE LOW RACK ENTER WEIGHT 2 5 3 2.
CONVECTION AUTOMATIC MIX FEATURES AUTO BAKE 3 Auto Bake automatically bakes cakes, brownies, muffins and French fries. 1 SELECT Touch AUTO BAKE pad. Note: Turntable function is automatically turned OFF. 2 FOOD NUMBER 4 USE 13X9X2 INCH METAL PAN ON LOW RACK NO FOOD IN OVEN PRESS START Touch number pad. (Ex: for cake, touch 1.) START INSTANT ON Touch START/ INSTANT ON pad. After AUTO BAKE cycle ends, 1 long tone will sound, and will be displayed.
O T H E R C O N V E N I E N T F E AT U R E S KITCHEN TIMER MULTIPLE SEQUENCE COOKING • Suppose you want to time a 3 minute long distance phone call. The oven can be programmed for up to 4 automatic cooking sequences for the microwave mode and 3 automatic cooking sequences for convection mode, switching from one setting to another automatically. PROCEDURE 1 Sometimes cooking directions tell you to start on one power level and then change to a different power level. Your oven can do this automatically.
OTHER CONVENIENT FEATURES HELP GUIDE Help Guide provides 5 features which make using your oven easy because specific instructions are provided in the Interactive Display. 3. Be sure to choose foods that can be left in the oven safely until the Auto Start time. Baked potatoes are often a good choice. 1. CHILD LOCK 4. LANGUAGE SELECTION The Child Lock prevents unwanted oven operation such as by small children. Note: Child Lock is not applicable to Hood Fan and Hood Light buttons.
CLEANING AND CARE measuring cup. Boil for several minutes using 100% power. Allow to set in oven until cool. Wipe interior with a soft cloth. EXTERIOR The outside surface is precoated metal and plastic. Clean the outside with mild soap and water; rinse and dry with a soft cloth. Do not use any type of household or abrasive cleaner. TURNTABLE/TURNTABLE SUPPORT DOOR The ceramic turntable and turntable support can be removed for easy cleaning.
CLEANING AND CARE FAN CHARCOAL FILTER The fan will automatically start when heat rises from range surface units or burners and when convection, high mix, low mix or the broil settings are used. This protects the microwave oven from excessive temperature rise. The fan will stay on until the temperature decreases. It cannot be turned off manually during this time. Charcoal Filter is used for No-vented, recirculated installation. The filter should be changed every 6 to 12 months depending on use. 1.
SERVICE CALL CHECK Please check the following before calling for service: 1. Place one cup of water in a glass measuring cup in the oven and close the door securely. Operate the oven for two minutes at HIGH 100%. A. Does the light come on in the oven? YES _____ NO _____ B. Does the cooling fan work? (Put your hand over the top ventilation openings.) YES _____ NO _____ C.
QUICK REFERENCE For more complete information and safety precautions, refer to the inside instructions. SET CLOCK MANUAL OPERATION If WELCOME PRESS CLEAR AND PRESS CLOCK is in the display, first touch STOP/CLEAR. High Power Cooking CLOCK 1. Touch CLOCK pad. 2. Enter correct time of day by touching numbers in sequence. (Ex: 12:30) 3. Touch CLOCK pad again. 1 2 3 0 2. After Step 1 above, touch POWER LEVEL pad. 3. Select power level (Ex: 5 for 50%) and touch START/INSTANT ON pad.