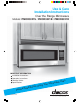
Use & Care Installation Instructions Over the Range Microwave Models: PMOR3021S / PMOR3021B / PMOR3021R IMPORTANT INFORMATION Installation Instructions Operation Instructions Cooking Guides Specifications ead R e s a Ple TINSEB402MRR0 ven O e v a icrow M r u o ing Y s U e r o Bef
F O R C U S T O M E R A S S I S TA N C E To aid in reporting this microwave oven in case of loss or theft, please record below the model number and serial number located on the unit. We also suggest you record all the information listed and retain for future reference.
CONTENTS For Customer Assistance .......................... 2 Reheat ...................................................... 22-23 Precautions to Avoid Possible Exposure Cook ......................................................... 23-24 to Excessive Microwave Energy ............... 2 Popcorn .................................................... 24 Contents ...................................................... 3 Sensor Center Recipes ............................. 25 Product Warranty ...........
PRODUCT WARRANTY WHAT IS COVERED CERTIFICATE OF WARRANTIES DACOR MICROWAVE OVEN WITHIN THE FIFTY STATES OF THE U.S.A., THE DISTRICT OF COLUMBIA AND CANADA*: FULL ONE YEAR WARRANTY If your DACOR product fails to function within one year of the original date of purchase, due to a defect in material or workmanship, DACOR will remedy the defect without charge to you or subsequent users. The owner must provide proof of purchase upon request and have the appliance accessible for service.
I M P O R TA N T S A F E T Y I N S T R U C T I O N S When using electrical appliances basic safety precautions should be followed, including the following: WARNING - To reduce the risk of burns, electric shock, fire, injury to persons or exposure to excessive microwave energy: 1. READ ALL INSTRUCTIONS BEFORE USING THE APPLIANCE. 2. Read and follow the specific “PRECAUTIONS TO AVOID POSSIBLE EXPOSURE TO EXCESSIVE MICROWAVE ENERGY” on inside front cover. 3. This appliance must be grounded.
U N PA C K I N G A N D I N S TA L L AT I O N I N S T R U C T I O N S UNPACKING AND EXAMINING YOUR OVEN Open the bottom of the carton, bend the carton flaps back and tilt the oven over to rest on plasticfoam pad. Lift carton off oven and remove all packing materials, WALL and TOP CABINET TEMPLATES. SAVE THE CARTON AS IT MAY MAKE INSTALLATION EASIER. 1. Remove the feature sticker from the outside of the door, if there is one. 2. Check to see that there is a WALL TEMPLATE and TOP CABINET TEMPLATE.
UNPACKING AND INSTALLATION INSTRUCTIONS 3 ELECTRICAL GROUNDING INSTRUCTIONS This appliance must be grounded. This oven is equipped with a cord having a grounding wire with a grounding plug. It must be plugged into a wall receptacle that is properly installed and grounded in accordance with the National Electrical Code and local codes and ordinances. In the event of an electrical short circuit, grounding reduces risk of electric shock by providing an escape wire for the electric current.
UNPACKING AND INSTALLATION INSTRUCTIONS 5 TOOLS RECOMMENDED FOR INSTALLATION • Phillips Screwdriver • Saw to cut exhaust opening (if needed) • Electric Drill • 1/2”, 5/8” and 3/32” Drill Bits • 1-1/2” Wood Bit or Metal Hole Cutter (if metal cabinet is used) • Scissors • Pencil • Protective Drop Cloth for product and range - you may also use carton for protection • Measure • Tape 6 INSTALLATION HARDWARE The INSTALLATION HARDWARE items 1 - 7 are in a small bag. Items 8 - " are packed separately.
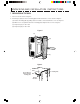
UNPACKING AND INSTALLATION INSTRUCTIONS 7 PREPARATION OF THE OVEN 1. Turn oven on the side. See Figure 5. 2. Follow steps (A)-(D) to remove mounting plate from the back of the oven as shown in Figure 5. (A) Release mounting plate by pulling out the lever that is on the bottom of the oven. See Figure 6. (B) When lever is out, pull that side of the mounting plate away from the oven. See Figure 5. (C) Repeat step (A) on other side. (D) Repeat step (B) on other side.
UNPACKING AND INSTALLATION INSTRUCTIONS 8 VENTILATION SYSTEM (PREPARING OVEN FOR INSTALLATION) This Microwave Oven/Hood is designed for adaptation to three types of hood ventilation systems. Select the type required for your installation. Recirculating — non-vented, ductless. Follow installation procedure (A). Recirculating requires the use of the Charcoal Filter, which has already been installed in the oven. Horizontal Exhaust — outside ventilation. Follow installation procedure (B).
UNPACKING AND INSTALLATION INSTRUCTIONS (C) VERTICAL EXHAUST: OUTSIDE VENTILATION 1. Remove and save 2 screws from back edge and 3 screws from the top center of the Fan Cover Bracket. Remove Fan Cover Bracket by sliding it in the opposite direction of the arrow on the Fan Cover Bracket as shown in Figure 11. 2. Lift Hood Fan Unit carefully and slip wires out of cavity. See Figure 12. CAUTION: Do not pull or stretch hood fan wiring. 3.
UNPACKING AND INSTALLATION INSTRUCTIONS 9 OVEN INSTALLATION THIS OVEN CANNOT BE PROPERLY INSTALLED WITHOUT REFERRING TO THE MOUNTING INSTRUCTIONS FOUND ON WALL AND TOP CABINET TEMPLATES. THE NEXT STEP IS TO READ AND FOLLOW MOUNTING INFORMATION ON WALL AND TOP CABINET TEMPLATES. THIS OVEN MUST BE ATTACHED TO AT LEAST ONE WALL STUD. SEE WALL CONSTRUCTION ON PAGE 6. WHEN DONE WITH TEMPLATES, PROCEED TO MOUNTING SCALE PLATE SECTION. MOUNTING SCALE PLATE SPACERS Attach 2 Scale Plates ! with tape (not included).
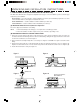
UNPACKING AND INSTALLATION INSTRUCTIONS 10 PREPARATION AND USE OF THE CARTON TO ASSIST IN THE INSTALLATION OF THE MICROWAVE OVEN Utilization of the carton may make installation easier. 1. Place carton upside down. See Figure 20. 2. Using cutting line around the carton, cut into two pieces (A) and (B). See Figure 21. 3. Position oven to assist in mounting to the wall. See Figure 22.
UNPACKING AND INSTALLATION INSTRUCTIONS MOUNTING OVEN TO THE WALL Two people are recommended to attach the Microwave Oven/Hood to the Mounting Plate. 1. Thread the Power Supply Cord through the hole made in the bottom of the top cabinet. Install the oven by snapping it onto the Mounting Plate. See Figure 23. 2. Use two Tapping Screws 5 to secure the levers that are on the bottom of the oven. See Figure 24. 3.
I N F O R M AT I O N Y O U N E E D T O K N O W ABOUT YOUR OVEN the amount of moisture that condenses in the oven. Generally, covered foods will not cause as much condensation as uncovered ones. Ventilation openings must not be blocked. This Operation Manual is valuable: read it carefully and always save it for reference. ALWAYS have food in the oven when it is on to absorb the microwave energy. The oven is for food preparation only. It should not be used to dry clothes or newspapers.
INFORMATION YOU NEED TO KNOW ABOUT UTENSILS AND COVERINGS The following coverings are ideal: It is not necessary to buy all new cookware. Many pieces already in your kitchen can be used successfully in your new microwave oven. Make sure the utensil does not touch the interior walls during cooking. • Paper towels are good for covering foods for reheating and absorbing fat while cooking bacon. • Wax paper can be used for cooking and reheating.
INFORMATION YOU NEED TO KNOW ABOUT MICROWAVE COOKING • Rearrange foods such as meatballs halfway through cooking both from top to bottom and from the center of the dish to the outside. • Arrange food carefully. Place thickest areas towards outside of dish. • Watch cooking time. Cook for the shortest amount of time indicated and add more as needed. Food severely overcooked can smoke or ignite. • Add standing time. Remove food from oven and stir, if possible.
PART NAMES FRONT VIEW BOTTOM VIEW (Front of Microwave) (Rear of Microwave) 1 Oven door with see-through window 2 Door hinges 3 Oven light It will light when oven is operating or door is open. 4 Rack holders for two rack positions. 5 Safety door latches The oven will not operate unless the door is securely closed. 6 One touch door open button Push to open door.
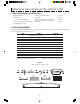
PART NAMES CONTROL PANEL Words in the lower portion of the display will light to indicate what function is in progress. 22-23 23 24 27-28 25-26 26 31 28-29 29 30 30 30 20 20 21 32 32 32 Number next to the control panel illustration indicates pages on which there are feature descriptions and usage information.
B E F O R E O P E R AT I N G • Before operating your new microwave oven make sure you read and understand this operation manual completely. 3 This is a 12 hour clock. If you attempt to enter an incorrect clock time, ERROR will appear in the display. Touch the STOP/CLEAR pad and re-enter the time. 1. Plug in the oven. Close the door. The oven display will show ENJOY YOUR OVEN PRESS CLEAR AND PRESS CLOCK . 2. Touch the STOP/CLEAR pad. : will appear.
M A N U A L O P E R AT I O N TIME COOKING USING THE RACK Your oven can be programmed for 99 minutes 99 seconds (99.99). Always enter the seconds after the minutes, even if they are both zeros. • Suppose you want to cook for 5 minutes at 100%. The rack allows several foods to be cooked or reheated at one time. There are two available rack positions. Select the rack position that maximizes space around and between the foods.
S P E C I A L F E AT U R E S SENSOR CENTER When the sensor detects the vapor emitted from the food, remainder of cooking time will appear. Door may be opened when remaining cooking time appears on the display. At this time, you may stir or season food, as desired. The sensor is a semi-conductor device that detects the vapor (moisture and humidity) emitted from the food as it heats. The sensor adjusts the cooking times and power level for various foods and quantities. 7.
SPECIAL FEATURES REHEAT CHART CONT. FOOD AMOUNT PROCEDURE 2. WITH STIR 13 x 9 x 2" glass utility casserole Ideal for reheating stirrable casseroles, such as macaroni and cheese or stew. Cover with vented plastic wrap or wax paper. Place on oven floor. Touch REHEAT, the number 2 and START/EASY MINUTE. At signal, stir casserole and rotate dish. Touch START/EASY MINUTE. At end, stir and allow to stand covered, for 5 to 10 minutes. 3.
SPECIAL FEATURES COOK CHART CONT. FOOD AMOUNT PROCEDURE 4. Frozen Vegetables .25 - 1.25 lb Add no water. Cover with lid or plastic wrap. After cooking, stir and let stand covered for 3 minutes. 5. Frozen Entrees 1 or 2 (6 - 17 oz) Use this pad for frozen, convenience foods. It will give satisfactory results for most brands. You may wish to try several and choose your favorite. Remove package from outer wrapping and follow package directions for covering.
SPECIAL FEATURES MEAL TIME Your oven has 3 convenient pads to assist with meal preparation. There are some foods under Breakfast Menu and Lunch Menu that use the sensor. See the Sensor Center information on page 22. For foods not using the sensor, follow the directions in the Interactive Display to enter quantity. 1. BREAKFAST MENU BREAKFAST MENU is for preparing popular breakfast foods. • Suppose you want to use Breakfast Menu to cook 2 servings of hot cereal. PROCEDURE NOTE FOR SPECIAL FEATURES: 1.
SPECIAL FEATURES BREAKFAST MENU CHART CONT. FOOD PROCEDURE AMOUNT 4. Scrambled Eggs 1 - 8 eggs For each egg, use 1 teaspoon of butter or margarine and 1 tablespoon of milk. Place butter or margarine in dish, measuring cup or casserole large enough for the egg to expand. Mix egg and milk together. Pour on to butter or margarine in dish. Place in oven and program. When audible signals are heard, stir egg mixture moving the cooked portion to the center of the dish and uncooked portion to the outside.
SPECIAL FEATURES 3. DINNER MENU 1 DINNER MENU 1 YELLOW RICE Touch DINNER MENU pad and 1, for Yellow Rice and Chicken. • Suppose you want to use DINNER MENU to cook Yellow Rice and Chicken. DINNER MENU RECIPES D I S P L AY PROCEDURE DINNER MENU will cook any of the dinners listed in the chart by simply following the directions in the lnteractive Display and on the Recipe Card. Follow Recipe Card for ingredients and instructions. 2 See recipe card for directions.
SPECIAL FEATURES 5.
SPECIAL FEATURES EASY DEFROST CHART CONT. FOOD PROCEDURE AMOUNT 4. Boneless Poultry .5 - 2.0 lb Use boneless breast of chicken or turkey. After each stage, if there are warm or thawed portions, rearrange or remove. Let stand, covered, for 5 to 10 minutes. 5. Bone-in Poultry .5 - 3.0 lb Arrange pieces with meatiest portions toward outside of glass dish or microwave safe rack. After each stage, if there are warm or thawed portions, rearrange or remove. Let stand, covered, for 5 to 15 minutes.
SPECIAL FEATURES SHORT CUTS SHORT CUTS automatically compute the correct heating time and microwave power level for melting, softening and warming foods shown in the chart. 3 2 1 MELT SELECT QTY Repeat touching same number pad to select quantity. (Ex: Touch 2 two more times for 1 square.) • Suppose you want to melt 1 square of chocolate. PROCEDURE x2 D I S P L AY 4 Touch MELT once. 2 2 CHOCO- START EASY MINUTE Touch START/EASY MINUTE pad. NOTE: 1.
O T H E R C O N V E N I E N T F E AT U R E S HELP GUIDE HELP GUIDE provides 4 features that make using your oven easy because specific instructions are provided in the interactive display. 3. Be sure to choose foods that can be left in the oven safely until the Auto Start time. Acorn or butternut squash are often a good choice. 1. CHILD LOCK 4. If you wish to know the time of day, simply touch the TIMER/CLOCK pad. As long as your finger is touching the TIMER/CLOCK pad, the time of day will be displayed.
OTHER CONVENIENT FEATURES DEMONSTRATION MODE MORE OR LESS TIME ADJUSTMENT To demonstrate, touch TIMER/CLOCK, the number 0 and then touch the START/EASY MINUTE pad and hold for three seconds. DEMO ON will appear in the display. Cooking operations and specific special features can now be demonstrated with no power in the oven. For example, touch EASY MINUTE pad and the display will show 1:00 and count down quickly to E ND .
CLEANING AND CARE Disconnect the power cord before cleaning or leave the door open to inactivate the oven during cleaning. Exterior Odor Removal The outside surface is precoated steel and plastic. Clean the outside with mild soap and water; rinse and dry with a soft cloth. Do not use any type of household or abrasive cleaner. Occasionally, a cooking odor may remain in the oven. To remove, combine 1 cup water, grated peel and juice of 1 lemon and several whole cloves in a 2-cup glass measuring cup.
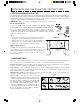
REPLACING PARTS CHARCOAL FILTER LIGHT BULBS Charcoal Filter, which was installed in your oven, is used for nonvented, recirculated installation. The filter should be changed every 6 to 12 months depending on use. 1. Disconnect power to the oven at the circuit breaker panel or by unplugging. 1. To replace light bulbs, first disconnect power to the oven at the circuit breaker panel or by unplugging. 2. To release cover, remove the screw on the light cover. (See illustration.) 3.
SERVICE CALL CHECK Please check the following before calling for service: Place one cup of water in a glass measuring cup in the oven and close the door securely. Operate the oven for one minute at HIGH 100%. A Does the oven light come on? YES _______ NO _______ B Does the cooling fan work? (Put your hand over the left side of louver.
AUTO-TOUCH GUIDE For more complete information and safety precautions, refer to your Operation Manual. SET CLOCK POPCORN If ENJOY YOUR OVEN PRESS CLEAR AND PRESS CLOCK is in the display, first touch STOP/CLEAR. 1 Touch POPCORN pad once for Regular or Regular Light. POPCORN 2 Touch POPCORN pad twice for Mini or Snack. POPCORN TIMER CLOCK 1 Touch TIMER/CLOCK pad and number 2. 2 Enter correct time of the day by touching numbers in sequence.
AUTO-TOUCH GUIDE KEEP WARM DINNER MENU 1 Touch KEEP WARM pad to keep food warm for up to 30 minutes. DINNER MENU 1 Touch DINNER MENU pad. 2 Select desired food. (Ex: touch 2 for Dressed-up Meat Loaf.) 2 Enter the desired time. (Ex: 25:00) 2 3 Touch START/EASY MINUTE pad. START EASY MINUTE DINNER MENU CHART Dinner Menu Recipes (All are for 6 servings) KEEP WARM 2 5 0 0 3 Touch START/EASY MINUTE pad. START EASY MINUTE With Manual Cooking 1 Enter cooking time. 8 0 0 2.
NOTES 38