Installation Instructions Warming Drawer Part No. 102345 Rev.
All specifications are subject to change without notice. Dacor ® assumes no liability for changes to specifications. © 2007 Dacor, all rights reserved.
Table of Contents Before You Begin............................................................... 1 Important Safety Instructions........................................... 1 General Safety Precautions.............................................. 2 Installation Specifications................................................. 3 Verifying the Package Contents........................................ 3 Installation Planning..........................................................
Important Safety Instructions General Safety Precautions To reduce risk of fire, electric shock, serious injury or death when using your appliance, follow basic precautions, including the following: warning warning • Read this manual completely before using this appliance. • Use this appliance only for its intended use as described in this manual. Use it only to warm food and heat plates and utensils. It is not designed for commercial, industrial or laboratory use.
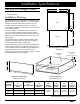
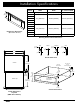
Installation Specifications Verifying the Package Contents • Use and Care manual • Mounting screws C B Installation Planning E A qualified technician must complete the installation of this built-in appliance. Proper installation is your responsibility. Chassis Carefully check the location where the drawer is to be installed. The drawer should be placed for convenient access. Make certain that electrical power can be provided in the selected location.
Installation Specifications Model EWD24 10 1/8" (257 mm) “A” Drawer Face Width “B” Chassis Face Width “C” Chassis Width 24” (610 mm) 23 5/8” (600 mm) 22 1/4” (565 mm) 27” (686 mm) 26 5/8” (676mm) 25 1/4” (641 mm) 30” (762 mm) 29 5/8” (752 mm) 28 1/4” (718 mm) EWD27 MWDH27 MWDV27 MRWD27 PWD27 A EWD30 MWDH30 MWDV30 Drawer Face Dimensions (MW Series Shown) EWO MRWD30 3 5/16" (84mm) PWD30 EWD36 1" (25mm) 2 3/16" (56mm) PWO EW MWO MW 3 1/4" (83mm) 2 1/4" (57mm) 35 5/8” (905mm) 1" (25m
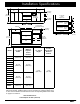
Installation Specifications Warming Drawer 36" Typ. (914 mm) Warming Drawer 3/4" Min.* (19 mm) C D 120 Vac electrical receptacle C 3/4" Min.* (19 mm) A B Cooktop 27"/30"/36" Dacor single oven D Warming Drawer 120 Vac Elect. D 1 1/2" (38 mm) Typical counter top Warming Drawer C 3/4” Min.* (19 mm) Warming Drawer 120 Vac Elect. Toe Kick A 36" Typ. (914 mm) A B Model IWD24 EWD24 “A” Cutout Width “B” Min.
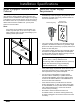
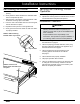
Installation Specifications Install a Support Platform in the Cabinet Electrical Power Supply Requirements Provide a platform (100 lb. load capacity) within the cabinet upon which the warming drawer will be supported. The platform must be installed level and straight. The top edge of the platform must be flush with the cutout at the front of the cabinet. There are no provisions to level the warming drawer after it has been installed. 3/4” (19 mm) thick plywood is recommended.
Installation Instructions warning • o avoid personal injury caused by the appliance T falling forward when the drawer is opened, secure the chassis to the cabinet and support platform as instructed. • Be certain that the power plug is disconnected from the electrical outlet before installation. • Verify that the electrical supply matches the ratings found on the appliance data plate and the installation specifications before proceeding.
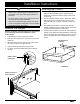
Installation Instructions Re-installing the Drawer 1. Pull the drawer slides all the way out of the drawer opening. 2. Gently lower the drawer between the extended slides until it is suspended by them. 3. Slide the back of the drawer mounting brackets under the drawer mounting clips on the slides. 4. Push one side of the drawer down onto its locking tab, until the tab locks into place. 5. Repeat the same process on the opposite side. 6.
Dacor ● 1440 Bridge Gate Drive, Diamond Bar, CA 91765 ● Tel: (800) 793-0093 ● FAX: (626) 403-3130 ● www.Dacor.