ca cor The Life of the Kitchen? USE AND CARE MANUAL Important Safety Instructions Getting to Know Your Oven Operating Your Oven... Cooking Tips Care and Cleaning . Part and Accessories Before You Coll for Service. Warranty and Service Warranty Card RENAISSANCE" WALL OVEN For use with RO series models Style varies, model RO230S shown Table of Contents i ET FS Family Owned American Made Part flo. 10548% Rev.
performance A Draco appear company value.
Important Safety Instructions INSTALLER: LEAVE THESE INSTRUCTIONS WITH THE APPLIANCE. CUSTOMER: READ THIS USE AND CARE MANUAL COMPLETELY BEFORE USING THIS APPLIANCE. SAVE IT FOR FUTURE REFERENCE. For service and warranty information see page 31. If you have any questions, call: Draco Customer Service (800) 793-0093 and Canada) Monday — Friday 6:00 am. to 5:00 ran. Pacific Time Web site: www.dacor.com Have the complete model and serial number for your appliance available.
Important Safety Instructions General Satiety Precautions To reduce the risk of fire, electric shock, serious injury or death when using your oven, follow basic safety precautions, including the following: A WARNING [A] WARNING = If you receive a damaged product, immediately contact your. dealer or builder. Do not install or use a damaged appliance. «Make sure that the oven has been properly installed and grounded by.a qualified installer according to the accompanying installation instructions.
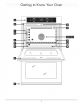
Getting to Know Your Oven Mode! Identification The oven is available in single and double oven models, Control panel —~ IRE Control panel Single oven # Double Oven Style varies Ti Style varies 9 el WME HOR. ONY Haw Bd rol pint FYE SL fa Control Panel ~ Single Oven gpk vel UE Ra a con.
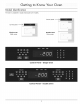
Getting to Know Your Oven Parts of the Oven Control panel Your oven's control panel consists of touch keys and a display. Use the control panel to control all the oven’s features (sometimes called modes). Alr intake /Exhaust slots The oven draws air in through the intake slots to cool its internal parts. The air comes aut through the exhaust slot at the bottom of the oven.
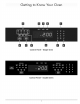
Getting to Know Your Oven Control Panel Layout START/CONTINUE key When you use the various features (or modes) on your oven, select the cook ing mode first, then touch the START key. Also, use the START key to start the timers. BE cooking mode keypad Select the type of cooking you want to perform by touching one of the cooking mode keys. Also includes the Self-clean and PROBE keys, and on double ovens, the PROOF key.
Getting to Know Your Oven Bix Control Panel Single Oven BAKE MOI CON FOSSE [YC GE i Pie Control Panel Double Oven
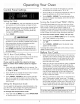
Operating Your Oven Control Panel Settings Setting the Clock 1. Touch the CLOCK key. The colon between the minutes and seconds on the time display will begin to flash. 2. Enter the current time on the number keypad before the colon stops flashing. For example: For 12:08, touch 1-2-0-8 on the keypad. Touching the # key changes the AM-PM indicator. 3. Touch START, [] IMPORTANT + The be ‘set during delay timed cooking, tone of the timers is in use or if self-clean or Sabbath mode is active.
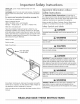
Operating Your Oven Racks You may use either rack type on any level inside the oven. [A] WARNING To reduce the chance of burns, position the oven racks when the vane fs cool. if-you must reposition a rack when the oven is hot, use potholders, To insert the standard oven racks... 1. Insert the end of the rack with the safety notches into the oven first. 2. Attach both sides of the rack to the rack supports in the oven as shown in the diagram below. 3.
Operating Your Oven Starting Your Oven 1. Adjust the racks to the appropriate level. 2. Determine the best cooking mode for the type of food to be cooked. Select from the following... CONVECTION BAKE A combination of the as 444 convection fan and a bottom heat source, = Good for single rack items in a deep pan. CONVECTION BROIL A combination of afl {50 the convection fan and & top heat source. Good for items that do not need to be flipped, such as thinner cuts of meat, fish, and garlic bread.
Operating Your Oven Lock-Out Feature If you want to disable the keys on the control panel when the oven is not in use: Push and hold the CANCEL » SECURE key for about three seconds. The control panel keys will stop working and "OFF" will appear on the display. Only the CANCEL + SECURE and the oven light keys remain functional, On double ovens, touching either CANCEL « SECURE key locks the control panel for both ovens. To reactivate the control panel, touch and hold the CANCEL SECURE key for three seconds.
Operating Your Oven Understanding the Various Oven Modes The three basic styles of cooking in an oven are: ¢ Baking: The gentle cooking of dry goods such as cookies, cakes, souffles, etc. ¢ Roasting: The cooking of meats or vegetables over a period of time. 4 Broiling: Cooking with an intense heat for a short amount of time. » Follow your recipe’s original cooking time and clambake $556 aperture, Uses only a heat source from below the food. This mode ° is the stand-by, non-convection mode.
Operating Your Oven Your oven offers three convection cooking modes... Pure Convection Convection bake Convection roast As & general rule, in the convection modes time is about 25% shorter, Set the timer 15 minutes before the shortest stated time and add more time if necessary. For Pure Convection and convection bake modes... Some recipes, especially those that are homemade, may require adjustment and testing when converting from standard to convection baking.
Operating Your Oven Understanding the Various Oven Modes (cont) Convection Roast % && Your ovens Convection roast mode uses a combination of the convection fan and heat sources above and below the food. It is best for rib roasts, turkeys, chickens, etc. Roasting Tips All baking modes can be used to roast in your oven. However, the Convection prats mode is recommended to produce meats that are deliciously seared on the outside and succulent juicy on the inside in record time.
Operating Your Oven Timers WARNING The timers on your oven do not turn the oven on or of. They are only for fuming purposes. When you want to. turn the oven off automatically, use the Delay Timed Cooking Features. NOTE Touching the CANCEL SECURE key does NOT foresee or stop the timers. Your oven is equipped with two builtin timers... » You can use bath of them at the same time. « You can time from 1 minute to 99 hours and 59 minutes.
Operating Your Oven Delay Timed Cooking [cont.} About the 3 Delay Timed Settings The delay timed cooking keys are: START TIME: The time the oven starts cooking COOK TIME: The amount of time the oven cooks before it goes into hold mode. STOP TIME: The clock time the oven turns off and goes into hold mode.
Operating Your Oven Using the Meat Probe When you cook foods like roasts and poultry, the internal temperature is the best way to tell when the food is properly cooked.
Operating Your Oven Using the Meat Probe {cont.) Dehydrating/Defrosting Important details about the meat probe: » You must select the specific cooking mode (BAKE, CON BAKE, PURE CON or CON ROAST) before you touch the PROBE key. » When using the meat probe feature the preheat cycle is disabled. For best results, select the mode and allow the oven to preheat prior to starting the meat probe feature. » The meat probe function will automatically cancel after 30 seconds if the meat probe is not connected.
Operating Your Oven When you dehydrate... 1. Wash and remove excess moisture from all fruits and vegetables before dehydrating. Cut fruits and vegetables into uniform pieces. You can add honey, spices, lime juice, or orange juice to give the fruit a different flavor. It is best to dehydrate on a baking rack with a pan underneath to catch any juices.
Operating Your Oven Setting Up the Sabbath Feature Proofing 1. Touch the # key. You can use your oven to proof feasted soughs at a low 2. Touch the BAKE or PURE CON key. On double and draft-free temperature using the Bake mode. ovens, be sure to touch the BAKE or PURE CON key 1. Touch the BAKE key*. for the oven you want to use, 2. Enter the temperature of 100°F on the keypad. 3. Touch the 8 or 2 keys repeatedly if you want to 3. Touch START.
Operating Your Oven Adjusting the Oven Temperature Even though your oven is adjusted at the factory to cook at the temperature shown on the display, it may cook faster or slower than your old oven. [A] WARNING Bo not adjust the probe ‘or self-clean offset temperatures. The offset for the PROBE and Self-clean offsets must remain at 0 for proper and/or safe operation, IMPORTANT: Do not measure the temperature inside the oven with a thermometer. Opening the door will cause an incorrect reading.
Cook ng Tips Food Placement Typically, when baking on two racks with your oven, use rack positions #3 and #5 (counting from the bottom up). When baking on three racks, use rack positions #2, #4 and #6, Turn pans on the racks so that the long sides run left to right, as you face them. When you are cooking a food item that is very heavy, use the Draco Glide Rack oven rack. You can pull it out further than a conventional rack, making it easier to check the food, stir or add ingredients.
Cooking Tips Time and Temperature Suggestions™ Food Rack Position** Cooking Mode Temperature Setting | Cooking Time Comments Angel food cake 4 BAKE 325°F (163°C) 37 min. . Use rack 3 for one doorbell pie, od and 5 BAKE 3509F (177°C) 30-45 min. | ie, 3 and 5 when cooking two Turn pan sideways Banana bread 3 CON BAKE 325°F (163°C) 50 min. on rack for more even cooking Beef ribs, frozen 3 PURE CON 380°F (177°C) €0 min, Beef tree-tip 2 CONY ROAST 375°F (191°C) 45 min.
Cooking Tips Time and Temperature Suggestions® {cont.) Food Rack Position** | Cooking:Mode | Temperature Setting | Cooking Time Comments Flat bread 4 PURE CON 3759F (191°C) 15 min, Garlic bread 3 CON BROIL 5559F (291°C) & min, Hamburgers 4 BROIL 555°F (291°C) 7 min. Fresh 1/4 |b. patties Lasagna, frozen 3 CON BAKE 375°F (191°C) 95 min. Macaroni and . cheese (frozen) 3 CON BAKE 3759F (181°C) 55 min. Meatloaf 4 CON BAKE 3259 (163°C) 55 min. 2 Ib meatloaf Pie, frozen 3 BAKE 400°F (204°C) 65 min.
Care and Cleaning [A] WARNING Clean only the parts of the oven listed in this manual. Clean therm only in the manner specified, To-avoid dangerous fumes or damage to your oven's surfaces and ‘accessories, use only.the types of cleaning solutions specified in this. manual, To-avoid bums, tum off the oven(s) and make sure that all parts are cool before cleaning.
Care and Cleaning Self clean (cont) If you want to stop the self-clean cycle, touch the CANCEL SECURE key. Keep in mind that the oven door will remain locked until it is safe enough to open. The lock symbol will disappear from the display when the door lock is released. You will still need to exercise caution when the door lock is released because the inside of the oven may still be hot. After the self-clean cycle is complete... The door latch will release when the inside has cooled down.
Care and Cleaning Cleaning the Exterior Control Panel Cleaning the Inferior Convection Filter WARNING For your.safely and proper-vane performance, re-install the fitter before using the oven to cool If you don't, the spinning fan blades at the back of the oven will be exposed, [A] WARNING The convection filter is located in the back of each oven Do. not use abrasive cleaners or scrubbers on the control panel. They will permanently damage the finish. chamber. Clean the filter regularly.
Care and Cleaning Cleaning the Interior {cont.) Door Gasket (Seal) WARNING Take extreme caution when cleaning the door gasket, Rubbing or displacing it may damage the tight door seal required for proper cooking and self-cleaning, Clean the door gasket by dabbing it with a solution of water and mild soap. Do not scrub it or it will become damaged. Oven Racks CAUTION To prevent damage, do not self-clean the oven racks.
Care and Cleaning Replacing the Light Bulbs [A] WARNING « To.prevent electrical shock andiron personal injury, make certain that the-oven and light bulbs) are coot and that power to the oven has been tuned off al the main power supply. before replacing the light bulb{s}. +. Always make sure the lens covers are in place when using the oven(s). The lens covers protect the light bulbs from breakage caused by high oven temperatures or'mechanical shock.
Before You Call for Service Problem Solution Guide NOTE: See Common Problems When Using the Bake Mode on page 12 for problems with cooking food. Problem May Be Caused By What to Do Nothing works. Oven not connected to electrical power. Have a licensed electrician connect oven to properly wired electrical connection. Power to oven is off. Turn on power at circuit breaker or fuse box. Check for tripped breaker or blown fuse. Control panel locked.
Before You Call for Service Problem Solution Guide {cont.) Problem May Be Caused By What to Da Oven goes into hold mode too quickly after meat probe is connected. Meat probe connector is still wet after cleaning. Dry the metal portion of the plug that connects to the oven using a soft dry rag. Cooling fan continues to run after oven has been turned off. Normal operation. The cooling fan may run for a while after the oven is turned off, until the internal parts have cooled, Time on display not correct.
Warranty and Service Warranty What Is Covered E R A WITHIN THE FIFTY STATES OF THE U.S.A, THE DISTRICT OF COLUMBIA, AND CANADA: FULL ONE-YEAR WARRANTY The warranty applies only to the Draco appliance sold to the first use purchaser, starting from the date of original retail purchase or closing date for new construction, whichever priced is longer.
NC POSTAGE NECESSARY IF MAILED ih THE UNITED STATES —— —— —— —— BUSINESS REPLY MAIL — FIRST-CLASS MAIL PERMIT NO 1600 GIT OF INDUSTRY CA Lo POSTAGE WILL BE PAID BY ADDRESSEE —— —— DECOR — ATTN WARRANTY PROCESSING DEPT PO BOX 90070 CITY OF INDUSTRY CA 91715-9907 Ida iluhalblbbdabldbdialoldl
decor BE Eddie Please visit www.dacor.com to activate your warranty online, WARRANTY INFORMATION IMPORTANT: ud Your warranty will not be activated until you activate it online or return this form to Draco. if you have purchased more than one Draco product, please return all forms in one envelope or activate the warranty for each product online. Please rest assured that under no conditions will Draco sell your name or any of the information on this form for mailing list purposes.