DAEWOO DPN-3500 GPS PORTABLE NAVIGATION USER MANUAL
1 - Contents What’s in the box 1. Your DPN-3500 w/Stylus touch pen 2. DPN-3500 holder 3. Windshield dock 4. CD-ROM 5. AC adaptor 6. USB cable 7. Car charger 8. User manual 9.
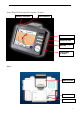
Your DPN-3500 keypad & layout: (Front) Battery indicator GPS indicator Menu / Power Zoom in/out Volume - / + 5 ways key w/Enter Rear : GPS receiver Reset switch Power switch 3
Top: Stylus Button: DC in Hold key Right: External Antenna 4
Left: SD socket Ear phone jack USB connector 5
2 - Getting started Full charge your DPN-3500 battery We recommend you to get full complete charge your DPN-3500 when the first time you connect it to the home AC adapter. It takes 4 hours to complete charge the battery. The battery indicator will be in RED when the battery of your DPN-3500 is low. Please be charge of battery. When in charging, the battery indicator will be in flashing orange. After the full charge, the battery indicator will be colored in light orange.
Calibration and Registration Please follow the next few steps to do the calibration and registration by taping the screen. Locating your current position Please have your DPN-3500 to be outside to locate your current position. When you first start the navigation device, you will hear the message saying “signal is too low”. It means the navigation has not located a reliable GPS signal yet. It will be up to 2 ~ 5 minutes to find your current position.
3 - Installing your device in a car Please check the points as the follows when using Windshield Dock to install DPN-3500 in your car: Use the windshield dock to place your DPN-3500 in your car. Make sure your windshield is clean and dry before attaching the dock. Place the dock in a place where it does not block your view of the road. Attach the dock to an area of the windshield where the glass is flat, not curved.
4 - Connecting with computer (optional) You can connect the DPN-3500 to your computer. Please also refer to the user manual for “installing the console’ – DestinAtor portion”.
5 - Information for user Important Safety Notices and Warnings Global Positioning System The Global Positioning System (GPS) is a satellite-based system that provides location and timing information around the globe. GPS is operated and controlled under the sole responsibility of the Government of the United States of America which is responsible for its availability and accuracy. Any changes in GPS availability and accuracy, or in environmental conditions, may impact the operation of your DPN-3500.
Protecting Your DPN-3500 Follow the cautions below to protect your DPN-3500 from damage: Do not store the DPN-3500 where prolonged exposure to extreme temperatures can occur (such as in the truck of a car), as permanent damage may result. Do not expose the DPN-3500 to water. Contact with water can cause this unit to malfunction. Do not leave your DPN-3500 in plain sight when you leave your vehicle. Take your unit with you or remove it from view of avoid theft.
6 - Troubleshooting Here are some of the questions you may need to ask. For more questions and answer, see http://www.daewoo-electronics.it Resetting your DPN-3500 If your unit locks up, please use stylus pen to tip the reset switch which located in rear of DPN-3500; if this does not help, power your DPN-3500 off and power it on again. How to charge the unit? DPN-3500 is normally charged whenever it is plugged into your car when using the supplied car charger, refer on page 8.
What can I do if the car charger no longer seems to work? Like all good automotive accessories, the car charger lead has a fuse, replace it with a standard fuse from an accessory shop. DPN-3500 Technical Specification CPU Samsung 2410 266MHz GPS SiRF III or Compatible solution Display 3.
Disposal of Used Electrical & Electronic Equipment The meaning of the symbol on the product, its accessory or packaging indicates that this product shall not be treated as household waste. Please, dispose of this equipment at your applicable collection point for the recycling of electrical & electronic equipments waste. In the European Union and Other European countries which there are separate collection systems for used electrical and electronic product.
Destinator ND User Manual Destinator Technologies
Notices, Disclaimers, and Terms of Use 1. Limited Product Warranty Destinator Technologies, warrants to the Client that the Products shall substantially conform to Destinator Technologies’ specification for a period of one (1) year from the date of the original purchase by the end user (the "Warranty Period").
Contents 1 - Introduction 3 Destinator ND Features .......................................................................................................................3 Tutorial .......................................................................................................................................................3 2 - Getting Started 4 What's on the Map?...............................................................................................................................
9 - System Settings 42 Volume Settings....................................................................................................................................43 Power Settings ......................................................................................................................................43 Backlight Settings ................................................................................................................................43 Date-Time Settings.................
1 - Introduction Welcome to the world of mobile navigation! Your Destinator device provides a full-featured mobile satellite navigation system. Gone are the days of “taking out the map”. You can now select an address or a predefined point of interest and request your navigation device to create a route.
2 - Getting Started What's on the Map? When you first turn on Destinator, the Main Map screen appears. You can use the icons displayed on this screen to plan and view your route. Directions Bar Current Location GPS-Generated Information Zoom Out Zoom In Compass Power Indicator Quick Nav Menu Button Volume GPS Status Figure 1 - Map Screen Your current location in Vehicle Mode. Your current location in Pedestrian Mode. Your last known location when GPS signal is unreliable. The generated route.
The GPS bar is a toggle button that displays the remaining travel distance and travel time, estimated time of arrival, and speed and altitude, and street name and address number. When you have calculated a route, the Directions bar displays information about your next turn. Click this bar for a complete list of turn-by-turn directions. GPS Not Found When you first start your navigation device, you will hear the message “Signal too low”.
Figure 2 - 2D Day Mode Map View Figure 3 - 2D Night Mode Map View Figure 4 - 3D Day Mode Map View Figure 5- 3D Night Mode Map View Point on the Map You can navigate to any point by tapping its location directly on the Map screen. This feature is especially handy when you want to navigate to a specific point on the map, but you don’t have the street address. When you tap on the map, the context menu appears. Navigate – This button lets you calculate a route from the map point.
Menus You can press the Menu menus, as shown below. button from the Main Map screen to display the three main Destinator Figure 7 - Destinator Menus The More button lets you cycle through the Destinator ND menus. You can click the Map button to return to the Main Map screen or the Quit button to close the Destinator ND Navigation System. Destination Menu This menu provides the following options: The Enter Address button lets you navigate to an address, as described in "Enter Address" on page 11.
Options Menu This menu provides the following options: The Avoid Roads button lets you avoid a road type, such as toll roads or selected streets, as described in "Avoid Roads" on page 25. The Multi-Stop Planner button lets you designate several stops on a route, as described in "Multi-Stop Planner" on page 23. The Route Playback button lets you record your route and play it back later. For more information, see "Route Playback" on page 27.
Settings Menu This menu provides the following options: The Look & Feel button lets you select a skin, which determines the look and feel of the Destinator Navigation System. The Map Settings button lets you specify map orientation, font, and zoom features. For more information, see "Map" on page 29. The Quick Nav Settings button lets you specify an address or place to which you can navigate with a single tap on the Quick Nav button. For more information, see "Quick Navigation" on page 30.
Cycling through Screens Every navigation function in the system, such as Address, POI, or My Favorites consists of a sequence of screens. You can cycle through the screen sequences by either: Selecting an item from the list and tapping it. Selecting an item form the list and tapping the Next button. The sequence ends with the Show on Map screen, where the destination is displayed and the GO button is available for you to calculate a route.
3 - Search for a Location Enter Address When you click the Address button, the Address screen appears, as shown below. 1. 2. 3. 4. Figure 8 - Display the Address Screen You can use the keyboard to enter the first characters of the address name. The characters appear in the Address field. Destinator automatically searches the Address list for the first occurrence of the entered characters. After you have selected a city, Destinator displays the next address field, such as street and address number.
Address Modes You can define the information used to locate an address by tapping the Mode button. Destinator provides a variety of address formats, as described below. City-Street This sequence displays the following address screens: City, Street, Address Number You can also navigate to city or street only. When you have selected a city, the first entry of the Street Name list is City Center. When you have selected a street, the first entry in the Address Number list is Street Midpoint.
Address Actions When you have specified an address, tap the Actions button to select from the following commands: Set as Origin Lets you designate the selected address as the route origin. Use this command when calculating a route from a point other than your current location. The navigation device displays the selected location as a starting point only for a few seconds before returning you to your current location. Note: You are still receiving the GPS signal.
If the destination is correct, you can instruct Destinator how to calculate your route by tapping either the Faster or Shorter button, as described below. This option selects the route that takes less time. Faster is the default value. This option selects the route that is the shorter distance. Remember, the shorter route may not always be the quickest, as you are able to travel faster on some roads than on others.
My Favorites A Favorite is a destination that you have stored for easy retrieval. To access a favorite destination, open the Destinations menu and tap the My Favorites button. The My Favorites screen displays your favorites groups. When you tap on a selected group, Destinator automatically displays its stored locations. Tap the selected location to show your destination on a map. Tap GO to calculate your route. 1. 2. 4. 5. 3. 6.
Favorite Groups You can tap the Actions button from the My Favorites screen to add, edit, or delete groups, as described below. Add Group When you tap this button, the Favorites Group screen appears. Enter the group name and select an icon to identify the group, as shown below. Figure 13 - Create Favorites Group The icon identifies all destinations located in that group, as displayed on the map.
You have a group called “Projects” that include addresses of your bank, grocery store, garage, hardware store, doctor’s office, post office, and so on. When the alert is set, Destinator reminds you about these places when you come within close proximity to them. You are going on a trip and friends have recommended certain restaurants that are on your route. You can create a group called “Restaurants” and enter the restaurant addresses.
POI (Points of Interest) The POI list is a collection of hundreds of interesting or useful places organized by easy-to-find categories. For example, you can use Destinator to guide you to a mall, hotel, restaurant, or gas station. From the Destinations menu, tap the Points of Interest button. The POI screen appears. You can find a button and entering text in the POI Category field.
Subcategories Many categories have subcategories to provide for an even greater list of choices. For example, “Gasoline Station” may have many subcategories each representing a particular brand name. The same is also true for “Hotels”. “Restaurants” have subcategories that represent different types of food, such as American, Italian, and French, as shown below.
Actions When you have selected a POI location, tap the Actions button to display the commands listed below. Set as Origin Lets you designate the selected location as the route origin. You would use this command when calculating a route from a point other than your current location. Note: You are still receiving the GPS signal. Show on Map Lets you show the map with the displayed destination for you to review before creating a route.
Turn-by-Turn List After you have entered a destination and calculated a route, the Directions bar appears at the bottom of the Map screen, displaying the following information: • The next turn direction • The distance to the next turn • The street name of the next turn button, Destinator displays a When you tap the Directions bar or click the Turn-by-Turn complete set of turn-by-turn directions from your current point to your selected destination.
Select Map This feature lets you change the currently selected map to another map saved on your SD memory card. If you want to store additional maps on your memory card, see “Maps” on page 35. You can tap the Select Map button from the Options menu to display the maps saved on your SD memory card. The Select Map screen displays map details and version numbers. The map currently used appears at the top of the list. 1. 2.
4 - Plan a Trip Multistop Planner The Multistop Planner lets you plan a route with up to twelve stops. When you press the GO button, the route is calculated in stages, from the departure point to the first stop. When you reach the first stop, the route recalculates to the second stop, and so on. 1. 2. 4. 5. 3. 6. Figure 21 - Travel to Multiple Routes The Show on Map screen provides you with the following route types: Faster and Shorter.
Defining Route Groups A Route Group represents a group of stops. From the Multistop Planner screen, select the Actions button and tap Add Group. From the Add Group screen, enter the Group name and save. The Actions screen also lets you edit or delete a selected group. 1. 3. 2. Figure 22 - Defining the Route Group Setting Stops along the Route You can set up stops by selecting the Route Group and tapping the Next button.
Stop Actions You can tap the Actions button for the following command options: Set as Origin Lets you designate the selected address as the route origin. You would use this command when calculating a route from a point other than your current location. Note: You are still connected to the GPS signal. Add Stop Lets you add a location by specifying an address from recent locations, favorite locations, or pre-defined POIs, such as fuel, food, or lodging.
Delete Group Select a group and tap this button to remove the group from the Avoid Roads screen. The road entries in this group are also removed. When selecting a group route, you can tap the Allow all roads located in the group. or Avoid button to include or exclude Avoid Road Locations When you tap Default or an Avoid Roads group, Destinator displays the group screen, which lets you select roads to avoid.
Route Playback This feature lets you record your route as you’re traveling and then to play it back on the Map screen. From the Options menu, tap the Route Playback button. To record a route, tap the Record button in the Route Playback screen. Destinator ND shows the Map screen and navigates you to your selected destination. To stop recording, return to the Route Playback screen and tap the Stop button. Figure 26 - Recording a Route To playback your recording, select the data file, and tap the Play button.
Pedestrian Mode The Pedestrian Mode button lets you toggle between traveling as a pedestrian or in a vehicle. When in Pedestrian Mode, your navigation region is limited to ten kilometers. When creating a pedestrian route, Destinator avoids highways or other roads where pedestrians would not travel. Voice prompts are not available in this mode. Pedestrian Mode displays a shadow that shows the position of the sun. This is helpful when you are trying to orient yourself to the Map screen during the day.
5 - Settings Map You can click the Map Settings button from the Settings menu to customize your map display, as shown in the figure below. Figure 27 - Map Settings The following map settings are: Map Orientation Forward is up – This option orients the map so that your forward direction is always at the top. North is up – This option orients the map so that North is always at the top. Use Automatic Zoom When this option is selected, the zoom is speed dependent.
Quick Navigation You can define the Quick Nav. location by selecting either the To Predefined Address or To Nearest POI Category in the Quick Nav. Settings screen. When the location is selected, you can navigate to your address by tapping the Quick Nav. button displayed on the Map screen. For example, if you have selected "Gas Stations" as the Quick Nav. destination, when you click the Quick Nav. from the Map screen, Destinator automatically creates a route to the closest gas station.
Prompts You can select the types of voice and visual notifications that you would like to use while navigating. From the Settings menu, tap the Prompts button. The Prompts screen appears, as shown in the figure below. Figure 30 - Prompts Settings Voice Prompts Speed Warning This prompt warns you when your car exceeds the speed limit. This prompt is not active unless selected. Route Recalculation This prompt is activated when Destinator recalculates a new route.
Units of Measure From the Settings menu, click the Units of Measure button to specify the system’s units of measurement. Figure 31 - Units of Measure You can select: System Units You can select: Imperial – Yards or miles Metric – Meters or kilometers About This information box provides version and copyright information. Language Settings This screen lets you select the language for announcing travel prompts, street names and driving directions.
6 - Installation Requirements Destinator ND is already installed on your proprietary device, but to add or change maps, you are required to install the Destinator ND Console on to your PC. PC Requirements To install and use the Console, your PC must meet the following requirements.
The Import Favorites button lets you download a list of your favorite locations from your PC to the selected My Favorites group on your device. The Quick Activation button lets you activate your Navigation System through an automated process. The Backup button allows you to save your Favorites, Multi-Stops or My Destinator. When you click on the Save button, the Favorites files, the MPR and the Desinator.
7 - Maps When you receive your device, Destinator ND is installed on your SD memory card along with a series of maps. This section provides information about installing additional maps from the Destinator ND Console. For information about installing the Destinator ND Console, see “Installation Requirements” on page 33. Map Screen Interface On the Destinator ND Console, a collection of maps is displayed. Standard Maps Maps available for installation from your CD.
Map Cutter Screen Interface Due to memory limitations of your SD memory card, you may want to customize a standard map by selecting the area you need. For example, if you are visiting a number of European cities on business, you may not want to install entire maps of those countries. You can crop a standard map from the Destinator Map Cutter screen. Select a standard map and click the Cut Map button. The Map Cutter screen appears, as shown in the figure below.
Focus the Map The following tools are provided to help you center your map, so you can designate the area that you want to cut. For example, perhaps you want the Center of London to be the center of your map. If you are creating a very local map, perhaps you want to make the office or the hotel the center. You can click the Address tool to set the origin of the map to a City, Street Address, or Intersection. The Address dialog box provides the Show and Set buttons to view and set the map focus.
The following commands are described below: Click this button to center the map on the selected point. Click this button to delete the selected point. Click this button to delete all selected points. Click these buttons to move a selected point up or down. Corridor You can select the amount of surrounding area that is included along the route's path, as measured in kilometers or miles. Route You can select either the quickest route, as determined by speed limit, or the shortest physical route.
Remove Map In the Target Device pane, click the Change button and select the location from where to remove the map. You can choose Storage Card. This updates the Installed Map pane. The Installed Map pane displays a list of all the loaded maps available. Select the check box by the map you want to remove. Click the Install/Remove Maps button to remove the selected map.
8 - Importing a Favorite You can download a list of favorite locations from your PC to your device. The list must be contained in .csv files. As part of the download procedure, you convert the .csv files to .dat format for storage on your device by using the Destinator Conversion utility. Favorites Importing File Structure The Favorites Importing file structure must be in .csv (Comma-Separated Values) format. The file contains the following fields: 1. Name of favorite 2. Comment 3. Longitude 4. Latitude 5.
Importing a .CSV File To import a .csv file: On the Destinator Console, click on a Standard Map. This will enable the Installing Map and Favorites Importer features. 1 Click the Favorites Importer button. The Converter dialog is displayed. 2 Select the .csv file, specify a category name, and click the Convert button. The Report Area displays a message stating that the content of the file has been converted and that the file is ready for download.
9 - System Settings Starts the Destinator ND application Opens the device’s System Settings screen Figure 36 - The Main Menu You can change the system settings by tapping the System button. The System screen shows all of the system settings that you can change, as displayed below. Power Settings – See Figure 39. Volume Setting – See Returns you to the Main Screen. Backlight Settings – See Figure 40. Figure 38. Time Settings – See Figure 41.
Volume Settings Figure 38 - Volume Settings This screen lets you change the volume level for voice prompts and tap sounds. Power Settings Figure 39 - Power Settings This screen indicates the battery status of the device. Backlight Settings Figure 40 - Backlight Settings This screen lets you determine the brightness of the screen. You can save power by selecting how long the backlight will stay on before it dims when running the device either on battery or on AC power.
Date-Time Settings Figure 41 - Date-Time Settings This screen lets you select your time zone, and to set the date and time. Language Settings Figure 42 - Language Settings This screen lets you select the language to be used for screen displays and voice prompts. System Information Figure 43 - System Information This screen displays information about the device.
45 Index A Address • 11 Address Actions • 13 Address Modes • 12 Avoid Road Groups • 25 Avoid Road Locations • 26 Avoid Roads • 8, 25 B Backlight Settings • 43 C Cancel Route • 20 Comma-Separated Values • 40 CSV • See Comma-Separated Values Cut Map • 38 D Date-Time Settings • 44 Defining the Route Groups • 24 Destination Menu • 7 Destinator ND Features • 3 Destinator Technologies • 3 E Enter Address • 7 F Favorite Groups • 16 Favorite Locations • 17 Favorites' Alert • 16 Focus the Map • 37 Focus the Ma
46 W What's on the Map • 4 Working with a Navigation list • 10 46