DTC-20,21 DTY-21,25,28,29 DTZ-24,28,29 HELPLINE NUMBER : 0870 100 2525 With queries, please quote the page number, reference number and model number GB SET-UP MANUAL Colour Television
ADDITIONAL INFORMATION FOR TV’S SOLD IN GREAT BRITAIN The appliance is supplied with a moulded three pin mains plug fitted with 5Amp fuse. Should the fuse require replacement, it must be replaced with a fuse rated at 5 amp and approved by ASTA or BSI to BS1362. The plug contains a removable fuse cover that must be refitted when the fuse is replaced.In the event of the fuse cover being lost or damaged, the plug must not be used until a replacement cover has been obtained.
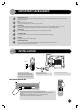
CONTENTS REMOTE CONTROL & TV CONNECTIONS . . . . . . . . . . . . . . . . . . . . . . 3 IMPORTANT SAFEGUARDS . . . . . . . . . . . . . . . . . . . . . . . . . . . . . . . . . . 4 INSTALLATION . . . . . . . . . . . . . . . . . . . . . . . . . . . . . . . . . . . . . . . . . . . . . 4 START UP . . . . . . . . . . . . . . . . . . . . . . . . . . . . . . . . . . . . . . . . . . . . . . . . . . 5 CONNECTING EXTERNAL EQUIPMENT . . . . . . . . . . . . . . . . . . . . . . . 5 DAILY USE. . . . . . . . . . . . .
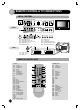
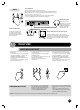
REMOTE CONTROL & TV CONNECTIONS LOCAL CONTROL DTC-20,21 / DTY-21,25,28,29 DTZ-24,28 / DTZ-29U7 Front DTZ-29U3 B1 B2 B3 B4 B5 MAIN POWER button FRONT VIDEO INPUT socket FRONT AUDIO INPUT (L + R) socket HEADPHONE socket STAND-BY indicator B6 B7 B8 B9 B10 REMOTE sensor TV / AV button VOLUME UP/DOWN buttons PROGRAM UP/DOWN buttons FRONT PANEL S-VIDEO jack Rear C1 SCART 1 socket C2 SCART 2 socket C3 AERIAL jack REMOTE CONTROL UNIT TV mode TELETEXT mode A1 A2 A3 A4 A5 A6 A1 A2 A3 A4 A5 A6 A7 A8 A9 A1
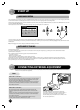
IMPORTANT SAFEGUARDS WATER AND MOISTURE The apparatus shall not be exposed to dripping or splashing water and no object filled with liquids, such as vases , should be placed on the apparatus. HEAT Never place the set near heat sources. Never put a naked flame, such as a candle, on the top of TV set. VENTILATION Do not cover the ventilation openings in the cabinet and never place the set in a confined space such as in a bookcase or built-in cabinet unless proper ventilation is provided.
START UP LANGUAGE MENU The very first time that you turn on the TV, the LANGUAGE menu will appear on the screen. Its purpose is to enable you to select the language that will be used for all the OSD (On Screen Display) menus. The user must enter a choice of language before proceeding further. The language entered at this stage can still be modified at any later time, by entering the LANGUAGE menu (accessed from the FEATURES menu: see later section under MENU DESCRIPTION).
TV/AV SELECTION Front Allows to switch between TV and external modes. By repeatedly pressing the remote control TV / AV (A5) or the TV front panel TV / AV (B7) button, the on-screen display is changed as shown (SVHS3 is an option): AV1 > AV2 > SVHS2 > AV3 > SVHS3 > TV Remark: If the signal source from the rear SCART1 socket (AV1) is RGB (e.g. normally from a DVD player) then AV1 RGB will be displayed. HEADPHONE SOCKET To hear TV sound with headphones, insert a 3.
PROGRAM SELECTION (FROM 0 TO 99) Direct selection Up / Down selection Use the remote control NUMBER 0….9 buttons (A3). For two digits program numbers, enter the second digit within 2 seconds. Use the remote control PROGRAM UP (A6) / DOWN (A21) buttons or the TV set front panel PROGRAM UP / DOWN buttons (B9). SOUND CONTROL Volume adjustment Use the remote control VOLUME UP (A20) / DOWN (A7) buttons or the TV set front panel VOLUME UP / DOWN buttons (B8).
PICTURE CONTROL You can select three pictures settings, by using the remote control NORMAL button (A17) : - Normal I (standard hard picture) - Normal II (standard soft picture) - Favourite For other adjustments: BRIGHTNESS, CONTRAST, COLOUR, SHARPNESS, NOISE REDUCTION, use the PICTURE menu. If an NTSC signal is received, then the TINT adjustment will also be available.
MENUS LANGUAGE SELECTION, CHILD LOCK, CLOCK SETTING, WAKE UP, NOISE REDUCTION These functions are available in the Features menu (see description page 13). Alternatively, the user can enter the time manually using the CLOCK function. However, if this is done the clock will not be periodically updated as would happen if the time is set automatically. We recommend that the user choose (if available) a CLOCK PROG which allows the time to be updated automatically.
PICTURE MENU (For operating instructions, see page 9, HOW TO USE THE SUB-MENUS) - Select and adjust the level of each function : BRIGHTNESS, CONTRAST, COLOUR, SHARPNESS, TINT (if available). - The above modified values are automatically stored in FAVOURITE mode. - NOISE REDUCTION feature can be activated or not. - The OK (A18) or NORMAL button will select the picture presets FAVOURITE, NORMAL I, NORMAL II. The currently selected preset is displayed in the menu header.
INSTALL MENU (For operating instructions, see page 9,HOW TO USE THE SUB-MENUS) Automatic tuning system Program list edition TV system modification Channel number Channel Frequency Channel name Program number INSTALL Country ATSS EDIT SYSTEM CHANNEL FREQUENCY NAME PROGRAM STORE TO GB GB C46 671,25 ABCDEFG 09 09 Program storage number TV system Channel number Channel Frequency Channel name Program number Program storage number Automatic Tuning System If you have a satellite decoder: If your decoder is c
Channel skipping - You can select skip „YES” or „NO” using the remote control RED „Skip” button (A11). A program with skip „YES” doesn’t appear on screen when changing channels with the PROGRAM UP (A6) / DOWN (A21) buttons. Channel deleting - Select the program to delete using the remote control CURSOR UP (A6) / DOWN (A21) buttons. - Press the remote control YELLOW „Delete” button (A26). The deleted program is moved to program number 99 with skip changed to „YES”.
FEATURES MENU See section near the end of section DAILY USE for a more detailed explanation of these functions. (For operating instructions see page 9, HOW TO USE THE SUB-MENUS) 1. Adjust this value ON or OFF. - In stand-by mode, the stand-by indicator flashes red and green to indicate the CHILD LOCK is set. - The front panel TV buttons (B7, B8, B9) become inactive and the TV will only respond to the remote control. 1. When switched to ON: Prevents the use of the TV set without remote control 2.
TELETEXT ENTERING/LEAVING TELETEXT MODE - Select the desired program with teletext. - Press the remote control TELETEXT ( ) button (A22) to select teletext mode. The initial page (or the last page viewed if you have already used teletext in the present channel) appears. - Teletext And Teletext (TAT) function (OPTION): if you want to watch two teletext pages on same screen, press the TELETEXT ( )button (A22) again.
USEFUL TELETEXT FUNCTIONS INDEX ( ) button (A18): Allows you to return directly to the initial teletext page. SUBPAGE ( PAGE HOLD button ( ) (A9): Any teletext page or subpage can be held on the screen by pressing the PAGE HOLD button. - The page number shown in the extreme top left corner instead of page number the HOLD icon is shown in green. - Press the HOLD button again to cancel hold mode (the page number will return to white). ) button (A10): - Press the SUBPAGE button (A10).
TELETEXT FORMAT PICTURE & SOUND CONTROL Doubling character height Repeatedly pressing the HEIGHT ( ) button (A23) doubles the character height in the following order: Upper half of the page (UP) > Lower half of the page (DOWN) > Return to normal height. If the page is in UP or DOWN mode, then normal size is automatically set if : - A new page request is made (e.g. CYAN, INDEX or PAGE UP/DOWN). - CANCEL mode (A8) function is used. - VOLUME menu is activated the with the MENU button (A19).
DMP3901900