= INSTRUCTION MANUAL TABLE OF CONTENTS SAFETY INSTRUCTIONS & SPECIFICATIONS ..........................................2 PARTS DESCRIPTIONS................................3 DIRECTIONS FOR SAFE USE .....................4 •How To Install.................................................4 •Water Connection ..........................................6 •Drain Hose Setting.........................................7 HOW TO OPERATE .......................................8 • Preparation for Washing ....................
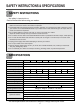
;; ;; SAFETY INSTRUCTIONS & SPECIFICATIONS SAFETY INSTRUCTIONS Your safety is important to us. Read all instructions before using your washer. ☞ Do not wash items cleaned, washed, soaked in, or spotted with wax, paint, gasoline, oil, or other flammable fluids. The fumes can create a fire hazard or explosion. ☞ Flammable fluids (dry-cleaning solvents, kerosene, gasoline, etc.) should not be used or stored in or near your washer. Do not add flammable fluids to your wash water.
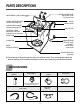
PARTS DESCRIPTIONS DETERGENT CASE (Symbol WATER CONNECTOR (Blue Color: Cold, Pink Color: Hot) ) FABRIC SOFTNER INLET (Symbol, See page 10) DOOR DRAIN HOSE LIQUID BLEACH INLET (Symbol, See page 10) LINT FILTER CONTROL PANEL (88 display and some buttons may be excluded) WASH TUB PLUG GROUND WIRE (This will not be provided in case of 3-wire power cord) PULSATOR ;; BASE (Height is optional) ADJUSTABLE LEG (Optional) ◆ The drawings in this book may vary from your washer model.
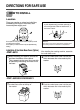
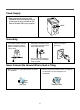
;; DIRECTIONS FOR SAFE USE HOW TO INSTALL Location Place your washer on a level and solid floor, considering the length of inlet hose, drain hose and power supply cord. If washer is not level, it should be corrected by the adjustable leg (provided optionally) in the front-right side under the base and/or, a thin block or brick. Do not place or store your washer below 0°C(32°F) to avoid any damage from freezing. Do not place your washer where it may be splashed during bathing.
Power Supply * Before plugging the plug into wall receptacle, check the voltage rating is in the range of rating, marked on the label at the back side of your washer. LABEL Grounding • If your water tap or water pipe is not made of metal, connect the ground wire to a copper plate or a metal rod and bury it in the earth. • If both your water tap and water pipe are made of metal, connect the ground wire to the base of the water tap. • In case of using 3-core cord, there is no need for grounding.
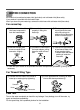
;; WATER CONNECTION Be careful not to confuse hot water inlet (pink color) and cold water inlet (blue color), if your washer is provided with dual water inlets. Also if you have only one water tap, connect the inlet hose with cold water inlet (blue color). For normal tap ! Pull down the collar of the inlet hose to separate it from the hose adapter. @ Loosen the four screws properly in fitting into water tap.
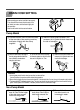
;; DRAIN HOSE SETTING Before operating your washer, install drain hose properly. First, connect the drain hose to the drain outlet at the rear side of your washer, and then fasten it tightly with the hose clamp. Next, the other end of drain hose set as the below. Pump Model ! Connect the drain hose to the drain outlet at the rear side of the washing machine, and fasten it tightly with the clamp supplied.
;; HOW TO OPERATE PREQARATION FOR WASHING To obtain the best washing results, you must operate your washer properly. This section give you this important information. Preparing clothes for washing • Close zippers, snaps, and hooks to avoid snagging other items. Remove pins, buckles, and other hard objects to avoid scratching the washer interior. • Empty pockets and turn them inside out. • Turn down cuffs and turn synthetic knits out to avoid pilling. • Tie strings and sashes so they will not tangle.
;; DESCRIPTIONS OF CONTROL PANEL DWF-5510 HIGH MID POWER °° FUZZY ADD LIGHT WASH HEAVY RINSE START / HOLD HOT COLD LOW RES. WA T LEV ER EL RES. WOOL/SUIT SPIN COURSE PROCE P TEM SS DWF-5520/5521/6020/6021 HIGH POWER MID °° FUZZY ADD LIGHT WASH HEAVY RINSE WOOL/SUIT SPIN START / HOLD HOT COLD LOW RES. WA T LEV ER EL RES. COURSE PROCE SS P TEM POWER Power Switch Press this button to turn the power ON or OFF.
;; DESCRIPTIONS OF CONTROL PANEL DWF-5510 HIGH MID POWER °° FUZZY ADD LIGHT WASH HEAVY RINSE START / HOLD HOT COLD LOW RES. WA T LEV ER EL RES. WOOL/SUIT SPIN COURSE PROCE P TEM SS DWF-5520/5521/6020/6021 HIGH POWER MID °° FUZZY ADD LIGHT WASH HEAVY RINSE WOOL/SUIT SPIN START / HOLD HOT COLD LOW RES. WA T LEV ER EL RES. COURSE PROCE SS P TEM POWER Power Switch Press this button to turn the power ON or OFF.
;; GENERAL PROCEDURES FOR OPERATION 1. Add measured detergent to the washer, (Follow manufacturer’s directions for safe use) 2. OPTIONAL STEP If desired, add measured liquid chlorine bleach to the bleach inlet. use only liquid chlorine in the bleach inlet * Follow manufacturer’s direction for safe use. Bleach inlet (Symbol) NOTE • Do not let bleach splash, drip, or run down into washer basket. Undiluted bleach will damage any fabric it to touches.
;; GUIDES FOR BASIC WASHING PROGRAMS Fuzzy Course • This course is a washing method for the general clothes except the extraordinary clothes such as blanket, wool, etc ! Put in the clothes @ Press the power switch. # Press the Start/Hold button, and close the lid. START / HOLD POWER Light Course • This course is effective for the washing of light clothes or lightly stained clothes. • Regulate the water level according to the wash load. ! Press the power switch.
Wool Course (Option) • This selection is effective for wool clothes. (1.2kg's limitation for 1 time-wash) • Do not put leather clothes, or chamois clothes into the washing tub for washing. It may cause shrinkage or deformation to the clothes. • Please use the neutral detergents only. • The water temperature is fixed to "COLD" • The water level "LOW" is not select. ! Press the power switch. @ Press the course selection button for “WOOL” # Select the water level proper to the wash load.
;; GUIDES FOR OTHER USEFUL PROGRAMS For the partial process or the combinations, or for adding time of each process. step 1. Press power switch. step 2. Press program button until the indicaing lamps make the combinations you want. If only spin lamp is turned on, that means you will operate your washer for spin only. If rinse and spin lamp are turned on, that means you will operate your washer for rinse and spin.
PERIODIC MAINTENANCE Proper care of your washer can extend its life. This section explains how to care for your washer properly and safely. Cleaning your washer Exterior Interior Wipe up detergent, bleach, and other spills with a soft, damp cloth or sponge as they occur. occasionally wipe the outside of the washer to keep it looking like new. Clean interior with 250ml of chlorine bleach mixed with 500ml of detergent. Run washer through a complete cycle. Repeat process if necessary.
Cleaning the Lint Filter ! Pull the Filter frame upward. @ Turn the lint filter inside out, wash to the lint off with water # Return the filter as it was, and insert the filter frame into the slot Filter Frame Lint Filter Cleaning the water inlet filter • Clean the filter when water leaks from, the water inlet. ! Pull the power plug out before cleaning it. @ Turn off the water supply to the washer and sperate the inlet hose. # Pull the inlet filter out.
SPECIAL GUIDES FOR REMOVING STAINS Stained, heavily-soiled, or greasy items may need to be prewashed or soaked for best results. Soaking helps remove protein-type stains like blood, milk, or grass. Prewashing helps loosen soil before washing. Stain removal rules • Use warm water for soaking or prewashing stained laundry. Hot water can set stains. • Most stains are easier to remove when they are fresh.
TROUBLE SHOOTING GUIDES Most problems are easily solved if you understand the cause. Check the following list for problem befor calling for service. Before calling for service, check these PROBLEM CHECK POINT • The washer will not operate at all.