Colour Television Instruction Manual MODEL NO. : DWP-28W2D, DWP-28W2KD, DWP-28W2GBD DWP-28W2FD, DWP-28W2SD DWP-28W2, DWP-28W2K, DWP-28W2GB DWP-28W2F, DWP-28W2S Manufactured under license from Dolby Laboratories. "Dolby" and the double-D symbol are trademarks of Dolby Laboratories.
ADDITIONAL INFORMATION FOR THE SET SOLD IN GREAT BRITAIN The appliance is supplied with a moulded three pin mains plug fitted with 5Amp fuse. Should the fuse require replacement, it must be replaced with a fuse rated at 5 amp and approved by ASTA or BSI to BS1362. The plug contains a removable fuse cover that must be refitted when the fuse is replaced.In the event of the fuse cover being lost or damaged, the plug must not be used until a replacement cover has been obtained.
CONTENT Important safeguards...............................................3 Before Powering up..................................................4 Identity of features on local and remote control.......5 Connecting external equipment...............................7 Daily use..................................................................9 Menu........................................................................11 Teletext....................................................................
IMPORTANT SAFEGUARDS WATER AND MOISTURE Never install the set in the following places: In a wet basement, bathroom. Do not place any container with liquid on the set. HEAT Never place the set near heat sources. VENTILATION Do not cover the air vents in the cabinet and never place the set in a confined space such as bookcase or built-in furniture unless proper ventilation is provided. Leave a minimum 10 cm gap all around the unit.
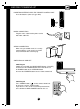
BEFORE POWERING UP INSERTING BATTERIES INTO THE REMOTE CONTROL UNIT Insert the batteries (two 1,5V, type AAA) MADE IN KOREA Batteries MAINS CONNECTION Plug the mains cable into the power socket with 240v / 50Hz AC. AERIAL CONNECTION When using an outdoor aerial, it is usually connected to the set by means of 75 ohm lead, terminated with a coaxial plug. SWITCHING ON AND OFF Switching on Switch the set on with the MAIN POWER button, ( ON/OFF ), and then PR UP or DOWN button on the front of the set.
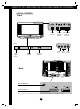
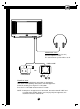
IDENTITY OF FEATURES ON LOCAL AND REMOTE CONTROL LOCAL CONTROL Front PR TV / AV BUTTON ON/OFF VOLUME DOWN/UP BUTTONS PROGRAMME DOWN/UP BUTTONS VIDEO L AUDIO R MAIN POWER BUTTON REMOTE SENSOR VIDEO INPUT STAND-BY INDICATOR AUDIO INPUT Back AERIAL TERMINAL AV1 SCART SOCKET1 SCART SOCKET2 5 AV2 HEAD PHONE
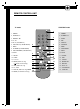
REMOTE CONTROL UNIT TV mode TELETEXT mode 1 1 POWER 1 2 3 4 5 6 7 8 9 1 POWER 2 NUMBER 0-9 2 NUMBER 0-9 3 NORMAL / OK 4 TV / AV 2 4 MIX 5 PR UP (CURSOR UP) 6 VOLUME UP (CURSOR RIGHT) 3 INDEX 5 PAGE UP 4 NORMAL/OK 0 3 7 MENU 6 SUBPAGE 7 MENU PR 5 8 PR DOWN (CURSOR DOWN) 8 PAGE DOWN MENU 9 VOLUME DOWN (CURSOR LEFT) 10 MUTE 9 HOLD 6 9 11 RECALL 12 SLEEP 7 8 13 not used 14 MOVE (Edit mode only) / (Smart Sound Change) PR 12 15 15 SKIP (Edit mode only) 16 TV / TEXT 17
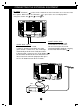
CONNECTING THE EXTERNAL EQUIPMENT TV and AV Use the TV / AV button ( ) on the remote control unit or on the front of the set to select one of the three options. Whenever the TV / AV button ( ) is pressed, the on-screen display will be changed as shown: AV1 AV2 S-VHS TV SCART JACK 2 (AV2) : This is used to connect a VCR, a Camcoder or a S-VHS VCR . You can also receive the S-VHS signal with SCART JACK2 by selecting S-VHS mode with AV button ( ).
HEADPHONE JACK Insert the headphone plug (3,5 mm) into the headphone socket. The sound from the speaker will be cut off. VIDEO GAME OR CAMCORDER FRONT AV JACK Connect the AV (Audio/Video) socket with an appropriate cable to the corresponding socket of the external equipment . Select AV mode by pressing the TV / AV button. Press the TV / AV button to return to the TV mode .
PROGRAMME SELECTION DAILY USE 1 2 Direct selection Up/Down moves Use remote control NUMBER buttons. For two digit programme numbers, press the button for the second digit within 2.5 seconds. Use PR UP/DOWN buttons on the remote control unit or on the front of the set. PR MENU PR ASPECT MENU Mono forcing If you are unable to get good sound on a channel due to a poor stereo broadcasting signal, you can change from stereo to mono transmission by pressing the remote control MODE button.
SOUND CONTROL 1 2 Volume adjustment Mute Use VOLUME UP/DOWN buttons on the remote control unit or on the front of the set. Turn the sound off by pressing the remote control MUTE ( ) button. Then the logo ( ) is displayed on the screen. Sound returns by pressing the same button once more. PR MENU The remaining time before TV turn-off is displayed on programme status.
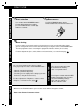
MENUS All menus are removed within 25 seconds if you don’t press any button. 1 Direct selection MAIN MENU - Press remote control MENU button to display main menu. Then, you have the choice between several sub-menus . PICTURE SOUND FEATURES INSTALL PR MENU PICTURE MENU HOW TO USE SUB MENUS PR 1 - Select the function you want to change using remote control CURSORS UP or DOWN buttons. 2 - Adjust the function using : Remote control CURSORS LEFT or RIGHT button.
2 PR If you want to cancel immediately the main menu, press MENU button once more. MENU NORMAL / OK - To select one of the sub-menus, use remote control CURSORS buttons UP, DOWN, LEFT, RIGHT. - To enter the selected sub-menu, press remote control OK button . PR PR MENU PR 3 4 - Confirm (if needed) by pressing remote control OK button . - Then Return to main menu pressing MENU button .
MENUS 1. Language selection FEATURES MENU FEATURES LANGUAGE 2. Child lock prevents the use of the TV set without remote control unit. CHILD LOCK CLOCK 3. TV clock setting - Note that if you turn off the set with the MAIN POWER button, the clock setting is lost and must be reset if necessary. The clock is set automatically if programme NO. 1 is selected for at least 6 seconds, and programme NO. 1 has teletext data. WAKE TIME WAKE PR 4.
1. Select the menu language. GB OFF 00 : 00 OFF 01 2. Child lock Select this value ON or OFF: - When switched ON: the stand-by indicator will flash red and green, child lock is operating. - The set can only be switched ON with the remote control unit. 3. Set TV clock with remote control 0 9 NUMBER buttons, then clock starts. 4. Switch "wake up" function ON/OFF with remote control CURSOR LEFT or RIGHT button - Enter wake up time with remote control 0...9 NUMBER buttons NB.
AUTOMATIC TUNING AND SORTING SYSTEM MENUS Automatic Tuning and Sorting System - Press remote control "OK" button for - Select "ATSS" function. more than 3 seconds to start the automatic - Select required country. tuning. - Note for satellite receiver users : - When automatic tuning is finished, recordable Before starting ATSS, connect your equipment to the TV set, or via the VCR, turn it programmes are displayed on screen. ON and tune in SKY NEWS.
MANUAL CHANNEL TUNING 1 2 Choose starting point TV system Selection Select the "Program" function and then the programme which you want to start manual tuning. Then, the channel number, the frequency, If you don’t know the frequency or channel number then refer to channel searching section. The name and the programme number of this programme are displayed in the install menu. If necessary, you can change the TV system : - Select "system" function.
TELETEXT 1- SWITCHING TELETEXT ON/OFF - Select the channel which is broadcasting the teletext programme you want to watch - Press the remote control TELETEXT ( ) button to select teletext mode. The overview station page or the last page viewed (If you watched teletext on this channel previously) appears. - If you need to return to TV mode, press again, the remote control TELETEXT ( ) button . 2-PAGE SELECTION - You can enter directly the desired page number with the remote control NUMBER 0...9 buttons .
4-TELETEXT FORMAT, PICTURE, SOUND CONTROL Doubling character size Repeatedly pressing the SIZE ( ) button doubles the character size in the following order : Upper half of the page > Lower half of the page > Return to normal size. Volume and brightness control in teletext mode Pressing the MENU button in teletext mode, the volume and brightness control menu will be displayed at the bottom of the screen. You can adjust volume and brightness using the corresponding colour on the remote control unit.