
User's Manual


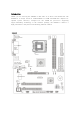


BIOS Flash Jumper: JWP1
This jumper is used to lock or unlock
area on BIOS. When unlocked, the BIOS boot block area can be updated. When
locked, the BIOS boot block area cannot be updated.
Fan Power Connectors: CPUFAN1/SYSFAN1/PWRFAN1
The 4-pin CPUFAN1 (processor fan) and 3-pin SYSFAN1 (system fan)/PWRFAN1
(power fan) support system cooling fan with +12V. When connecting the wire to
the connectors, always take note that the red wire is the positive and shouldbe
connected to the +1connected to GND. If the mainboard has a System Hardware
Monitor chipset on-board, you must use a specially designed fan with speed sensor
to take advantage of the CPU fan control.
Front Panel Connectors: JFP2
The mainboard provides a front panel connector for electrical connection to the
front panel switches and LEDs. JFP2 is compliant with Intel® Front PanelI/O
Connectivity Design Guide.
Front Panel Audio Connector: JAUDIO1
The front panel audio connector allows you to connect to the front panel audio and
is compliant with Intel® Front Panel I/O Connectivity Design Guide.
Front USB Connector: JUSB1/JUSB2
The mainboard provides two standard USB 2.0 pin headers JUSB1&JUSB2. USB2.0
technology increases data transfer rate up to a maximum throughput of 480Mbps,
which is 40 times faster than USB1.1, and is ideal for connecting high-speedUSB
interface peripherals such as USB HDD, digital cameras, MP3 players, printers,
modems, etc.
Serial Port Connector: COM 2
The mainboard offers one 9-pin male DIN connector COM 1 (on the rear panel),
and one optional serial port COM2. Both are 16550A highspeed communicationports
that send/receive 16 bytes FIFOs. You can attach a serial mouse or other serial
device directly to them.
Clear CMOS Jumper: JBAT2
There is a CMOS RAM on board that has a power supply from external battery to
keep the data of system configuration. With the CMOS RAM, the system can
automatically boot OS every time it is turned on. If you want to clear the system
configurationuse the JBAT1 (Clear CMOS Jumper) to clear data. Follow the
instructions in the image to clear the data