INSTRUCTION MANUAL Color Television DTQ 13P2FC DTQ 19P2FC DTQ 13P3FC DTQ 19P3FC
CAUTION RISK OF ELECTRIC SHOCK DO NOT OPEN CAUTION : TO REDUCE THE RISK OF ELECTRIC SHOCK, DO NOT REMOVE COVER (OR BACK) NO USER-SERVICEABLE PARTS INSIDE. REFER SERVICING TO QUALIFIED SERVICE PERSONNEL. The lightning flash with arrowhead symbol, within an equilateral triangle, is intended to alert the user to the presence of uninsulated “dangerous voltage” within the product’s enclosure that may be of sufficient magnitude to constitute a risk electric shock.
Daewoo Electronics Corporation of America 120 Chubb Avenue, Lyndhurst, NJ 07071 1-800-DAEWOO8 (1-800-323-9668) Fax:201-935-5284 Dear Customer : Daewoo Electronics Corporation of America would like to thank you for choosing this color television receiver. It incorporates a host of features designed to give you excellent performance for many years to come.
CONTENTS Table of Contents Important Safeguards Chapter 1: Overview of Your Equipment 2 4 Your TV's Front Panel Your TV's Back Panel Your Remote Control Installing your remote control batteries Notes 4 4 5 6 6 Chapter 2: Connecting an Antenna or Cable to Your TV 7 Connecting an Antenna Connecting a Cable System Connecting Other Pieces of Equipment Safety Note 7 8 9 9 Chapter 3: Operating Your TV 10 Turning your TV On Programming Your TV's Channel Memory Changing Channels Changing the Volume Chang
S A F E T Y IMPORTANT SAFEGUARDS PLEASE READ ALL THESE INSTRUCTIONS REGARDING YOUR TELEVISION EQUIPMENT AND RETAIN FOR FUTURE REFERENCE. FOLLOW ALL WARNINGS AND INSTRUCTIONS MARKED ON THE TV RECEIVER. 1 2 3 Read all of these instructions. Save these instructions for later use. Unplug this television equipment from the wall outlet before cleaning. Do not use liquid cleaners or aerosol cleaners. Use a damp cloth for cleaning.
13 An outside antenna system should not be located in the vicinity of overhead power lines or other electric light or power circuits, or where it can fall into such power lines or circuits. When installing an outside antenna system, extreme care should be taken to keep from touching such power lines or circuits as contact with them might be fatal. 14 Do not overload wall outlets and extension cords as this can result in fire or electric shock.
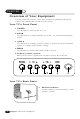
CHAPTER 1 Overview of Your Equipment Your TV comes with a remote control. The section below summarizes the buttons, controls, and terminals that you will use with your TV. Your TV's Front Panel 1 POWER Use this button to turn your TV on or off. 2 ▼ CH▲ Use these buttons to change channels on your TV, or to select items in the menu system. 3 CVOLB Use these buttons to change your TV's volume, to activate selections in the menu system, or to change audio and video settings.
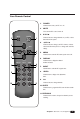
Your Remote Control 1. POWER Use this button to turn your TV on or off. 2. MUTE Use to turn the TV’s sound on and off. 3. ▼ CH▲ POWER MUTE Use these buttons to change channels on your TV, or select items in the menu system. 1 2 CH 4. 3 Use these buttons to change your TV's volume, to activate selections in the menu system, or to change audio and video settings. MENU 4 VOL VOL 4 5 3 5. MENU Use this button to turn the TV's menu system on and off. 6.
Installing your remote control batteries 1 Open the battery compartment on the back of the remote control. 2 Install two AAA-size batteries (not included) as shown. Make sure the “+” and “-” terminals are oriented correctly. 3 Replace the cover. Notes Do not mix different types of batteries, or mix an old and a new battery. Remove and replace weak batteries. Weak batteries can leak and damage your controller. Dispose of batteries properly; never throw them into a fire.
CHAPTER 2 Connecting an Antenna or Cable to Your TV Your TV will provide you with the best performance if you connect it to an external antenna or cable system. Follow the directions below make this connection. Please note that you will normally only have to make one of the connections shown below, not all of them. All connections will be made to the antenna terminal on the back of your TV. The antenna terminal is a silver metal post partially surrounded by two plastic tabs.
Antennas with two sets of leads You might have two sets of leads from your antenna system, especially if you have one antenna for VHF signals and one antenna for UHF signals. If your antenna system has both a coaxial lead and twin 300-ohm leads, you must obtain a combiner (available at your local electronics store). Press or screw the coaxial lead onto the combiner; place the twin leads underneath the screws on the combiner and tighten the screws.
If your cable system requires you to use a converter box for all channels, connect the incoming cable to the IN terminal on the converter box. Connect another cable between the OUT terminal on the converter box and the antenna terminal on the TV. You will need to keep your TV tuned to channel 3 or 4 and change channels using the converter box. Converter Box OUT IN If your cable system only requires you to use a converter box for some channels (i. e.
CHAPTER 3 Operating Your TV Once you have connected your TV to an antenna or cable system, plugged the TV in, and put batteries in the remote, you are ready to use the TV. The first thing you should do is program your TV so it memorizes all of available channels. Turning Your TV On 1 To turn your TV, press the POWER button on the remote control. You can also use the POWER button on the front panel. Make sure your TV is plugged in before you try to turn it on.
Changing Channels You can change channels in three ways: 1 1 The ▲CH▼ buttons will take you through all memorized channels, one by one. The ▲CH▼ buttons will not access channels that have not been programmed into the TV's memory. For more information about programming channels into memory, see the section “Programming your TV's Channel Memory” on the previous page. 2 The number buttons (0-9) will take you to any channel, even if it has not been memorized.
Changing the TV's Channel Memory Your TV's memory determines the channels that are available using the ▲CH▼ buttons. You can add channels to this memory or remove them from memory. If a channel is removed from memory, you can tune to it with the number buttons, but you cannot tune to it with the ▲CH▼ buttons. If there are just one channel memorized, then the Add/Delete Channels function will search the whole channels.
Adjusting Video Settings You may wish to adjust the video settings (e. g. contrast or color) to obtain the most pleasing picture. To do so, follow these directions: 1 With the TV on, press the MENU button. then “Video” menu will appear. 2 The “Settings” item will be selected. Use the CVOLB buttons to turn Settings to Preset or Custom. 3 Use the ▲CH▼ buttons to select the video setting you wish to adjust. Descriptions of the video settings are on the next page.
Returning to the factory settings If you would like to return to the original video settings, as they were calibrated at the factory, follow these steps : 1 With the TV on, press the MENU button. then “Video” menu will appear. 2 Press the CVOLB buttons to set the “Settings” to ‘Preset’. The TV will remember the ‘Custom’ settings you had previously chosen. When you set “Settings” to ‘Custom’ again, your previous custom settings will be restored.
CHAPTER 4 Using Timer Functions Your TV has a built in-clock, and you can set the TV to turn on and off at times that you select. You can also set your TV to turn off after counting down a certain amount of time. Setting the Clock 1 With the TV turned on, press the MENU button until “Time” menu will be displayed. 2 The “Set Clock” item will be selected. Press the CVOLB buttons to set the clock. If you hold down either CVOL or VOLB button, the corresponding numbers will change more quickly.
Setting the Off Timer If you enter a time in the “Off time” setting, your TV will automatically turn off at that time. Follow these instructions to set the “Off time”. 1 With the TV turned on, press the MENU button until “Time” menu will be displayed. 2 Use the ▲CH▼ buttons to select “Off time” item. 3 If you hold down either CVOL or VOL B button, the corresponding numbers will change more quickly.
Setting the Sleep Timer The sleep timer allows you to set an amount of time from 15 minutes to 4 hours. TV will count down the amount of time you set, then turn itself off. To set the sleep timer: 1 With the TV turned on, press the MENU button until “Time” menu will be displayed. 2 Use the ▲CH▼ buttons to select “Sleep timer” item. 3 Use the CVOLB buttons to set the sleep time. Each time you press VOL, you step between the available sleep times : 15min, 30min, 45min, 60min, 90min, or 120min.
CHAPTER 5 Additional Features This section contains descriptions of the more advanced features of your TV. Changing the Language of the On-screen Menus You can choose to display the on-screen menus in English, Spanish, French. To change the on-screen language: 1 With the TV on, press the MENU button twice, then “Set-Up” menu will appear. 2 The “Language” item will be selected. Press the CVOLB buttons to select the language you want to use: English, Spanish, French.
CC on Mute When the sound is muted, user can select the caption display. It will display the caption content instead of sound mute. 1 With the TV turned on, press the MENU button until “Special” menu will be displayed. 2 Use the ▲CH▼ buttons to select “CC on Mute” item. 3 Use the CVOLB buttons to select “C1” or “C2”.
Auto Tint(option) This is function for fresh tone compensation. 1 With the TV turned on, press the MENU button until “Special” menu will be displayed. 2 Use the ▲CH▼ buttons to select “Auto Tint” item. 3 Use the CVOLB buttons to select “On” or “Off”.
CHAPTER 6 Troubleshooting Your Daewoo television is designed to give you trouble-free performance for many years. If you have a problem with your TV, try the solutions listed below. If the suggestions listed below do not solve your problem, contact your Daewoo dealer or an authorized Daewoo service center. You can also call Daewoo directly at 1-800-DAEWOO8. There is no picture or sound, or the TV won't turn on. ¥ Make sure the TV is plugged in. ¥ Make sure the MUTE is not set. ¥ Make sure the power is on.
WARRANTY Warranty Daewoo Electronics Corporation of America warrants each new electronic product manufactured by it to be free from defective material and workmanship and agrees to remedy any such defect or to furnish a new part (at the Company’s option) in exchange for any part of any unit of its manufacture which under normal installation, use, and service disclosed such defect, provided the unit is delivered by the owner to us or to our authorized distributor from whom purchased or authorized service st
This instrument is listed by Underwriter’s Laboratories, Inc. It is designed and manufactured to meet rigid U.L. safety standards against X-radiation, fire, casualty and electrical hazards. Daewoo Electronics Corporation of America 120 Chubb Avenue Lyndhurst, NJ 07071 For more information about this or other Daewoo products, please call 1-800-DAEWOO8.