DVD Recorder + VCR DF-4501P User Manual
Safety Instructions INTRODUCTION Please keep the product’s guarantee sheet and receipt in a safe place. Precautions • Read this booklet carefully. • Make sure the rating of your household electricity supply matches that shown on the back of your product. • Read this page and chapter ‘Setting up your product’ to help you set up and adjust your product correctly. • Do not put the product in a hot or humid place. • Do not open the product. Get a qualified technician to carry out any repairs.
Important Safeguards RISK OF ELECTRIC SHOCK DO NOT OPEN CAUTION: TO REDUCE THE RISK OF ELECTRIC SHOCK, DO NOT REMOVE COVER (OR BACK). NO USER-SERVICEABLE PARTS INSIDE. REFER SERVICING TO QUALIFIED SERVICE PERSONNEL. The lightning flash with arrowhead symbol, within an equilateral triangle, is intended to alert the user to the presence of uninsulated ‘dangerous voltage‘ within the product’s enclosure that may be of sufficient magnitude to constitute a risk of electric shock.
Important Safeguards 17 DISC Do not use a cracked, deformed or repaired disc. These discs are easily broken and may cause serious personal injury and product malfunction. 18 SERVICING Do not attempt to service this unit yourself as opening or removing covers may expose you to dangerous voltage or other hazards. Refer all servicing to qualified service personnel. 19 DAMAGE REQUIRING SERVICE A. B. C. D. E. F.
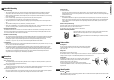
Overview Overview INTRODUCTION DVD, DVD+R, DVD+RW? Regional code What is a DVD? DVD (Digital Versatile Disc) is a storage medium that combines the convenience of the compact disc with the latest digital video technology. DVD video uses modern MPEG2 data compression technology that enables an entire feature film to be stored on a single five inch disc. 2 ALL If the region number on your DVD disc does not correspond to the region number of this player, the disc cannot be played.
Overview Notes on Recording • The recording times shown are not exact because the DVD Recorder+VCR uses variable bit-rate video compression. This means that the exact recording time will depend on the material being recorded. • When recording a TV broadcast, if the reception is poor or the picture contains interference, the recording times may be shorter. • Discs recorded at high speeds (equal to or greater than 2X) may not be recognized.
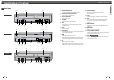
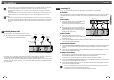
Identification of Controls Identification of Controls ! @ # DF-x5xx $ % ^ * & ( ! ) 12 3 4 @ 5 6 5 6 5 6 # DF-x7xx $ ^ * % & ( ! ) 123 4 @ ! POWER (STANDBY/ON) Turns the DVD Recorder+VCR on and off. @ Cassette Compartment (VCR deck) Insert a video cassette here. # Disc Tray (DVD deck) Insert a disc here. $ VCR EJECT Ejects the tape in the VCR deck. % REC Starts recording. Press repeatedly to set the recording time. ^ STOP Stops playback.
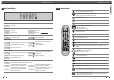
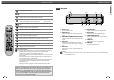
Identification of Controls INTRODUCTION Front Panel Display Identification of Controls Remote Control Turns the DVD Recorder+VCR on and off. - Opens and closes the disc tray in DVD mode. - Ejects the tape in the VCR deck in VCR mode. Selects VCR mode. Selects DVD mode. Channel PR23 Switches the DVD Recorder+VCR input to TV tuner, AV1, AV2, FAV or DV. - Selects numbered options in menus. - Selects TV channels. - Manually adjusts tracking.
Identification of Controls Identification of Controls INTRODUCTION Rear panel Stops playback or recording. ! Skips to the next or previous chapter/track. @# $ ^ % & Starts recording. Press repeatedly to set the recording time. For more details, Refer to One Touch Record (OTR) on page 40. Selects Recording mode: - DVD ; Approx 1 Hour (HQ mode), 2 Hours (SP mode), 4 Hours (EP mode), 8 Hours (SEP mode) - VCR : SP or LP. Increases or decreases the slow motion speed when playing a DVD or VHS tape.
Connections Connections • There are a variety of ways to connect the DVD Recorder+VCR to your TV and other equipment. Use only one of the connections described below. Whichever TV connection you use will work with all input sources. • Please refer to the manuals for your TV, VCR, stereo system, or other devices as necessary to make the best connections.
Connections Connections Connecting an Amplifier/Receiver Connecting Optional Equipment Connecting to an amplifier equipped with two channel analog stereo or Dolby Pro Logic ll/Pro Logic To receive audio/video signals from other equipment, connect the AVF jacks on the DVD Recorder+VCR to the audio/video out jacks on your external component, using optional audio/video cables.
Initial Installation Initial Setup After successfully connecting your DVD Recorder+VCR to your TV and other devices, this chapter will show you how to complete the initial installation. Setup Menu Overview You must follow the initial installation process to set the time, date, channels, and language preferences for the DVD Recorder+VCR. 1 2 3 ‘Initial Setup Wizard‘ is displayed on the screen. Make sure the RF cable from your antenna or cable TV jack is connected.
Initial Setup 6 Select ‘Reception‘ using [œ/√]. Use […/†] to select the desired broadcast system (Aerial or Cable). Aerial: If you are using a standard antenna to receive channels. Auto Scan Manual Set Standard Reception Auto Search Fine Tune Cable -- † Decoder Off PR No. -- 0 Store Channel NAME P-04 Store Cancel Cable: If you are using basic cable to receive channels. 7 Select ‘Auto Search‘ using [œ/√]. Search the real channel number by pressing […/†].
Initial Setup Initial Setup ‘Recording Options’ Settings Adjust Channels 1 Follow steps 1-2 as shown under ‘Manual Set’. 2 Use […/†] to select ‘Adjust Channels‘. 3 Press [ENTER]. The ‘Adjust channels’ menu appears. 4 Use […/†] to select the PR number you want to adjust. Then press DVD Record Quality You can set the default DVD recording quality to: HQ (High Quality - 1 hr/disc), SP (Standard Quality - 2 hrs/disc), EP (Extended Play - 4 hrs/disc) or SEP (Very Low Quality - 8 hrs/disc).
Initial Setup Initial Setup ‘Language’ Settings ‘Preferences’ / Video Settings OSD Language 1 Select a language for the DVD Recorder+VCR Setup menu and on-screen displays. 1 Language While ‘Init Setup‘ is selected, press [ENTER] to go to the initial setup page. English Français Español Portugues Italiano Deutsch Nederlands Magyar † † Use [œ] and [√] to select ‘Language ‘. … œ√† Choose ENTER OK SETUP Exit 2 3 4 Use [œ/√] to select ‘Preferences While ‘Preferences ‘.
Initial Setup ‘Preferences’ / Audio Settings 1 ‘Preferences’ / Parental Controls Press [SETUP]. The Setup menu appears. While ‘Init Setup‘ is selected, press [ENTER] to go to the initial setup page. 2 3 4 Use [œ/√] to select ‘Preferences While ‘Preferences Set Parental Level Preferences Video •Audio Parental Ctrl Auto Settings VCR Modulator Out Digital Output Dynamic Range BItstream ‘ is selected, press [†] to select ‘Audio‘.
Initial Setup Change Password 1 While ‘Preferences VPS/PDC ‘ is selected, press [†] to select ‘Parental Preferences Ctrl‘. 2 Initial Setup Video Audio Parental Ctrl Auto Settings VCR Modulator Out Press [√] to select ‘Password‘. Then press [ENTER]. … œ√† Choose 3 The ‘Input Password’ submenu appears. Enter your current 4-digit password then press [ENTER]. 4 Enter a new 4-digit password, then press [ENTER]. Re-enter the new password to confirm, press [ENTER].
Initial Setup The On-Screen Display provides feedback on the status of the DVD Recorder+VCR and/or the currently loaded disc. To access the On-Screen Display (or OSD), press the [DISPLAY] button. System Information System Information helps service personnel identify key firmware information about your DVD Recorder+VCR in case service is required. System Info Version WP3000000FQ-050813 Loader Version AA003 A100 Micom Software 1.0.6 DivX® Registration code WWJR3845 to learn more visit www.divx.
On-Screen Display Overview Displaying TV Information While watching TV, press [DISPLAY] to display/remove the on-screen display. You would see a screen like the following: DVD Playback Playing a DVD/VCD PR 1 : - - - STEREO PDC 12:30 SP 1 Press [EJECT] to open the disc tray. 2 Load your disc in the tray with the playback side down (label side up). 3 Press [EJECT] to close the tray. 4 ‘LOAD’ appears on the front panel display, and playback starts automatically.
DVD Playback DVD Playback Slow Motion A-B Press [SLOW+] or [SLOW–] to enter Slow Motion mode. The default speed is 1/2. When you press [SLOW+] or [SLOW–] repeatedly, the speed will be set to 1/4, 1/8, 1/16, and normal speed. You can repeat a scene between two points (A and B): Subtitles (DVD) 1 2 3 4 5 Press [SUBTITLE] and then press [SUBTITLE] repeatedly during playback to select among all available subtitle languages.
VCR Playback VCR Playback Before You Begin Special Playback Features 1 2 Notes on special playback features Press the [VCR] button to set the remote control to operate the VCR deck. Turn the TV on and select the video input source connected to the DVD Recorder+VCR. Audio system: Turn the audio system on and select the input source connected to the DVD Recorder+VCR. Horizontal lines (noise bars) will appear on the TV screen. This is normal.
Other Disc Playback Other Disc Playback Audio CD/MP3 PLAYBACK The DVD Recorder+VCR can play audio CDs and MP3 files on CD-ROM, CD-R or CD-RW discs. 1 Insert the CD disc and close the tray. The Audio CD or MP3 CD menu appears on the TV screen after a few moments to load the disc. 2 Use […†] to select a track or a file, then press [PLAY] or [ENTER]. ••• MP3 ••• 5 6 7 Press [NEXT] or [PREV] to manually skip to the next or previous image. Press [√] (or [œ]) to rotate the image (counter) clockwise.
Other Disc Playback DivX PLAYBACK DivX model only Basic Recording Recording from TV The DVD Recorder can play DivX files on CD-R/RW. Follow the instructions below to record a TV program. 1 Insert the DivX disc and close the tray. The DivX Menu appears on the TV screen after a few moments to load the disc. 1 Turn on the DVD Recorder+VCR and load a recordable disc or tape. 2 3 Use […†] to select a file, then press [ENTER]. 2 Set the desired Recording mode by pressing [REC MODE] repeatedly.
Basic Recording Basic Recording Checking the Recording Time Copy Edit (DVD ➝VCR) Total time and recorded time are displayed on the TV screen after pressing [DISPLAY]. Recorded time is displayed on the front panel display. During one touch copy you can search or change REC SPEED and resume copy. To Pause the Recording 1 2 Press [PLAY/PAUSE] to pause the disc or tape during recording. When you want to continue recording, press [PLAY/PAUSE] or [REC (●)] in DVD mode and press [REC (●)] in VCR mode.
Timer Recording Timer Recording Timer Recording using Manual Set Record Screen • The Timer indicator lights on the front panel display when the DVD Recorder+VCR is ready for the Timer Recording. • The DVD Recorder+VCR will record the audio according to the current TV tuner setting (Stereo, Mono or SAP). Use the [AUDIO] button to set the audio before switching the DVD Recorder+VCR to Standby mode. • The DVD Recorder+VCR will automatically power off when the Timer Recording ends.
Timer Recording Recording from an External Input Canceling a Timer Recording Recording from External Components You can clear a Timer Recording any time before the recording actually starts. • Use […†] to select the program you want to erase on the Timer Recorder List. Press [■STOP] to delete the program. You can record from an external component, such as a camcorder or VCR, connected to any of the DVD Recorder+VCR’s external inputs.
Recording from an External Input What is DV? DV model only Using DV, also known as i.LINK, you can connect a DV-equipped camcorder to the DVD Recorder+VCR using a single DV cable for input and output of audio, video, data and control signals. The i.LINK interface is also known as IEEE 1394-1995. “i.LINK” and the “i.LINK” logo are trademarks. • The DVD Recorder+VCR is only compatible with DV-format (DVC-SD) camcorders. Digital satellite tuners and Digital VHS video recorders are not compatible.
Disc Operation Disc Operation in DVD±R, DVD-RW disc Make Compatible (DVD±RW) 'Make Compatible' for a DVD±RW will automatically create a menu screen for navigating the disc. This menu screen is accessible by pressing [MENU] or [TITLE]. 3 4 5 Press […/†] to select ‘Make Compatible‘. If you want to make the disc compatible, press [ENTER]. For recordable DVD media, such as DVD±R and DVD±RW discs, you can manage the disc using the Disc Menu.
Disc Edit Disc Edit Title Menu You can manage the titles on your DVD±R/±RW discs using the Title menu. At first, go to Disc Edit mode. 1 2 Press [SETUP]. The Setup menu appears. Divide (DVD±RW) This feature allows you to divide a title into two titles. DVD Recorder Init Setup ➞ Disc Edit œ √ Select Init Setup Disc Oper Disc Edit Timer REC While ‘Disc Edit‘ is selected, press [ENTER] to go to the Disc Edit page. 2 3 4 5 Select the title to be divided using [ENTER].
Disc Edit Troubleshooting Check the following guide for the possible cause of a problem before contacting customer support. Edit Chapters 2 Select the title to be edited using [ENTER]. 3 Select ‘Chap Edit’ using [… †] . 4 Press [ENTER] to edit the chapters. 5 Select 'OK' and press [ENTER] to confirm. Edit TITLE CH 10 TITLE CH 10 7 SEP HQ Select Confirm The Chapter Edit Menu will be displayed. Use [œ √…†] to select one of the various chapter marker functions (Add, Delete, or Hide).
Troubleshooting Troubleshooting Moisture Condensation Symptom Cause 54 Finalise the disc; see page 49. Moisture condensation can occur: In locations where moisture condensation may occur: When the DVD Recorder+VCR is moved from a cold place to a warm place. Keep the DVD Recorder+VCR plugged into an AC power outlet with the power on. This will help prevent condensation. Under extremely humid conditions.
Technical Specifications General Power requirements 200-240V,50/60Hz Power consumption Maximum 26W (Stand-by :3.7W) Dimensions (approx.) 430 *92 *312 (w*h*d) Mass (approx.) 4.