
Operating instructions


Recording
VQT4W66
27
Recording TV programmes
Recording
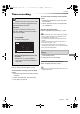
To set the recording time
1 Select “Recording Time” or “Continuous
recording” in step 4 (> left).
Recording Time:
You can set the length of recording time from
30 minutes to 4 hours.
• You can select the recording time with
[2, 1].
Continuous recording:
The recording is continued until you press
[STOP ∫].
2 Press [OK].
To convert the recording mode after recording
in DR mode
Refer to “File Conversion”. (> 44)
To confirm whether the conversion is
completed
Refer to “To confirm whether the conversion is
completed”. (> 45)
To cancel a conversion
Refer to “To cancel a “During standby”
conversion”. (> 45)
• One recording will terminate when simultaneous recording
is being done and timer recording starts.
• Teletext will not be recorded.
• Following contents or media cannot be played back while
recording.
- Xvid and MKV file
- photo
- USB HDD (For data files) and USB memory
• Copying cannot be performed while recording.
• When “Automatic Standby after OTR” is set to “On” (> 90),
this unit is turned to standby mode if this unit is not
operated for approximately 5 minutes after completing
“Automatic Stop” or “Recording Time”.
• The title before conversion (the title recorded in DR mode)
will be deleted once the conversion is completed.
• Conversion will take about the same time as the recorded
duration.
• When the HDD does not have enough remaining space,
conversion will not start.
• Conversion is stopped when this unit is turned on.
Conversion will start from the beginning again once the unit
is switched to standby mode.
• The conversion will not start if the timer recording is
scheduled within the time required for the conversion.
• When converted, audio content and subtitle will be
converted with the same settings as at the start of
recording.
• This operation will only record to built-in HDD.
• This unit can record two programmes being
broadcasted at the same time.
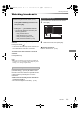
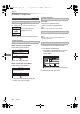
1 Select the channel to record.
2 Press [REC MODE] and select the
conversion mode, then press [OK].
• This unit will record the programmes in DR
mode once, and then automatically
convert to the selected recording mode
while this unit is in standby.
• Recording mode (> 8)
• The conversion mode set here is used
as an initial value for the next recording.
3 Press [REC ¥].
Recording starts.
• “REC1” or “REC2” will light on the unit’s
display.
4 Select “Automatic Stop”, then press
[OK].
• One touch recording (OTR)
Recording stops automatically when the
programme ends.
• You can also select “Recording Time” or
“Continuous recording”. (> right)
HG
HX
HE
HL
HM
XP
SP
LP
EP
Off (DR)
Conversion Mode Setting
OK
RETURN
HDD Remain: (DR)m
h
High
Definition
Data Size
Large
Small
Large
Small
Standard
Definition
Automatic Stop at 8:45 AM
REC1/OTR
Recording Time
Continuous recording
30 min
8:00 AM - 8:45 AM
DMRBWT835GL_eng.book 27 ページ 2013年2月1日 金曜日 午前9時55分