GB LCD TELEVISION INSTRUCTION MANUAL DLT-32G1 DLT-37G1 DLT-42G1
Caution CAUTION RISK OF ELECTRIC SHOCK DO NOT OPEN CAUTION : TO REDUCE THE RISK OF ELECTRIC SHOCK, DO NOT REMOVE COVER (OR BACK). NO USER-SERVICEABLE PARTS INSIDE. REFER SERVICING TO QUALIFIED SERVICE PERSONNEL. The lightning flash with arrowhead symbol, within an equilateral triangle, is intended to alert the user to the presence of uninsulated “dangerous voltage” within the product’s enclosure that may be of sufficient magnitude to constitute the risk of an electric shock.
Important Safeguards Please read the following safeguards for your TV and retain for future reference. Always follow all warnings and instructions marked on the television. 1. Read, Retain and Follow All Instructions Read all safety and operating instructions before operating the TV. Retain them safely for future reference. Follow all operations and instructions accordingly. 2. Heed Warnings Adhere to all warnings on the appliance and in the operating instructions. 3.
Important Safeguards 12. Power Lines An outside antenna system should not be located in the vicinity of overhead power lines or other electric light or power circuits, or where it can fall into such power lines or circuits. When installing an outside antenna system, extreme care should be taken from touching such power lines or circuits as contact with them might be fatal. 13. Overloading Do not overload wall outlets and extension leads as this can result in a risk of fire or electric shock. 14.
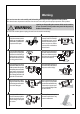
Warning This section must be read carefully and followed by the user prior to the operation of the product. The manual states important instructions for the user’s own safety, and the proper operation of the product. WARNING Ignoring or disregarding the contents of this section and improper operation of the product may result in the person’s death or serious injury. In case of an accident, please unplug the unit from the outlet immediately.
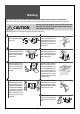
Warning This section must be read carefully and followed by the user prior to the operation of the product. The manual states important instructions for the user’s own safety, and the proper operation of the product. CAUTION Ignoring or disregarding the contents of this section and improper operation of the product may result in the person’s death or serious injury. Please keep the user’s manual in a safe place for future reference. Do not view the TV too closely since it may cause damage to your eyes.
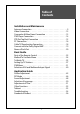
Table of Contents Installation and Maintenance Antenna Connection . . . . . . . . . . . . Video Connection . . . . . . . . . . . . . . Camcorder & Video Game Connection DVD Player Connection . . . . . . . . . . STB (Set Top Box) Connection . . . . . . PC Connection . . . . . . . . . . . . . . . . Cable TV Broadcasting Connection . . . Connect with the Dolby Digital AMP . . Name of Each Part . . . . . . . . . . . . . . . . . . . . . . . . . . . . . . . . . . . . . . . . . . . . . . . . . . . . . . . .
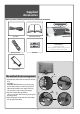
Supplied Accessories Make sure that the following accessories are provided with the product. AC lead Instruction manual ER POW MAL NOR MUT E TI MUL IA MED DVB /Ana AV PR / PAG E log VOL / OK ECT SEL VOL PR TITL SUB GUI E DE CAN / PAG GE GUA LAN MEN CEL E FAV OUR ITE ECT ASP U S.E M T / EXI REC FFE CT ALL GHI DEF ABC MNO JKL PQR 5 VW 4 STU Cover Bottom 3 2 1 6 YZ& X .
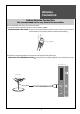
Antenna Connection Indoor Antenna Connection Not recommended unless very close to the transmitter Not recommended unless very close to the transmitter. 1. Connect the feeder cable of the antenna to the combining adapter. WHEN THE IMAGE IS NOT CLEAR : Unclear screen image and bad reception may be a cause of a wrong antenna connection. Be sure to check its direction and site when installing. combining adapter 2. Connect the combining adapter to the antenna input at the left side of the TV set.
Antenna Connection CTV Antenna Connection Such community TV Antenna installation may be found in most of communial apartments. When a coaxial cable is used : Plug the coaxial cable to the antenna socket, and fix it firmly by turning it to the right.
Antenna Connection Outdoor Antenna Connection An outdoor Antenna connection-such as VHF and/or UHF-may be necessary for installation in private houses. Single Antenna Connection VHF Antenna Left side of the tv set UHF Antenna ANT/CABLE UP-GRADE PORT Separate Antenna Connection.
Video Connection Connecting with an External Source R - AUDIO - L AV 3 S-Video VIDEO S-VIDEO You may connect an S-Video input to enjoy clearer and brighter picture images. You can make the connection with the AV3 input. Note : If S-video and the RCA phono jacks are connected at the same time, the TV set will only detect the S-Video mode. • If your AV device has both Video OUT terminal and S-Video OUT terminal, the S-Video connection is recommended for better picture quality.
Camcorder & Video Game Connection Watching a Camcorder Recording on TV or playing a Video Game 1. Prepare the S-video and RCA connector. 2. These connectors connect to S-video or AV 3 as shown in the picture below. 3. Turn on the TV set and camcorder/video game. 4. Select AV3/S-video mode, using the ”AV”button of the Remote controller or “ ” button of the TV set.
DVD Player connection When connecting with a component cable or Euro SCART cable INPUT HDMI 1 DIGITAL AUDIO HDMI 2 OPTICAL COMPONENT Pr Pb Y PC INPUT PC AUDIO R - AUDIO - L Back of the tv set DVD Note : • You can use a scart cable but some DVD’s have a component output for a better picture. • When you connect with a component video, output from your DVD player to the TV please check that the colour of the cables between the DVD and TV set. Matches the sockets on both appliance.
STB(Set Top Box) Connection When connecting with a HDMI cable Back of the tv set INPUT HDMI 1 DIGITAL AUDIO HDMI 2 OPTICAL COMPONENT Pr Pb Y PC INPUT PC AUDIO R - AUDIO - L Set Top Box When connecting with a component cable Back of the tv set INPUT HDMI 1 DIGITAL AUDIO HDMI 2 OPTICAL COMPONENT Pr Pb PC INPUT PC AUDIO R - AUDIO - L Set Top Box 15 Y
PC Connection When connecting with PC(D-Sub) cable. 1. First adjust resolution of the PC. (Refer to table in page 17.) 2. Then disconnect your monitor from your PC and connect between PC and TV set using the D-sub and Audio cable as shown in the picture below. 3. Turn on the PC and TV set. 4. Select PC mode by pressing the “MULTIMEDIA” button on the remote control or ” ” button of the TV set.
PC Connection PC CONNECTION NOTES: 1) The resolution of the TV set is best at 1360(6) x 768(WXGA). 2) If there is a [Vertical Frequency] setting menu in the [Display] Menu of the PC, adjust the frequency to 60Hz. 3) If the PC resolution is too high, it may be hard to detect signals. Select a suitable resolution. 4) HDMI input port receives only digital Signal. 5) Depending on the graphic card when you plug & unplug the HDMI connection the screen may not display correctly.
Cable TV Broadcasting Connection External Input Connection Source Watching cable television is only possible after you have subscribed to the local broadcasting company and installed a cable receiver. You may make the connection to either the Component input or SCART input AV1 or AV2.
Connect with the Dolby Digital AMP. If you connect the optical output to a Dolby digital AMP, you can listen to better quality sound.
Name of Each Part Front / Side Panel The buttons on the TV set have the same functions as those of the remote control. Control Key Buttons. ① TV/VIDEO Button : Each time you press this button, the TV will cycle through: TV / AV1 / AV2 / AV3(S-Video) / COMP / PC / HDMI1 / HDMI2. ② MENU Button : Use this button to enter and exit the MENU. ③ ▲ VOL ▼Buttons : Use these buttons to change your TV’s volume or to move the cursor in the menu.
Name of Each Part Side and Rear Panel Side Panel Rear Panel COMPONENT Pr Pb AV 3 OPTICAL Y PC INPUT UP-GRADE PORT PC AUDIO R - AUDIO - L 21 R - AUDIO - L DIGITAL AUDIO HDMI 2 VIDEO S-VIDEO INPUT HDMI 1
Parts of the Remote Control MUTE DVB/Analog MULTI MEDIA AV VOL POWER 1. (MUTE) : Press this button, and the sound goes off. Press again, and the sound returns. NORMAL 2. (POWER) : TV on/off button in STANDBY mode. PR / PAGE 3. DVB/Analogue : Each time you press this button, the TV will toggle between DVB & RF Analogue. 4.
Parts of the remote control MUTE DVB/Analog POWER MULTI MEDIA AV NORMAL VOL 19. ASPECT : Selects the screen aspect ratio. Full 4:3 14:9 Zoom 14:9 Zoom16:9 Auto Full 20. RECALL : You can recall the present modes (TV, Video, Component, PC) and Signal information. In TV mode, the Programme number, Sound, and Clock. PR / PAGE VOL SUBTITLE LANGUAGE FAVOURITE CANCEL / EXIT ASPECT MENU M RECALL S.EFFECT DEF GHI ABC 1 2 3 JKL MNO PQR 4 5 6 STU VWX YZ&.
Method To Use Basic Menu Basic Menu - The basic menu appears on the screen if you press the “MENU” button of the remote control. - There are 6 items Picture, Screen, Sound, Install, Function and DVB in the basic menu. - Each item has sub-items under it. If the desired item is selected, the relevant sub-items are displayed upward. 1. Press the “MENU” button. • The main menu appears if you press the “MENU” button.
To Watch TV On/Off, Number, Mute, Recall, VOL , PR Buttons with same name in the main body of the TV performs the same function. Press the “ON/OFF” button on the side of the set or Remote control. • The buttons on the remote control and the main body operate only when AC power is turned on. Note : You can also turn on the TV using “ PR ” key and number buttons in the ST-BY mode.
To Watch TV - If the AV1 terminal on the TV set is connected with an external device, which is switched on, the TV will be ON at AV1 mode. Otherwise, TV will be ON at RF mode. 1. Turning on the TV. • Plug the AC lead into a power outlet. • The STANDBY LED lamp turns on in red. • Press “ ” button of the main body or “POWER” button on the remote control. • The STANDBY LED lamp on the front panel begins to flicker in red and blue and the TV turns on. POWER VOL PR / PAGE PR 19 ––––– Mono 12 : 00 2.
Setting Up TV Stations Auto Tuning - All stations that can be received are stored by this method. It is recommended that you use Auto tuning during installation of this set. 1. Press the “MENU” button to select the Install menu. • Move the selection bar to the Install menu with “ / ” buttons. VOL PR / PAGE Picture Mode Picture OK / SELECT VOL Screen PR / PAGE Sound Dynamic Brightness 41 Contrast 51 Colour Install 31 Sharpness 31 Tint Function R N.R.
Setting Up TV Stations Manual tuning 1. Press the Number buttons(0~9) or the “ PR ” button to select a program number you want. VOL PR / PAGE OK / SELECT VOL 2. Locate the selection bar on the Manual tuning at the Install menu. • Press the “MENU” button to select the Install menu. • Move the selection bar to the Install menu with “ / ” buttons. • Place the selection bar on Manual Tuning and press the “ ” button.
Setting Up TV Stations Setup The Setup menu shows you information as follows: - Channel, System, Frequency, Station name, Program number and Store to PR number. 1. Searching for channels in the Setup menu • Press the “ PR “ buttons to select a program number you want. • Move to Setup in the Install menu. • Search a real channel informations(Channel, System and Program) with “ / “ buttons.
Setting Up TV Stations Edit The Edit menu shows you information as follows: - Program position assignment: Program number and Station name, Real channel number. - Skip information: Yes or No. 1. Deleting the program positions. • Move to Edit in the Install menu. • Move the selection bar to the program number to delete with the “ / ” buttons. • Press the Delete (Red) button.
DVB Menu DVB Menu - Press the Menu button to display the main menu. Then, select DVB MENU. You may see the DVB MENU OSD. Whenever you need more information during any DVB MENU directory, press info button “ ” then you will see more detailed information on the screen. And in some menus, you can use the cyan, yellow, red, green buttons. Those buttons’ function depend on which menu it is. * This menu is activated only on digital mode.
DVB Menu Channel List Channel List 1. BBC ONE 2. BBC TWO 3. ITV 1 4. Channel 4 5. five 1 6. ... Select ◄ ► Function Move Delete ▲ BBC ONE Edit Name ▼ Select Channel Select Lock Watch Favourites i More - Select the MOVE function to change the channel number and press the OK. Enter the new number you want and press the OK button. If the number you are selecting is already memorised for another channel, a warning message will appear on screen. Channel exist.
DVB Menu Favourites Edit Favourite Lists 1. BBC ONE ① 2. BBC TWO ① ② ② 3. ITV 1 ① 4. Channel 4 ② 5. five 6. ... 1 List 1 ◄ List 2 ► Select List ▲ BBC ONE List 3 List 4 ▼ Select Channel Select List 5 Add/Remove i More - This menu allows you to make your favourite channel list. You can make 5 favourite lists. - Move highlight on any list (1~5). Then press the Select key to make your own list. When you press the Select key, the mark (①②③④⑤) will show up on the channel name’s right side.
DVB Menu Guides Select each sub-menus. Guides Now / Next EPG Now / Next EPG - You can check now / next program here. Move highlight up/down and get information. - Yellow/cyan button is for changing the schedule. List Schedule EPG Timeline Schedule EPG - Press Info key “ ” to see detailed information of each program MENU Exit SELECT Select Now / Next EPG Channels 23. bid - up.tv 25. TCM 26. UK Style 27. Discovery 28. DiscoveryH&L 30. ITV4 32. Cartoon Nwk 33. Boomerang 37. Quiz Call 55.
DVB Menu List Schedule EPG - You can check program schedules here. Navigate channel by pressing UP/DOWN/RIGHT/ LEFT button. - Press Yellow/cyan buttons to change date. Red/green buttons are for changing the time. - Press Info key “ ” to see detailed information of each program List Schedule EPG Wed 10/11 8:00 BBC ONE Wed 10/11 8:00-10:00 1. BBC ONE 2. BBC TWO 3. ITV 1 4. CHANNEL 4 5. FIVE 6. ITV2 8. 8 10. ITV3 13.
DVB Menu Timers - If you want to watch a special program on time without having to use the remote everyday, please setup Timers. - At first, press select key. You will see time setup OSD. (See the right) - You can change channel at Name. - Setting start/end time as you want at Start / End. - Select Mode (Once, Daily, Weekly) - If a channel is set to change to LOCKed channel, password OSD will be displayed before channel changing.
DVB Menu Settings Select each sub-menu Setting Configuration Configuration This has 6 sub-menus. - Change Time Zone : GMT - CET Language - Subtitle on/off You can also control this with the remote control SUB TITLE button. Installation Note: You can select sub title language in the Features menu. MENU Exit - Change Banner time : off - 1 sec - 2sec - 4sec - 8sec SELECT Select - You can choose your favourite list (see page 33) in Favourite Mode. If it is selected as off, all channels are shown.
DVB Menu Language - System : Select some language, then OSD is displayed in that language: English German French Italian Spanish Danish Polish Norwegian Swedish Finnish Portuguese Dutch. - Preferred : has two sub menus. Audio is change the audio sound in selected language. Subtitle is change the subtitle display in selected language: English German French Italian Spanish Danish Polish Norwegian Swedish Finnish Portuguese Dutch Catalan.
DVB Menu Manual Search Channel Number 44 Signal Quality: Very Good Signal Level: 0 .. 9 Select Channel Select Search Cancel Exit i More Common Interface - This allows you to upgrade your TV set with additional features including access to extra channels (if available) using a conditional access module (eg. TopUp TV). - If there is no CI Card in the slot,„No common interface module detected” appears on the screen.
MUTE Selection of AV and Multimedia Input Signal DVB/Analog POWER MULTI MEDIA AV NORMAL VOL PR / PAGE When watching video, Camcorder, DVD, Cable TV with AV - See page 12 for connection method of Camcorder and Video. - When pressing ” ” button on the TV set, screen changes as follows: TV AV1 AV2 AV3/S-Video COMP PC HDMI1 HDMI2 TV 1. Pressing the “AV” button on the remote control.
Selection of AV and Multimedia Input Signal Comp PC 12 : 00 12 : 00 HDMI 2 HDMI 1 12 : 00 12 : 00 HDMI & PC mode 1. For optimum picture quality, use 1360(6)x768 computer or set top box output at a 60Hz refresh rate. Using other formats or refresh rates may result in reduced picture quality. 2. If the message ‘No signal’ appears on the screen, adjust the PC output to a format listed in the Multimedia Input table.
Screen Adjustment When setting up various screen modes - The user may select various screens designed for a good picture without adjusting the brightness, contrast or colour individually. 1. Pressing the “NORMAL” button. • The screen changes as follows: Normal Cinema Dynamic Favourite Normal • The screen adjustment status changes as the following screens are displayed sequentially whenever pressing the “NORMAL” button.
Screen Adjustment When adjusting the screen to taste - You can enjoy various screens by adjusting Brightness, Contrast, Colour, Sharpness, etc to the user’s taste. 1. Select “Picture” by pressing the “MENU” button. • The menu screen appears as follows. VOL PR / PAGE Picture OK / SELECT VOL Screen PR / PAGE Sound Install Function Picture Mode Dynamic Brightness 41 Contrast 51 Colour 31 Sharpness 31 Tint R G N.R. DVB Colour Temp Move 2. Select and adjust each item.
Screen Adjustment Adjustment of Screen Size in TV and AV mode GUIDE - Randomly change the size of the screen. - The AUTO screen operates when power is first turned on. SUBTITLE LANGUAGE FAVOURITE CANCEL / EXIT 1. Pressing the “ASPECT” button on the remote control. • The screen changes as follows: Full 4:3 14:9 Zoom14:9 Zoom16:9 Auto Full Aspect Full Screen Aspect Auto Aspect Zoom 16 : 9 MENU ASPECT M RECALL S.
Screen Adjustment Adjustment of the screen in the PC mode 1. Auto Adjustment • Move to Auto in the Screen menu. • Press the ” / ” buttons to detect optimal resolution automatically. VOL PR / PAGE Picture Screen OK / SELECT Sound VOL PR / PAGE Install Function PC Auto Adjustment 31 V Position 31 Phase 54 Clock DVB -7058 Move 2. Adjustment of the H-Position • Move to H-Position in the Screen menu. • Press the ” / ” buttons to adjust the horizontal position of displayed image.
PIP Mode - The user can enjoy two screens by using PiP function. VOL 1. Adjustment of PiP Mode (Picture in Picture) • Move to Mode in the PiP. • Press the ” / ” buttons to select, PiP mode changes as follow: Side by Side Small PiP Large PiP Off PR / PAGE Picture Screen OK / SELECT Aspect Auto PC Access PIP Access Sound VOL PR / PAGE Install Function DVB 2. Adjustment of Sound Output • Move to Sound Output in the PiP.
PIP Mode 5. Pressing the “P.SWAP” button on the remote controller. • Switches over the Main and Sub screen. 6. Pressing the “P.INPUT” button on the remote controller. • If Sub is on Digital, Switch the Sub screen in the MULTIMEDIA cycle(HDMI1 HDMI2 HDMI1…) PC and COMP aren’t selected because they are on the Analogue side.
Sound Adjustment When adjusting sound to taste - The user can enjoy various sounds by adjusting AVC, Dynamic Bass, Effect, Balance and Equalizer. 1. Select AVC Mode • Select Auto Volume Control On/Off by pressing ” / ” button, then the volume is same every time you switch the TV on. VOL PR / PAGE Picture OK / SELECT VOL Screen PR / PAGE AVC On Dynamic Bass On Effect Off Sound Balance Install Equalizer | 0 Access Function 2.
Sound Adjustment Multi-Sound and Stereo 1. Mono Sound Selection • During Stereo sound reception if the stereo is weak, you can switch to MONO by pressing the “ ” button. Then the colour of “MONO” character will change to Red. In Mono reception the depth of sound is improved. • To switch back to stereo, press the “ ” button again. PR 19 M RECALL S.EFFECT ABC DEF GHI 1 2 3 JKL MNO PQR 4 5 6 STU VWX YZ&. PR 19 ––––– Note : •“ ––––– Mono 12 : 00 Mono 12 : 00 ” only works in RF mode.
Selection of Language Selection of Language When you first turn on the TV set, the on screen display of language selection is displayed automatically. 1. Press the “MENU” button and select “Function”. VOL PR / PAGE Picture OK / SELECT VOL Screen Language Child Lock Clock PR / PAGE Off –– : –– Sound Wake Up Install Wake Time Function English Wake Pr Off 00 : 00 00 DVB Move Select Exit 2. Select “Language” by pressing “ / ” button. VOL PR / PAGE Picture OK / SELECT 3.
Adjustment of Time Adjustment of Time - You must previously adjust current time in order to activate Automatic On/Off, switching of Wake Up Time and Sleep Mode. However in the UK the time is set automatically from the broadcast received. 1. Manual clock setting • To go to the Clock, press the “ ” button. • Place the cursor to Hour / Minute with “ / ” buttons. • Set the Hour / Minute with the “ / ” buttons. • Place the cursor to Clock with “ / ” buttons and then press the “MENU” button to complete.
Other Functions 1. Setup of Child Lock • Move to Child Lock in the Function menu. • Select Child Lock to “On” using the “ ” button VOL PR / PAGE Picture Note : • This prevents the use of the TV set without the remote control. • If the TV set is in Child Lock mode, the LED will cycle between red and blue. • If the Child Lock is “On”,then the set can only be switched back on using the remote control.
Teletext Analogue Teletext SWITCHING TELETEXT ON/OFF Press the “TEXT” button ( ). The index page or the page viewed last will appear. Press the “TEXT” button again to return to the TV mode. NOTE: Teletext works only in TV/AV mode. However digital broadcasts have digital text. To use digital text press the “TEXT” button in DVB mode. COLOUR BUTTONS IN TOP (Tables Of Pages) NB. not used in the UK /FLOF (Full Level One Feature) TELETEXT A red, green, yellow and blue field is shown at the bottom of the screen.
Troubleshooting Symptoms and Solutions Please check the following list prior to calling Daewoo Electronics Customer Service Centre for assistance. Symptom Check items Neither picture nor sound - Check the contact of sockets is OK. - Check the TV main power is on. Picture is OK but no sound - Check the Volume control is not set to minimum or mute. Sound is OK, but no colour. - Check the colour control and adjust it properly. - Check the program is in colour and not in black & white.
Troubleshooting In PC mode Symptom Check items “UNSUPPORTED” appears on the screen - Check the resolution and frequency of your PC. Then, adjust them to optimum condition for LCD TV. - Refer to the table of PC mode input format (If registered resolution and frequency on the table not listed then no picture will be displayed.) “NO SIGNAL” appears on the screen. - Ensure that the signal cable is firmly connected to PC and TV. Image is not clear. - Adjust the PHASE control. Image is not centred.
Standard of Product Screen Size 32”(800.4mm) 37”(940.3mm) Aspect Ratio Resolution Pixel Pitch Contrast Ratio Dimension (W x H x D) Weight Power Consumption TV System Power Source 42”(1067.308mm) 16:9 1366 x 768 (WXGA) 170.25um x 510.75um 0.200mm x 0.600mm 0.227mm x 0.681mm 5000:1 5000:1 5000:1 806 x 590 x 260mm 940 x 682 x 260mm 1044 x 757 x 345mm 23.5Kg 31.