DR-C91/92D1N-BS 04.1.19 9:51 PM ˘ ` 1 Product Information Important Safeguards CAUTION RISK OF ELECTRIC SHOCK DO NOT OPEN CAUTION: TO REDUCE THE RISK OF ELECTRIC SHOCK, DO NOT REMOVE COVER (OR BACK). NO USER-SERVICEABLE PARTS INSIDE. REFER SERVICING TO QUALIFIED SERVICE PERSONNEL.
DR-C91/92D1N-BS 04.1.19 9:51 PM ˘ ` 2 Important Safeguards This set has been designed and manufactured to assure personal safety. Improper use can result in electric shock or fire hazard. The safeguards incorporated in this unit will protect you if you observe the following procedures for installation, use and servicing. This unit is fully transistorized and does not contain any parts that can be repaired by the user.
DR-C91/92D1N-BS 04.1.19 9:51 PM ˘ ` 3 information with respect to proper grounding of the mast and supporting structure, grounding of the lead-in wire to an antenna-discharge unit, connection to grounding electrodes, and requirements for the grounding electrode. See example as shown.
DR-C91/92D1N-BS 04.1.19 9:51 PM ˘ ` 4 Advantages of This Product Are .....
DR-C91/92D1N-BS 04.1.19 9:51 PM ˘ ` 5 Product Information Read Carefully before Using Cautions in use of DVD-Video player are described below. Please read carefully before using a DVD-Video player. Installation place and handling ¥ When you place this player near other devices, they may affect poorly together. ¥ When you place DVD-Video player and TV in the upper and lower sides, it may cause flickering of pictures or failure (tape is not ejected).
DR-C91/92D1N-BS 04.1.19 9:51 PM ˘ ` 6 Contents Product Information Important Safeguards ................................. 1 Advantages of This Product Are .... ............... 4 Read Carefully before Using ......................... 5 Contents ................................................ 6 Identification of Controls ............................ 7 Remote Control ...................................... 10 Installation Connecting with TV .................................. 11 FM/AM Antenna connection .....
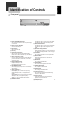
Product Information Identification of Controls Front panel ! Power (STANDBY/ON) button Use to power the device on/off if AC power supply is connected. @ Place to insert videotape Insert the desired tape. # Eject button Use to eject the tape. $ Disc tray % Open/Close Tray button Open or close tray by pressing [OPEN/CLOSE] button. Place a disc on the disc tray, label side up.
Identification of Controls Operation Display Window ! Speaker setup indicator @ Memorized radio stations # Chapter indicator $ Track indicator % Sleep time indicator ^ Playback disc indicator & Dolby Digital indicator * Prologic II indicator ( FM/AM indicator ) Playback indicator 1 Pause indicator 8 2 Multi Angle indicator 3 DTS indicator 4 DSP indicator 5 PCM indicator 6 PBC (PlayBack Control) indicator 7 FM Stereo indicator 8 Mute indicator 9 Random playback indicator 0 Repeat playback indicator “ Pro
DR-C91/92D1N-BS 04.1.19 9:51 PM ˘ ` 9 Rear Panel ! @ % ! Power Cord Jack for supplying power to the unit. Connect to a wall outlet. @ 5.1 Speaker Out Jack Connect each of the speaker wires to the satellite speakers. Speaker cords, 1 for each speaker, are needed for connection. When connecting the speakers, make sure the polarities ("+" side of the speaker wire to "+" on the receiver) of speaker wires and terminals are matched.
Remote Control 10
Product Information Instructions in using remote control ¥ ¥ ¥ ¥ Operate remote control within 7m from the unit. Do not press 2 (two) buttons at the same time. Do not light up sending part of remote control. Do not keep in the place with much dust and humidity.
Various methods in connecting with TV AUDIO VIDEO S-VIDEO 12
DR-C91/92D1N-BS 04.1.19 9:51 PM ˘ ` 13 Connecting with TV 4 : Connecting to a TV that has a S-Video in jacks Use a S-Video cable (not supplied) to enjoy higher quality pictures. ¥ VHF: 2 ~13 channels of TV, UHF: 14~69 channels of TV, CATV: Broadcasting is transmitted with cable from broadcasting station by contract with the station and consumers. It does not need any antenna. ¥ In/Out jack in Audio/Video terminal: - In: A jack used to receive signal required in this unit from other units.
Speaker system connection 15 Installation Connect the speakers using the supplied speaker cords by matching the colors of the terminals and those of the cords. To obtain the best possible surround sound, adjust the speaker parameters (distance, level, etc.
Connecting with Other Equipment Connection with other video equipment 16
DO NOT REMOVE COVER (OR BACK). ANT INPUT CAUTION RISK OF ELECTRIC SHOCK DO NOT OPEN CAUTION: TO REDUCE THE RISK OF ELECTRIC SHOCK. Installation Connection with an Analog Audio NO USER SERVICEABLE PARTS INSIDE. REFER SERVICING TO QUALIFIED SERVICE PRESONNEL.
DR-C91/92D1N-BS 04.1.19 9:51 PM ˘ ` 18 Output Select To Select DVD Press [DVD] button. If DVD mode is correctly selected, DVD indicator on the front panel is lighted. Then, remote control button works as DVD function. Press the [DVD] button, then the mode of DVD-Video Player becomes to the DVD OPERATION mode. To Select VCR Press [VCR] button. If VCR mode is correctly selected, VCR indicator on the front panel is lighted. Then, remote control button works as VCR function.
Clock Set 1 Press [SETUP] button. Press [ENTER] button to select CLOCK SET. Select ÒTime and Date SetÓ with [ENTER] button in CLOCK SET screen. Installation ■ Set TV to CH 4 (or 3). ■ Press [VCR] button on remote control to change into VCR mode and follow the procedures below.
DR-C91/92D1N-BS 04.1.19 9:51 PM ˘ ` 20 VCR Playback 1 2 3 4 5 √] button to power on. Press [√ Press [VCR] button of remote control to change into VCR mode. Insert the desired tape. If you want to playback it, press [PLAY] button. When the operational status is flickering or poor, adjust it with [TRACKING +/Ð] button. To stop it, press [ ] button. For pause, press [PLAY/PAUSE] button in playback mode. If you press this button once more, it starts playback again.
DR-C91/92D1N-BS 04.1.19 9:51 PM ˘ ` 21 Memorizing TV Channels To Memorize Channels Automatically 2 Select ÒAuto Channel SearchÓ. Press [†] button to move into CHANNEL SET, and then select CHANNEL SET with [ENTER] button. Press [ENTER] button in CHANNEL SET window to select AUTO CHANNEL SEARCH. Select ÒDetect AutomaticallyÓ. Press [ENTER] button in AUTO CHANNEL SEARCH window to detect the channel automatically.
DR-C91/92D1N-BS 04.1.19 9:51 PM ˘ ` 22 Memorizing TV Channels To Delete Channels Manually ■ Follow the procedures below to delete stored channels. 1 2 3 Press [SETUP] button and select ÒCHANNEL SETÓ. Select ÒAdd/Remove ChannelsÓ. Select the desired channel and delete it. ADD/REMOVE CHANNELS Channel 02 is now REMOVED. Press [NUMBER] button of remote control to select the desired channel to delete. When [√] button is pressed, ÒADDEDÓ under the channel number converts into ÒREMOVEDÓ.
Using advanced features Play the tape automatically ■ This feature allows the VCR to automatically start playing when you insert a tape with the safety tab removed. Press [SETUP] button and select ÒFUNCTIONSÓ. VCR Operation Move into ÒFUNCTIONSÓ with [†] and then, select the desired one with [ENTER] button.
Searching a cassette tape for programs (indexing) ■ When you record a programs, the VCR places an index mark at the start of the recording. To search for an index mark: ¥ If two recordings overlap, the index mark for the second program will be erased. Therefore, when you use the index feature to find the second program, the VCR will skip over it.
DR-C91/92D1N-BS 04.1.19 9:51 PM ˘ ` 25 Using advanced features Display (O.S.D) 1 2 And, by one more pressing [DISPLAY] button before disappearing the OSD from the screen, only the tape counter will remain on the screen. VCR Operation 3 Press [DISPLAY] button to display the tape counter, clock and status mode on the TV screen for a short time. Press [DISPLAY] button the third time and the tape counter also disappears from the screen and to return to the original display.
DR-C91/92D1N-BS 04.1.19 9:51 PM ˘ ` 26 Hi-Fi Stereo Playback (Hi-Fi Model only) Playing a tape in Hi-Fi high-quality ¥ Press the [AUDIO] button repeatedly to select among playback qualities. Hi-Fi ¥ ¥ LINEAR MIX ÒHi-FiÓ signal lights up at the top of a screen. If the Hi-Fi sound on the tape is not stable (background noise), select LINEAR to reduce them. Forced Mono ¥ ¥ Programs are broadcasted in mono or stereo sound, or with a SAP. Press [AUDIO] repeatedly to select among STEREO, MONO and SAP.
DR-C91/92D1N-BS 04.1.19 9:51 PM ˘ ` 27 DVD initial setting LANGUAGE Setup ■ A user can set OSD language, Audio, Subtitle and Disc Menu. 3 …/† †] Select ÒSubtitleÓ by pressing [… button. 4 …/† †] Select ÒDVD MenuÓ by pressing [… button. 5 Select ÒOSD LanguageÓ by pressing …/† †] button. [… Set it as the preferred audio language. In case the audio language is set and recorded in the DISC, it is automatically played in the set language in every playing. Please set it as the preferred language.
DR-C91/92D1N-BS 04.1.19 9:51 PM ˘ ` 28 DVD initial setting DISPLAY Setup ■ A user can set up a connected TV condition and screen. 1 2 The change of ÒVideo OutÓ for Component or S-Video need user to change the TV Format fitly. In STOP or RESUME STOP mode, press the [SETUP] button to display the DVD ÒSETUPÓ menu. Press the [œ] or [√] buttons to select ÒDisplayÓ from the top menu bar. Select ÒAspect RatioÓ by pressing …/† †] button.
DR-C91/92D1N-BS 04.1.19 9:51 PM ˘ ` 29 DVD initial setting AUDIO Setup ■ A user may select audio menu according to a userÕs speaker set. 1 In STOP or RESUME STOP mode, press the [SETUP] button to display the DVD ÒSETUPÓ menu. Language Display Audio Press the [œ] or [√] buttons to select ÒAudioÓ from the top menu bar. 3 Select ÒSpeaker SetupÓ by pressing …/† †] button. [… 4 To select among the speakers (LEFT, CENTER, RIGHT, L.SURR.., SUB.W and …], [† †], [œ œ], or R.
DR-C91/92D1N-BS 04.1.19 9:51 PM ˘ ` 30 DVD initial setting RATINGS Setup ■ Parental Control restricts the type of discs that can be played on the DVD/VCR according to their ratings. Discs that do not fall within the rating limits can not be played unless the rating password is entered. 1 The initial password is 3308. In case you forget newly-input password, you can use 3308 as a password. ÒParental LockÓ can only be activated if: ¥ A password has been set and the unit is in Lock mode.
DR-C91/92D1N-BS 04.1.19 9:51 PM ˘ ` 31 DVD initial setting 5 To return to DVD settings, select Default from the Ratings menu by …] or [† †] buttons and pressing the [… select Reset.
DR-C91/92D1N-BS 04.1.19 9:51 PM ˘ ` 32 DVD Playback 1 √] button to power on. Press [√ 2 Press [OPEN/CLOSE] button to open the disc tray. Press [DVD] button to select DVD mode. Place a disc firmly on the disc tray, making its label look upward. Insert the disc and press [OPEN/CLOSE] button to close the tray. The disc tray is closed and after checking the discÕs condition, Playback or Stop function starts to operate. 3 To playback it, press [PLAY/PAUSE] button.
DR-C91/92D1N-BS 04.1.19 9:51 PM ˘ ` 33 DVD Playback Various Playback Methods ■ If you want fast (or reverse) playback, press [√√] or [œœ ] button in Playback mode. You can watch fast playing (reverse) screen. * This reverse playback can be unavailable for certain DVD. Unavailable for MP3. ■ If you want slow (or reverse) playback, press [❚ √] or [œ ❚ ] button in Playback mode. You can watch the desired screen in the slow forward (reverse) playback.
DR-C91/92D1N-BS 04.1.19 9:51 PM ˘ ` 34 Playing a desired scene To skip scenes in a disc DVD, VCD, VCD2.0, CD, MP3 √√❚ ] button. To move to next chapter (or track), press [NEXT√ The current chapter (or track) moves to the next chapter (or track). œœ PREV] button. Press [❚œ The current scene moves to the previous chapter (or track) or first scene of current chapter (or track). Directly moving to a desired title DVD ■ Some movie discs may contain multiple titles.
DR-C91/92D1N-BS 04.1.19 9:51 PM ˘ ` 35 Playing a desired scene Playing a programmed order DVD, VCD, CD In stop mode, press the [PROGRAM] button. 1 The CD Playlist screen appears. Use the […] or [†] buttons to move the cursor to the track you want to add to the playlist. Press the [ENTER] button to add it to the Playlist. The track will be displayed on the bottom right box. Press the [œ] or [√] buttons to select ÒPlayÓ and press [ENTER] to begin program playback.
DR-C91/92D1N-BS 04.1.19 9:51 PM ˘ ` 36 Playing a desired scene Repeating a defined period from A to B DVD, VCD, CD ■ You may repeat a defined period from A to B. A MP3 disc may not be repeated from A to B. 1 At the point where you want to start the repeat playback, press [A-B] button. 2 At the point where you want to end the repeat playback, press [A-B] button again. 3 To exit from repeat playback mode, press [A-B] button.
DR-C91/92D1N-BS 04.1.19 9:51 PM ˘ ` 37 Playing a desired scene Searching VCD and CD with a track number or time 1 Press [SEARCH] button. VCD, CD T _ _0 01:46:03 T 001 _ _:_ _:_0 It shows the track numbers and times. If you want to search with a track number, please enter the new track number to be searched using the [NUMBER] or […/†] button. 2 If you want to search with a time, 3 In completing entering, please press [SEARCH] button.
DR-C91/92D1N-BS 04.1.19 9:51 PM ˘ ` 38 Confirming the current PLAY mode on screen Confirming the current DVD disc mode 1 During playback, press [DISPLAY] button. 2 Press [DISPLAY] button again. 3 Press [DISPLAY] button again. DVD T 001 C 020 01:46:03 It shows the current title, current chapter and time elapsed. 1/4:Dolby Digital, 5.1Ch. -English It shows the audio selected. 1/4:Subtitles Off 1/4:Off It shows the subtitle selected and repeat playback mode .
DR-C91/92D1N-BS 04.1.19 9:51 PM ˘ ` 39 Confirming the current PLAY mode on screen Confirming the current MP3 disc mode The track list appears automatically in Playback mode. It shows the MP3 File information in disc, the directory, MP3 File name and directory list. With […†œ √] buttons, you can move the cursor to MP3 Music File. To playback MP3 File, press [ENTER] key. MP3 Track List +DIR / +DIR mp3 001 A 002 A 003 A 3@t8_03 004 A 4@t8_04 005 A 006 A 007 A 7@t8_08 † Use …† arrows to find a track.
DR-C91/92D1N-BS 04.1.19 9:51 PM ˘ ` 40 AUDIO, SUBTITLE language and Sound Fields ■ The user may select an audio language and subtitle language if a disc includes Multi-language. Selecting an audio language Press the [AUDIO] button. It shows the audio information DVD disc includes. A certain disc may not support audio select or subtitle select. DVD 1/4:Dolby Digital, 5.1Ch. -English The user can select each audio information by using […†] buttons.
DR-C91/92D1N-BS 04.1.19 9:51 PM ˘ ` 41 ZOOM and Multi Angle Using a zoom function DVD, VCD ■ A picture can be magnified by about 2, 4 or 8 times the actual size. While playback or still mode, press [ZOOM] button till the right figure appears. Every time the user presses [ZOOM] button, a zoom magnification changes 2 times (X2) ➝ 4 times (X4) ➝ 8 times (X8) ➝ OFF ➝ 2 times (X2) ... one by one. A base point to be enlarged is center and the point can be changed with the operation of […†œ √] button.
DR-C91/92D1N-BS 04.1.19 9:51 PM ˘ ` 42 About MP3 discs Playing a disc containing MP3 files MP3 This unit will play MP3 files recorded on CD-R and CD-RW discs. 1 2 3 4 5 6 Turn on your television and select the channel assigned to this DVD player. Press the DVD open [OPEN/CLOSE] button, the disc tray opens. Put a disc containing MP3 files on the disc tray with the label side up. Press the DVD open [OPEN/CLOSE] button, the disc tray closes.
DR-C91/92D1N-BS 04.1.19 9:51 PM ˘ ` 43 Displaying menu in a disc To display menu in a disc DVD, VCD2.0 ■ If a disc includes menu, the user may use it. 1 Press [TITLE/PBC] or [MENU] button. ¥ It shows menus in the disc. Also they are different according to discs. ¥ If it is a VCD2.0, select PBC ON mode by pressing [TITLE/PBC] button. * This function is not available for CD and VCD1.1.
Recording To Record With VCR 1 Press [√] button to power on. 2 3 4 5 6 7 Insert a recordable tape. ¥ ¥ Press [VCR] button of remote control to change into VCR mode. Power on TV and select Ch 3, or press [INPUT] button of TV set to select External Input mode. Insert a tape with safety tab. With [CHANNEL], [NUMBER] and [INPUT] buttons, select the desired broadcasting channel or external input unit to record. Select the desired speed (SP or SLP) with [SPEED] button. Press [REC] button.
DR-C91/92D1N-BS 04.1.19 9:51 PM ˘ ` 45 Recording To Record From DVD To Videotape during DVD playback 1 Press [DVD] button of remote control to change into DVD mode. Insert the desired DVD disc. When it is a DVD disc with copy protect function, you canÕt copy it. Insert a recordable tape. You canÕt copy in case of DTS audio mode of disc. Change it to ÒDolby DigitalÓ or Ò2CHÓ mode if you want to copy. 2 3 Play the DVD disc and press [REC] button. DVD plays and VCR starts recording.
DR-C91/92D1N-BS 04.1.19 9:51 PM ˘ ` 46 Timer Recordings TIMER RECORDINGS ■ ■ ■ ■ Turn on the TV. Make sure that current time is set correctly. Insert a recordable tape with safety tab. Prior to the setting, press [VCR] button to change to VCR mode. 1 2 Press [SETUP] button and select ÒTIMER RECORDINGSÓ. Move into ÒTIMER RECORDINGSÓ with [†] and then, select the desired one with [ENTER] button. Select ÒMake a New ProgramÓ. Press [ENTER] button to select ÒMake a new ProgramÓ.
DR-C91/92D1N-BS 04.1.19 9:51 PM ˘ ` 47 Timer Recordings 6 Set proper ÒRECORDING SPEEDÓ. Select one of SP/SLP with [†] or […] button. For more information on recording speed, see ÒUsing video cassetteÓ in the page 48. PROGRAM1 (ONE TIME) Channel Start Date Start Time End Time Tape Speed Move: Video: INPUT For correct operation of TIMER RECORDING, the unit should be turned off or turned on DVD mode. 7 Press [SETUP] button to complete the setting. ÒProgram # has been saved.
DR-C91/92D1N-BS 04.1.19 9:51 PM ˘ ` 48 Timer Recordings Various TIMER RECORDINGS One Time: It is available of TIMER RECORDINGS at the desired specified time. Daily : Once you set TIMER RECORDINGS of the desired program telecasted at the same time day after day, it is available of daily recordings. It is available of TIMER RECORDINGS from Sunday to Saturday. Weekday : It is similar to Daily TIMER RECORDINGS, but this TIMER RECORDINGS is available from Monday to Friday.
DR-C91/92D1N-BS 04.1.19 9:51 PM ˘ ` 49 Watching and Recording Cable TV To Watch and Record Promptly Cable TV 1 Power on converter and then, set a channel to watch or to record. Power on DVD-video and then, set the channel of DVD-video to the converter-connected channel (one of CH03/04/EXTERNAL INPUT). Power on TV and then, set the video-connected channel (one of CH03/04/VCR). 2 Simultaneous Recording and Watching At this time, CH selected by the converter is displayed on TV screen.
DR-C91/92D1N-BS 04.1.19 9:51 PM ˘ ` 50 Presetting the radio stations ■ You can preset 50 stations for FM and AM. Before tuning, make sure that you have turned down the volume to the minimum. 1 2 3 4 5 Press [FM/AM] button until the FM or AM appears in the display window. And then every time you press [FM/AM] button, FM and AM changes alternately. Press and hold [TUNING Ð/+] button for about two seconds until the frequency indication starts to change, then release.
DR-C91/92D1N-BS 04.1.19 9:51 PM ˘ ` 51 Listening to the radio ■ Preset radio stations in the DVD receiverÕs memory first (see ÒPresetting radio stationsÓ on the previous page). 1 2 Press [FM/AM] button until AM or FM appears in the display window. 3 Adjust the volume by rotating VOLUME on the front panel or pressing [VOL-] or [VOL +] button repeatedly. The last received station is tuned in. Press [PRESET Ð or +] button repeatedly to select the preset station you want.
DR-C91/92D1N-BS 04.1.19 9:51 PM ˘ ` 52 Speaker Setup for enjoying the surround sound effect Surround Sound Audio Components DTS Digital Surround, Dolby Digital and Dolby Pro Logic technologies can be used to enjoy 3-dimensional sound effects with video image. We recommend you use the following devices. ¥ Hi-Fi Stereo VCR to play the program sources. ¥ Large screen TV monitor for a high-quality video image. ¥ Use the program sources (e.g. LD, DVD, VIDEO TAPE etc.
Speaker Positioning A typical speaker setup uses 6 speakers: 2 front speakers, a center speaker, 2 rear speakers, and a subwoofer. Add a sub-woofer to hear excellent bass sound, DTS digital surround or Dolby Digital surround. Set up a listening position; a couch or chairs, etc. as shown in the speaker positioning example. ¥ Front speakers We recommend that the height of the tweeters of the front speakers be at the same height as the listenerÕs ears, to the left and right of the TV.
DR-C91/92D1N-BS 04.1.19 9:51 PM ˘ ` 54 Delay Time Setting ■ In Dolby Digital or Dolby Pro Logic mode it is assumed that the time it takes the sound from each speaker to reach the listener, is the same.
DR-C91/92D1N-BS 04.1.19 9:51 PM ˘ ` 55 Delay Time Setting Setting the delay time in the Dolby Digital and Dolby Pro Logic modes 1 2 Press [DELAY] button. 3 4 … or †] buttons to change the delay time. Press the [… The current surround delay time appears in the display window. Press the [DELAY] button to select the desired speaker to set.
DR-C91/92D1N-BS 04.1.19 9:51 PM ˘ ` 56 Setting the sound level Setting the sound level of the desired channel To adjust the volume of all the speakers at one time : Use the VOLUME control. 1 2 Press [LEVEL] button. 3 4 5 … / †] button to adjust the sound level of the selected Press [… channel. The LEVEL indicator will appear in the display window. Press [LEVEL] button to select a desired speaker to set.
DR-C91/92D1N-BS 04.1.19 9:51 PM ˘ ` 57 Delay Time Setting Setting the Balance between each channel by using the test tone ■ In Dolby Digital and Dolby Pro Logic mode by using the test tone function you can easily adjust the sound balance of the speakers from the listenerÕs position in DVD initial setup mode. (speaker setup) This Test Tone function is unavailable in a state of No Disc. 1 2 Select the test tone mode by √/» »] button.
DR-C91/92D1N-BS 04.1.19 9:51 PM ˘ ` 58 About DVD Playable Disc ¥ DVD, Video CD (Version 1.1, 2.0), S-VCD and Audio CD Disc type Playable Restriction DVD Video CD CD Possible Possible Possible Region number 1 or Region number All (DVD-5, DVD-9, DVD-10, DVD-18) Version 1.0/1.1/2.
DR-C91/92D1N-BS 04.1.19 9:51 PM ˘ ` 59 About DVD CHAPTER It means the information recorded in a DVD. A title in a DVD is divided into many tracks, of which a track is called as a chapter. A certain scene of a screen can be quickly searched with the chapter number. TITLE It means the information recorded in a DVD. A DVD can be divided into may titles. TRACK It means the information recorded in a video CD and audio CD. A disc consists of many a track, for which a user can search a certain position.
DR-C91/92D1N-BS 04.1.19 9:51 PM ˘ ` 60 Basic information about VCR and Videotape Terms related with VCR AFT Automatic fine tuning, a circuit that automatically adjusts TV reception to optimum condition. CABLE Cable television. Index Search A feature of this VCR that automatically records an index each time recording begins. It helps you locate a particular segment of the tape quickly and easily.
DR-C91/92D1N-BS 04.1.19 9:51 PM ˘ ` 61 Before doubting about troubles (DVD) Symptom Checks ¥ The player does not play. ➤ If a DVD is from overseas, it may not be played. Please check a DVDÕs region code whether it has the relative region code 1 or All. ➤ Please check whether a DVD is inserted in a right direction. ➤ If it is a CD-ROM for PC or DVD-ROM, it does not work. ¥ No sound comes through.
DR-C91/92D1N-BS 04.1.19 9:51 PM ˘ ` 62 Before doubting about troubles (VCR) Symptom Checks ¥ ÒPower OnÓ does not work. ➤ Please check whether a power plug is inserted in an electric outlet. ¥ It does not work even in ÒPower OnÓ. ➤ Please check whether a videotape is inserted in. ➤ Try to insert a plug again. ¥ A videotape is not inputted in. ➤ Please check whether a power plug is inserted in an electric outlet. ➤ Please check whether a videotape is in.
DR-C91/92D1N-BS 04.1.19 9:51 PM ˘ ` 63 Before doubting about troubles (VCR) Symptom Checks ¥ Recording a TV program is impossible. ➤ Please check whether a channel is fixed on video. If not, you have to turn it into ÒTVÓ by pressing [INPUT] button. ➤ Please check whether the timer recording info is right. ➤ Are RF cables inputted antenna connection terminal correctly? ➤ Does a CH number selected in display section appear? ➤ Please check a tab on a tape whether it is broken or not.
DR-C91/92D1N-BS 04.1.19 9:51 PM ˘ ` 64 Specifications Power AC 120V, 60Hz Consumed electricity 95W Weight 6.45kg Dimension (WxHxD) 430mm x 91mm x 370mm Operative temperature +5¡C~35¡C Installation condition Horizontal / Relative humidity under 80% Received channels VHF: 2-13 CH / UHF: 14-69 CH / Cable: 1-125 Signal type NTSC COLOR Antenna Input/output U/V-mixed: 75½ unbalanced VIDEO input 1.0 Vp-p unbalanced, RCA JACK AUDIO input -8.
DR-C91/92D1N-BS 04.1.