
Instruction manual


Issue H Oct 04
PAGE
34
GV Dry Vacuum Pumps
MAINTENANCE
34
5. If the bearings are in a satisfactory condition,
use a suitable syringe to force approximately
50 g (1.8 oz) of new Fomblin RT15 grease into
the bearings so that a smooth layer of grease
covers the case and bearings. Do not put too
much grease in the bearings or the pump will
run hot.
6. Use a 24 mm A/F spanner to turn the drive
rotor shaft (1) in the correct direction (7) three
or four complete revolutions.
7. Press any grease forced out of the bearings back
into the bearings.
8. Refit the bearing cap (4) with a new bearing cap
‘O’ ring (3) on the drive rotor shaft. Apply a
suitable thread sealant (for example, Loctite
Screwlok 242 or equivalent) to each of the
three bearing cap retaining bolts (5) and refit
the bolts to secure the bearing cap.
9. Repeat Step 8 to refit the bearing cap (6) on the
driven rotor shaft.
10. Dispose of the old grease safely: refer to
Section 6.2.
5.9 Flush the cooling jacket
Flush the cooling jacket every year or when you
think that the cooling efficiency is reduced because
of deposits or other contamination in the cooling
jacket. The pressure and flow rate of the water
supply that you use to flush the cooling jacket must
be equal to or higher than the normal cooling-water
supply. Do not exceed the pressure specified in
Section 2.5.
WARNING
If the water flow through the cooling
jacket is blocked or restricted, the
water in the pump may get very hot.
Allow the pump to cool down before
you remove the cooling-water
connections. If you do not, hot water
may be ejected from the pump and
may cause injury.
1. Switch off your cooling-water supply.
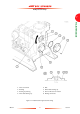
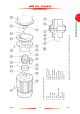
2. Refer to Figure 1. Disconnect the cooling-water
supply and return pipelines from the water inlet
(7) and outlet (2) connections.
3. Fit a suitable water supply pipeline to the water
outlet connection (2), and fit a suitable water
return pipeline to the water inlet connection
(7).
4. Turn on the water supply to flush the cooling
jacket in the reverse direction, and wash out
any deposits from the cooling jacket.
5. Allow the water to flow for a few minutes,
switch off the water supply, then disconnect the
water return pipeline.
6. Place a suitable splash tray under the cooling-
water inlet connection (7), then unscrew and
remove the 1
1
/
4
inch BSP water inlet fitting
(that is, the large fitting to which the cooling-
water inlet connection (7) is fitted) from the
port in the end of the pump.
7. Use a suitable tool to remove any sediments
from the port.
8. Turn on the water supply for a short time to
flush any remaining deposits from the cooling-
jacket.
9. Disconnect the water supply pipeline from the
cooling-water outlet connection (2), then
dispose of the water and deposits in the splash
tray.
10. Apply a suitable thread sealant (such as Loctite
577) to the threads of the 1
1
/
4
inch BSP water
inlet fitting, then refit the fitting to the port in
the end of the pump.
11. Refit your pump cooling-water supply and
return pipelines to the water inlet (7) and outlet
(2) connections.