
Operation Manual


Enjoying the Sound Effects
The surround sound of the machine lets you enjoy the presence of a movie theater or concert hall in your room.
Before using any sound effect, make sure the Speaker Setup configurations have been set correctly.
The speaker configuration is very important for the surround sound.
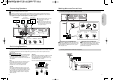
See “Connecting Speakers” and “Positioning Speakers”.
Following are the sound systems the machine can reproduce.
This 5.1-channel digital surround format lets you
individually play five full-range (20Hz-20kHz) channels (left
and right front, center, two surround channels) plus an
LFE(Low Frequency Effect) channel for the low-range
effect sound.
It creates a realistic sound like that heard in theaters and
concert halls.
DOLBY DIGITAL Surround
DVD videos that have the mark are recorded
using this format.
DTS Surround
DVD videos, video discs, and CDs that have the mark
are recorded using this format.
To play back DTS Surround sound with connected
equipment such as a video disc player, you must make the
digital connection in addition to the above speaker
configuration.
This surround format consists of four channels (left and
right front, center, and monaural surround channel) and
emphasizes the center channel. This format is very
effective for panning music, conversation, and three-
dimensional sound movement output from three front
channels. It also simulates the atmosphere and surround
effects of the sound reflected from the side and rear walls
of the theater.
VHS, VHS Hi-Fi, video disc, and DVD videos that have the
mark are recorded using this system.
27
DOLBY DIGITAL Surround and DTS (Digital Theater System) Surround
DOLBY PRO LOGIC Surround
Notes : DTS Surround
If you play a DTS Surround encoded disc with the DTS, or a
DTS encoded disc using a digitally connected player, you may
hear a noise for a short while until the DTS decoder of the
machine recognizes the DTS encoded signal and starts
operating. This is not a malfunction.
If you play in fast reverse or fast forward, pause, or skip a
chapter or track, while playing a DTS Surround source, noise
may be heard. This is not a malfunction.
Even when playback of the DTS Surround source stops and
the DTS signal transmission ends, the machine remains in
DTS mode and the DTS indicator remains lit. This is to prevent
noise when you pause, fast forward, fast reverse, or skip a
chapter or track of the playback source. Therefore, if the source
switches from the DTS signal to a 2CH DOWN MIX(2 channel
digital stereo) signal immediately, the 2CH DOWN MIX signal
may not be played.
Some CD players (if connected to the machine) and video
disc players may be unable to play DTS Surround sources
correctly even if you connect the player to the machine digitally.
In such a case, the digital signals (such as the output level,
sampling frequency, frequency response, etc.) processed by
the player cannot be recognized as DTS data by the machine
and you may hear noise instead of the proper sound.
While playing back sources other than DOLBY DIGITAL and
DTS Surround sounds, you can select the desired DSP
mode.
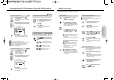
Press SURROUND MODE on the remote controller or the
machine repeatedly until the desired DSP mode appears in
the machine's display.
The DSP indicator lights up when one of the DSP modes is
selected.
Each press of the button changes the DSP mode as follows:
STEREO
DOLBY PRO LOGIC THEATER HALL
STADIUM STEREO
The machine automatically detects the sound system when
DOLBY DIGITAL Surround, DTS Surround is played back.
The sound system appears in the machine’s display.
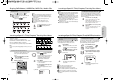
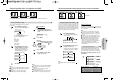
Press SUR. MODE on the remote controller
or the machine repeatedly until the desired
DSP mode appears in the machine's
display.
The DSP indicator lights up when one of the
DSP modes is selected.
Each press of the button changes the DSP
mode as follows:
STEREO
DOLBY PRO THEATER
HALL STADIUM STEREO
Lights up when DTS Surround sound is reproduced.
Lights up when DOLBY DIGITAL Surround sound is
reproduced.
Lights up when DOLBY Pro Logic Surround sound is
reproduced.
Lights up when DSP Surround sound is reproduced.
DSP(Digital Signal Processor)
Advanced DVD/Audio CD
Operation
26
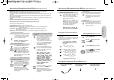
Press VOLUME or turn VOLUME.
The volume level increases or decreases.
Various Functions Common to all the Sources
Adjusting the Volume
Adjusting the Tone
Press SLEEP on the remote controller.
“SLEEP 10” and SLEEP indicator appears in
the machine’s display, which means the
machine will turn off and enter standby mode
in 10 minutes.
Each press of the button makes the
remaining time shorter by 10, 20, 30, 60, 90
minutes and OFF.
When Sleep Timer is on, System's display
dimmered.
To cancel the Sleep Timer
Press SLEEP repeatedly until the SLEEP
indicator is disappeared.
Dimming the System's Display
Press DIMMER repeatedly on the remote
controller.
Original Brightness Dimmer Display
OFF
To resume the original brightness, press the
button repeatedly.
Listening Through Headphones
Notes :
The speakers will not reproduce sound while headphones are
connected.
Sound will automatically be switched to stereo after
connecting the headphones to the PHONES jack.
Using the Sleep Timer
Press MUTE.
The stand-by indicator is blinking in the
machine display.
To restore the sound, press MUTE, Volume
or CH-LEVEL.
Muting the Sound
The volume of the front left and right, center, surround left
and right, and subwoofer speakers will be adjusted at the
same time.
When headphones are connected, you can adjust the
volume of the sound
Connect the plug of the stereo headphones to the
PHONES jack on the machine.
Notes :
Stereo, Surround volume level will be adjusting with separately.
To avoid damage to the speakers, do not keep operating the
volume with distorted strong sound.
Adjust the volume to the optimum listening level.
Press “TONE”.
Press
until “TONE ON” appears in the
machine’s display.
Press “TONE” repeatedly until “BASS” or
“TREBLE” appears in the machine’s
display.
Press
to adjust “BASS” or “TREBLE”
level between -10 and +10.
Notes
To cancel TONE adjustments, press TONE and until
“TONE OFF” appears in the machine’s display.
During the DVD playback, cannot adjust TONE control.