
Service manual

73
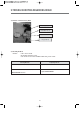
11. ATTENTION POINT WITH SERVICING
No Item Part Name Checking Point
1 Replacing Thermistor Thermistor Dry Keep the Packing from seperating (Hold Packing when replacing)
Dry Keep the Packing from folding
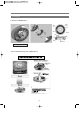
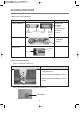
2 Replacing Duct B As DUCT B AS & Check the sealing between Duct Pipe & Duct B AS
& Duct Pipe DUCT PIPE
3 Replacing & Inlet Valve Use only screw M4*8 for fixing Inlet Valve
Repairing Inlet Valve
4 Replacing Hose Drain Hose Drain Keep the sealing condition of Tub O tightly
5 Replacing HOSE HOSE A,B,C Check the assembling order between INLET BOX & Hose A,C :
A,B,C Pre Wash-Cold
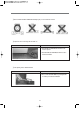
6 Replacing Heater Wash Unfastening the nut for fixing earth first then unfasten
Heater Wash the nut for fixing heater
At assembling the heater dry, check if the assembling condition between
fixture heater is tight.(little gap on left & right)
At fastening the nut for fixing the heater wash, keep the protrusion length
of bolt to 10~12mm.
(if under 10mm, water can leak, and if over 12mm, fixture heater can
deform)
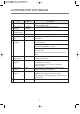
7 Replacing Thermistor Wash Unfasten the Nut for fixing heater, replace the thermistor, and
“Thermistor Wash” fasten the nut for fixing heater
8 Assembling Hinge Door
At fastening screw for fixing Door AS, be careful so that scratching at
“Hinge Door” the related parts does not happen
: If the scratching happens, it is possible to be claimed about
appearance damage
9 (Dis)assembling Door As Be careful about the up/down direction of Door Glass : Keep the
“Door AS” indication point of the part code downward.
10 (Dis)assembling MOTOR AS To avoid the injury on the hand, grip the rim of the rotor
“Motor AS” At initiating the assembling operation of the stator, grip the
stator and fasten the screw; at unfastening the screw, grip the stator so
that it does not fall.
11 Damper AS Damper AS Fixed 4 Dampers with spring when assemble.