
Owner`s manual

17
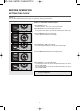
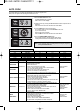
Auto Cook Menu Start Temp. Method Cookware
Glass Turntable +
Metal rack
Glass Turntable +
Metal rack
Micro and heat proof
shallow dish.
(e.g Pyrex.)
Glass Turntable +
Metal rack
Microproof dish.
(e.g Pyrex.)
Glass Turntable
ROAST PORK
ROAST BEEF
ROAST CHICKEN
BAKED FISH
FRESH
VEGETABLES
Chilled temp.
Chilled temp.
Chilled temp.
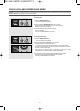
1. Tie the joint into a neat shape.
2. Place the meat on the dish.
3. Brush with a little oil.
4. Place roasts fat-side down on the dish.
5. Cook on "AUTO COOK-ROAST PORK or ROAST BEEF".
6. Turn over when hearing the beep.
7. Remove from oven. Drain off any excess juices.
8. Stand for 10 minutes in foil before serving.
1. Wash and dry chicken. Tie the legs loosely together with string.
2. Pierce the skin a couple of times just under the legs.
3. Brush butter mixture all over the chicken on the dish.
4. Place roasts breast-side down on the dish.
5. Cook on "AUTO COOK-ROAST CHICKEN".
6. Turn over when hearing the beep.
7. Remove from oven. Drain off any excess juices. Season with salt if
required. Stand for 10 minutes in foil before serving.
1. All types of fresh fish(except battered or breadcrumbed fish) can
be cooked whether whole, fillets or steaks.
2. Place the prepared fish in a buttered dish.
3. Season with salt and pepper, sprinkle with lemon juice and dot
with butter. Do not cover dish.
4. Place on dish on the metal rack on the turntable.
5. Cook on "AUTO COOK- BAKED FISH".
1. Wash and trim.
2. Place prepared vegetables into a suitable sized container.
3. Sprinkle with 4-5 tbs. of water.
4. Cover with pierced cling film or a lid.
5. Place on dish on the turntable.
6. Cook on "AUTO COOK- FRESH VEGETABLES.
* For best results cut vegetables into similar sized pieces.
This function allows you to simply and automatically cook a range of popular foods.
Always use oven gloves when touching the utensils in the oven.
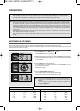
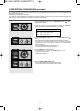
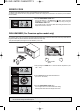
AUTO COOK
1. Press the Auto Cook button once.
The Auto Cook indicator ( ) lights.
“AC-1” will show in the display.
2. Select the menu by pressing the Auto Cook button until the required menu is
displayed.
Refer to the auto cook menu chart below for further details.
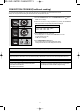
3. Turn the dial knob to set the cooking weight.
For a cooking weight of 2.0 lb, turn the dial knob to set 2.0 lb.
(up to 4.0 lb can be set)
“2.0” and ( ) shows in display.
Refer to the auto cook menu chart below for further details.
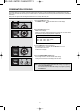
4. Press the START/SPEEDY COOK button.
The oven light comes on and the turntable starts rotating.
Cooking starts and the time in the display will count down.
Auto Cook Menu Chart
Press auto cook key
Once
Twice
3 times
4 times
5 times
Auto Cook Menu
roast pork
ROAST BEEF
roast chicKen
baked fish
FRESH VEGETABLE
Minimum Weight
1.0 lb
1.0 lb
1.6 lb
0.6 lb
0.2 lb
Maximum Weight
4.0 lb
4.0 lb
4.0 lb
2.0 lb
2.0 lb
Weight Step
0.2 lb
0.2 lb
0.2 lb
0.2 lb
0.1 lb
Note : You can check the current cook setting while the cooking is in progress by
pressing the Auto Cook button.
1. Rost pork
2. Roast beef
3. Roast chicken
4
.
Roast fish4. Roast fish
5. Fresh vegetable
5. Fresh vegetable
Auto cook
Auto cook
Defrost
Defrost
M/W
M/W
Grill
Grill
Combi
Convection
Clock
Steam Cleaning
Warm
STOP/clear
START/speedy cook
1. Rost pork
2. Roast beef
3. Roast chicken
4. Roast fish
5. Fresh vegetable
Auto cook Defrost
T
i
m
e
/
W
e
i
g
h
t
Q
u
a
n
t
i
t
y
M/W
Grill
CombiCombi
Convection
Convection
Clock
Clock
Steam Cleaning
Warm
STOP/clear
START/speedy cook
1. Rost pork
2. Roast beef
3. Roast chicken
4. Roast fish
5. Fresh vegetable
Auto cook Defrost
M/W
Grill
Combi
Convection
Clock
Steam Cleaning
Steam Cleaning
Warm
Warm
STOP/clear
STOP/clear
START/speedy cook
START/speedy cook