MICROWAVE OVEN KOR-3000DSL OPERATING INSTRUCTIONS Helpline number: 0870 100 2525 Before operating this oven, please read these instructions completely.
PRECAUTIONS TO AVOID POSSIBLE EXPOSURE TO EXCESSIVE MICROWAVE ENERGY (a) Do not attempt to operate this oven with the door open since open-door operation can result in harmful exposure to microwave energy. It is important not to defeat or tamper with the safety interlocks. (b) Do not place any object between the oven front face and the door or allow soil or cleaner residue to accumulate on sealing surfaces.
IMPORTANT SAFETY INSTRUCTIONS READ CAREFULLY AND KEEP FOR FUTURE REFERENCE. WARNING : To prevent fire, burns, electric shock and other warnings: Listed below are, as with all appliances, certain rules to follow and safeguards to assure high performance from this oven: 11. Do not use the oven for any reason other than food preparation, such as for drying clothes, paper, or any other nonfood items or for sterilizing purposes. Also, the cooking tray can become too hot to handle or may break. 11.
EARTHING INSTRUCTIONS This appliance must be earthed. In the event of an electrical short circuit, earthing reduces the risk of electric shock by providing an escape wire for the electric current. This appliance is equipped with a cord having a earthing wire with a earthing plug. The plug must be plugged into an outlet that is properly installed and earthed. WARNING : Improper use of the earthing plug can result in a risk of electric shock.
SPECIFICATIONS POWER SUPPLY MICROWAVE 230V~ / 50Hz, SINGLE PHASE WITH EARTHING POWER CONSUMPTION 1200 W OUTPUT POWER 800 W FREQUENCY 2450 MHz OUTSIDE DIMENSIONS (W X H X D) 465 X 279 X 360 mm CAVITY DIMENSIONS (W X H X D) 290 X 220 X 306 mm NET WEIGHT APPROX. 13KG TIMER 59 min. 00sec. POWER LEVELS 5 LEVELS * Specifications are subject to change without notice.
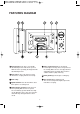
FEATURES DIAGRAM 1 Door latch-When the door is closed it will automatically shut off. If the door is opened while the oven is operating, the magnetron will automatically shut off. 6 Glass cooking tray-Made of special heat resistant glass. The tray can be easily removed for cleaning. Make sure it is correctly positioned (indentation) before operating. Place food in a suitable container (dish) on the tray. 2 Door seal-The door seal surfaces prevent microwaves escaping from the oven cavity.
FEATURES DIAGRAM ( continued ) 0 M/W DEF. LOCK POWER CLOCK g DEFROST q e w AUTO COOK 1. Dinner Plate 2. Soup 3. Beverage 4. Fresh Vegetable r Time/Weight Quantity t STOP/CLEAR START/EASY COOK u y 0 DISPLAY- Cooking time, power level, indicators and present time are displayed. r AUTO COOK- Used to cook using a program or to reheat. q POWER- Used to set power level. t DIAL KNOB- Used to set the time and weight. w CLOCK- Used to set clock.
OPERATION PROCEDURE This section includes useful information about oven operation. 1. Plug power supply cord into a 230V 50Hz power outlet. 2. After placing the food in a suitable container, open the oven door and put it on the glass tray. The glass tray and roller guide must always be in place during cooking. 3. Shut the door. Make sure that it is firmly closed. oven light is on only when the microwave 1 The oven is operating.
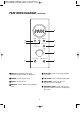
CONTROLS SETTING THE CLOCK When the oven is first plugged in, the display will flash “ :0” and a tone will sound. If the AC power ever turns off, the display shows “ :0” when the power comes back on. CLOCK 1. Press CLOCK button. This is a 12 hour clock system. 2. Press CLOCK button once more. This is a 24 hour clock system. NOTE : This oven has multiple clock systems. If you want 12 hour clock system, omit this step. 3. Turn the DIAL KNOB to adjust hour.
TIME DEFROSTING When TIME DEFROST is selected, the automatic cycle divides the defrosting time into periods of alternating defrost and stand times by cycling on and off. 1. Press DEFROST button. The DEF. indicator & “0” appear and the g indicator starts blinking. 2. Press DEFROST button once more. The g indicator disappears and “:0” is displayed. 3. Turn the DIAL KNOB to adjust the defrosting time. The display will show what you selected.
COOKING IN ONE STAGE POWER 1. Press POWER button. (Select the desired power level.) The M/W indicator appears and the display will show what you selected. NOTE: If step 1 is omitted, the oven will cook at full power. 2. Turn the DIAL KNOB to adjust the cooking time. The display will show what you selected. NOTE: Your oven can be programmed for 59 minutes 00 seconds.(59:00) 3. Press START button. START When you press START pad, the M/W indicator starts blinking to show the oven is cooking.
EASY COOKING EASY COOK allows you to reheat for 30 seconds at 100% (full power) by simply pressing the Easy cook button. By repeatedly pressing the EASY COOK button, you can also extend reheating time to 5 minutes by 30 seconds. EASY COOK 1. Press EASY COOK button. When you press EASY COOK button, ":30" appears. After 1.5 seconds, the oven starts reheating. When the cooking time ends, you will hear 3 beeps.
CHILD SAFETY LOCK The safety lock prevents unwanted oven operation such as by small children. To set, press and hold STOP/CLEAR button for 3 seconds, LOCK indicator appears and a beep sounds. To cancel, press and hold STOP/CLEAR button for 3 seconds, LOCK indicator disappears and a beep sounds. TO STOP THE OVEN WHILE THE OVEN IS OPERATING 1. Press STOP/CLEAR button. • You can restart the oven by pressing START button. • Press STOP/CLEAR button once more to erase all instructions.
COOKING UTENSILS Utensils should be checked to ensure that they are suitable for use in microwave ovens. Microwave energy is produced by high frequency radio waves. They are reflected from metal, but will pass through most cooking utensils without heating them. As the waves come into contact with the food, they are converted into heat energy. Listed below are the suggested cooking utensils for this microwave oven and when to use them. 1. Dishes with metal trim of any type-should not be used.
DEFROSTING FROZEN FOODS CHART Item and Weight Defrosting Time Standing Time BEEF Mineed beef 454g (1 lb.) 10-12 min. 5-7 min. Break apart and remove thawed portions with fork. Stew Meat 681 (11/2 lbs.) 9-11 min. 5-7 min. Separate and rearrange once. Loin Roast 907g (2 lbs.) 15-18 min. 7-10 min. Turn over after half the time. Shield as needed. 7-8 min. 5-7 min. Turn over after half the time. PORK Loin Roast 907g (2 lbs.) 15-16 min. 7-10 min. Turn over after half the time.
COOKING CHART MEAT ITEM POWER LEVEL COOKING TIMER PER 500g Beef Standing/rolled Rib - Rare P-80 9-11 min. - Medium P-80 10-12 min. - well done P-80 12-14 min. Ground Beef(to brown for casserole) P-HI 5-7 min. Hamburgers, Fresh or defrosted (4 oz. Each) 2 patties P-HI 3-5 min. 4 patties P-HI 4-6 min. Pork Loin, Leg P-80 13-16 min. Bacon 4 slices P-HI 2-3 min. 6 slices P-HI 3-4 min. NOTE: The above times should be regarded only as a guide. Allow for difference in individual tastes and preferences.
VEGETABLE ITEM asparagus, fresh asparagus, frozen broccoli, fresh broccoli, frozen brussels sprouts, fresh brussels sprouts, frozen carrots, fresh carrots, frozen cauliflower, frozen celery, fresh corn, fresh POWER LEVEL PREPARATION QUANTITY COOKING TIME STANDING TIME P-HI 11/2-in.pieces 500g(1 lb.) 7-9 min. 3 min. P-HI Whole spears 280g(10 oz. pkg) 7-9 min. 3 min. P-HI Spears 500g(1 lb.) 7-9 min. P-HI Whole or cut 280g(10 oz. pkg) 7-9 min. 3 min. P-HI Whole 280g(10 oz. tub) 7-9 min. P-HI Whole 280g(10 oz.
ITEM Fried chicken Fried fresh fillets Pizzas (sliced) Pouch dinners Bagels Danish Dinner rolls Hard rolls Frozen Juice Concentrates Non-Dairy creamer Pancake Frozen vegetables QUANTITY POWER LEVEL COOKING TIME SPECIAL INSTRUCTION 2 pieces P-HI 3-5 min. Arrange, on paper tower lined 4 pieces P-HI 4-6 min. paper plate, covered with paper 6 pieces P-HI 5-7 min. tower. 2 fillets P-HI 3-4 min. 4 fillets P-HI 4-6 min. 1 P-HI 2-4 min. Arrange on microwave oven 2 P-HI 3-5 min. roasting rack. 4 P-HI 5-7 min.
BEFORE YOU CALL FOR SERVICE Refer to the following checklist, you may prevent an unnecessary service call. * The oven doesn't work; 1. Check that the power cord is securely plugged in. 2. Check that the door is firmly closed. 3. Check that the cooking time is set. 4. Check for a blown circuit fuse or tripped main circuit breaker in your house. * Sparking in the cavity; 1. Check utensils. Metal containers or dishes with metal trim should not be used. 2.
QUESTIONS AND ANSWERS ( continued ) * Q : Why this standing time recommended after the cooking operation has been completed? * A : Standing time is very important. With microwave cooking, the heat is in the food, not in the oven. Many foods build up enough internal heat to allow the cooking process to continue, even after the food is removed from the oven. Standing time for joints of meat, large vegetables and cakes is to allow the inside to cook completely, without overcooking the outside.
DISPOSAL OF USED ELECTRICAL & ELECTRONIC EQUIPMENT The meaning of the symbol on the product, its accessory or packaging indicates that this product shall not be treated as household waste. Please, dispose of this equipment at your applicable collection point for the recycling of electrical & electronic equipments waste. In the European Union and Other European countries which there are separate collection systems for used electrical and electronic product.
DAEWOO ELECTRONICS SALES UK LIMITED YOUR PRODUCT GUARANTEE Dear Customer, Thank you for buying this Daewoo product. In the unlikely event of a failure all repair work will be carried out by your retailer or Daewoo approved service centre, for a period of 12 months from date of sale. Daewoo Electronics Sales UK Ltd., will provide the following services in order to expedite this guarantee.
ABOUT THIS MANUAL ef3f,1!m-:9ife:`!f1m\ no pqr stu /v^ wxyz I{ " # $%& '()* +,-./01-2304 567 <=>:- 8:3=? @ <=>:-)* +,-.0CCC83D A 89:;,, BA EF 4F G H 0F IF 2F J K O P M L N Q:Q,!RST!UV44WXYZ[ C/\CI\CI.]^SH.U_OEW[ C/\CI\C/.E`E0WSH.U_O4W[ Ca\CI\4I.]^SH.U_OEW[ bcd ef3f,1 " # g ^ h i:DT a0C.C//C!j9kT a0C.