ABOUT THIS MANUAL VISION CREATIVE, INC. 서울 종로구 통의동 6번지 이룸빌딩 4층 담 당 김선녀 님 브 랜 드 DAEWOO F. MODEL KOR-6L8K5S83 B. MODEL KOR-6A0R BUYER DESUK 언 어 영어 COUNTRY 인 MEMO 쇄 총 29p 11.12.12-표지, 2p, 6p, 8p, 9p, 10p, 11p, 12p, 13p, 14p, 15p, 16p_ 신규 12p 11.12.13-2p, 20p 수정_ 신규 2p 11.12.23-2p, 6p 수정_ 신규 2p 12.01.
MICROWAVE OVEN KOR-6A0R OPERATING INSTRUCTIONS & COOK BOOK Customer Helpline number: 0844 887 2525 Before operating this oven, please read these instructions completely.
PRECAUTIONS TO AVOID POSSIBLE EXPOSURE TO EXCESSIVE MICROWAVE ENERGY (a) Do not attempt to operate this oven with the door open since open-door operation can result in harmful exposure to microwave energy. It is important not to defeat or tamper with the safety interlocks. (b) Do not place any object between the oven front face and the door or allow soil or cleaner residue to accumulate on sealing surfaces.
TABLE OF CONTENTS • PRECAUTIONS TO AVOID POSSIBLE EXPOSURE TO EXCESSIVE MICROWAVE ENERGY1 • IMPORTANT SAFETY INSTRUCTIONS .....................................................................................3 • EARTHING INSTRUCTIONS .......................................................................................................5 • INSTALLATION ............................................................................................................................5 • FIRST SET UP ..................
IMPORTANT SAFETY INSTRUCTIONS READ CAREFULLY AND KEEP FOR FUTURE REFERENCE WARNING : To prevent fire, burns, electric shock and other warnings: Listed below are, as with all appliances, certain rules to follow and safeguards to assure high performance from this oven: packaged and recommended especially for microwave ovens. Microwave popped corn produces a lower yield than conventional popping; there will be a number of unpopped kernels. Do not use oil unless specified by the manufacturer. 9.
13. The contents of feeding bottles and baby food jars shall be stirred or shaken and the temperature checked before consumption, in order to avoid burns. 14. Always test the temperature of food or drink which has been heated in a microwave oven before you give it to somebody, especially to children or elderly people. This is important because things which have been heated in a microwave oven carry on getting hotter even though the microwave oven cooking has stopped. 15.
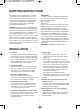
EARTHING INSTRUCTIONS This appliance must be earthed. In the event of an electrical short circuit, earthing reduces the risk of electric shock by providing an escape wire for the electric current. This appliance is equipped with a cord having a earthing wire with a earthing plug. The plug must be plugged into an outlet that is properly installed and earthed. IMPORTANT The wires in this mains lead fitted to this appliance are colored in accordance with the following code.
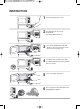
INSTRUCTION money money money money money money 6 1 Connect the plug into the socket. 2 Zero Standby mode is selected automatically. (The display will be turned off.) 3 • Press and hold ECO button until LED display is turned on and a beep sounds. • The oven is now ready for use. 4 Ten minutes after cooking is finished the oven willautomatically go into Zero Standby and use no power. 5 To use oven again repeat step 3. 6 Save energy and money without the hassle ofunplugging the appliance.
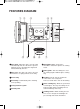
FEATURES DIAGRAM 1 2 3 4 5 6 q 9 0 8 1 Door latch - When the door is closed, it will automatically shut off. If the door is opened while the oven is operating, the magnetron will automatically shut off. 7 7 Waveguide cover - Protects the microwave outlet from splashes of cooking foods. 8 Roller guide - This must always be used for cooking together with the glass cooking tray. 2 Door seal - The door seal surfaces prevent microwaves escaping from the oven cavity.
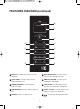
FEATURES DIAGRAM (continued) 0 1 2 4 3 5 6 6 6 7 8 9 1 DISPLAY - Cooking time, power level are displayed. 6 ONE TOUCH COOK - Used to cook or reheat specific quantities of food. 2 AUTO COOK - Used to cook or reheat many of favorite food. 7 TIME SET BUTTON - Used to set the cooking time and weight. 3 WEIGHT DEFROST - Used to defrost foods for weight. 8 STOP/CLEAR - Used to stop the oven operation or to delete the cooking data. 4 TIME DEFROST - Used to defrost foods for time.
OPERATION PROCEDURE This section includes useful information about oven operation. power supply cord into 230V AC 50Hz 1 Plug power outlet. will be returned to the " : 0 " when the 8 Display cooking time ends. eco button until beep sounds and 2 Press display is turned on. the STOP/CLEAR button is pushed 9 When during the oven operation, the oven stops 3 cooking and all information retained. To erase all information, push the STOP/CLEAR button once more.
CONTROLS TURNING AC POWER ON & OFF THE OVEN When the oven is first plugged in , the display will show nothing. 1. Press and hold Eco button until display is turned on and beep sounds. The oven is turned AC power on. 2. Press and hold STOP/CLEAR button until display is turned off. The oven is turned off and will use no power. NOTE: If the mains power goes off the display disappears until the power comes back on and the Eco button is pressed and held until a beep sounds.
WEIGHT DEFROSTING When WEIGHT DEFROST is selected, the automatic cycle divides the defrosting time into periods of alternating defrost and stand times by cycling on and off. 1. Push the WEIGHT DEFROST button. 2. Push the TIME SET buttons for inputing the desired weights. The display will show you " 0" . The display will show you what you selected. NOTE: Your oven can be programmed for 200g~3000g in Weight defrosting mode. 3. Push the START button.
COOKING IN ONE STAGE 1. Push the POWER button. (Select the desired power level.) The display will show what you selected 2. Push the TIME SET buttons for the cooking time. The display will show what you selected NOTE: If step 1 is omitted, the oven will cook at full power. 3. Push the START button. NOTE: Your oven can be programmed for 59 minutes 90 seconds. (59 : 90) Using lower power levels increases the cooking time which is recommended for foods such as cheese, milk and slow cooking of meats.
COOKING IN TWO STAGE All recipes require frozen foods to be defrosted fully before cooking. This oven can be programmed to automatically defrost food before cooking. 1. Push the WEIGHT DEFROST button. 2. Push the TIME SET buttons for the defrosting weight you want. X6 3. Push the POWER button. (Select desired power level.) 4. Push the TIME SET buttons for desired cooking time. The display will show what you selected “P-HI” is displayed. The display will show what you selected.
+30 sec +30 sec allows you to reheat for 30 seconds at 100% (full power) by simply pushing the +30 sec button. By repeatedly pushing the +30 sec button, you can also extend reheating time to 5 minutes by 30 second increments. 1. Push the +30 sec button. When you push the +30 sec button, “:30” is displayed, and the oven starts reheating ONE TOUCH COOKING One touch cooking allows you to cook or reheat many of your favorite foods by pushing just one button.
1. Push the PASTA button once for 1 serving of pasta or twice for 2 servings of pasta When you push the PASTA once, “1” is displayed. After 1.5 seconds, the display is changed into cooking time and the oven starts cooking. * PASTA * • 1 serving: Push the PASTA button once. • 2 serving: Push the PASTA button twice within 1.5 seconds. AUTO COOK AUTO COOK allows you to cook or reheat many of your favorite foods by repeatedly pushing the AUTO COOK button.
HOW TO STOP THE OVEN WHILE THE OVEN IS OPERATING 1. Push the STOP/CLEAR button. • You can restart the oven by pushing the START button. • Push the STOP/CLEAR once more to erase all instructions. • You must enter in new instructions. 2. Open the door. • You can restart the oven by closing the door and pushing the START button. NOTE: Oven stops operating when door is opened. TO SET STANDBY POWER "0" MODE 1. Push the STOP/CLEAR button. “ :0” appears in the display. 2.
CARE OF YOUR MICROWAVE OVEN The oven should be cleaned regularly and any food deposits removed. Failure to maintain the oven in a clean condition could lead to deterioration of the surface that could adversely affect the life of the appliance and possibly result in a hazardous situation. 1 Turn the oven off before cleaning. the inside of the oven clean. When food 2 Keep spatters or spilled liquids adhere to oven walls, necessary to remove the glass 6 Ittrayis occasionally for cleaning.
QUESTIONS AND ANSWERS * Q : I accidentally ran my microwave oven without any food in it. Is it damaged? * A : Running the oven empty for a short time will not damage the oven. However, it is not recommended. * Q : What does “standing time” mean? * A : “Standing time” means that food should be removed from the oven and covered for additional time to allow it to finish cooking. This frees the oven for other cooking. * Q : Can the oven be used with the glass tray or roller guide removed? * A : No.
BEFORE YOU CALL FOR SERVICE Refer to following checklist, you may prevent an unnecessary service call. * Sparking in the cavity; 1. Check utensils. Metal containers or dishes with metal trim should not be used. 2. Check that metal skewers or foil does not push the interior walls. * The oven doesn’t work : 1. Check that the power cord is securely plugged in and the oven is Zero Standby mode. Press 'Eco' button to ~ Zero Standby mode. 2. Check that the door is firmly closed. 3.
SPECIFICATIONS 230V AC, 50Hz SINGLE PHASE WITH EARTHING POWER SUPPLY KOR-6L8K3 : 1000W INPUT POWER MICROWAVE KOR-6A0R : 1200W KOR-6L8K3 : 700W ENERGY OUTPUT KOR-6A0R : 800W FREQUENCY 2,450 MHz OUTSIDE DIMENSIONS (W x H x D) 446 x 270 x 330 mm CAVITY DIMENSIONS (W x H x D) 295 x 219 x 303 mm CAVITY VOLUME 20 L KOR-6L8K3 : APPROX. 10.3 Kg NET WEIGHT KOR-6A0R : APPROX. 10.3Kg TIMER 59 min. 90 sec. POWER SELECTIONS 10 Levels * Specifications are subject to change without notice.
COOKING INSTRUCTIONS Utensil Guide Only use utensils that are suitable for use in microwave ovens. To cook food in the microwave oven, the microwaves must be able to penetrate the food, without being reflected or absorbed by the dish used. Care must therefore be taken choosing the utensil. If the utensil is marked microwave-safe, you do not need to worry. The following table lists various of utensil and indicates whether and how they should be used in a microwave oven.
USE YOUR MICROWAVE OVEN SAFELY General Use Do not attempt to defeat or tamper with safety interlocks. Do not place any object between the oven front frame and the door or allow residue to build up on sealing surfaces. Wipe with a mild detergent, rinse and dry. Never use abrasive powders or buttons. Do not subject the oven door to strain or weight such as a child hanging on an open door. This could cause the oven to fall forward resulting in injury to you and damage to the oven.
MICROWAVING PRINCIPLES Microwave energy has been used in this country to cook and reheat food since early experiments with RADAR in World War ll. Microwaves are present in the atmosphere all the time, both naturally and manmade sources. Manmade sources include radar, radio, television, telecommunication links and car phones.
COOKING TECHNIQUES STANDING TIME STARTING TEMPERATURE Dense foods e.g. meat, baked potatoes and cakes, require standing time(inside or outside of the oven) after cooking, to allow heat to finish conducting to cook the center completely. Wrap meat joints and baked potatoes in aluminium foil while standing. Meat joints need approx. 10-15 minutes, baked potatoes 5 minutes. Other foods such as plated meal, vegetables, fish etc require 2-5 minutes standing.
DEFROSTING GUIDE ▶ Do not defrost covered meat. Covering might allow cooking to take place. Always remove outer wrap and tray. Use only containers that are microwave-safe. ▶ Begin defrosting whole poultry breast-side-down. Begin defrosting roasts fat-side-down. ▶ The shape of the package alters the defrosting time. Shallow rectangular shapes defrost more quickly than a deep block. ▶ After 1/3 of the defrost time has elapsed, check the food.
COOKING & REHEATING CHART Cooking chart Power Level Cooking Time Per lb./450g 700W 800W P-80 8-10 min. -Medium P-80 9-11 min. -well done Item Special Instruction MEAT Beef joint -Rare P-80 11-13 min. Pork Joint P-HI 12-14 min. Bacon joint P-HI 8-10 min. Whole chicken P-HI 6-8 min. Portions chicken P-80 5-7 min. Breast (boned) P-80 6-8 min. Fish Fillets P-HI 4-6 min. Whole Mackerel, P-HI 4-6 min. P-HI 5-7 min. P-HI 4-6 min.
Reheating chart • Baby food particularly needs to be checked carefully before serving to prevent burns. • When heating pre-packaged ready-cooked foods, always follow the pack instructions carefully. • If you freeze foods which were bought from the fresh or chilled counters, remember that they should be thoroughly thawed before following the heating instructions on the packed. It’s worth putting a note on them so that other members of the household will remember too.
VEGETABLE CHART Use a suitable glass pyrex bowl with lid. Add 30-45ml cold water(2-3 tbsp.) for every 250g unless another water quantity is recommended - see table. Cook covered for the minimum time - see table. Continue cooking to get the result you prefer. Stir once during and once after cooking. Add salt, herbs or butter after cooking. Cover during a standing time of 3 minutes. Hint : cut the fresh vegetables into even sized pieces. The smaller they are cut, the quicker they will cook.