DC-G8GD2P-JL (DESUK) 2008.3.18 10:41 AM ˘ ` a INSTRUCTION MANUAL DVD PLAYER + VIDEO CASSETTE RECORDER SG-9211P HELP LINE ; 0800 408 9102 Please read this manual carefully before connecting your DVD+VCR and operating it for the first time. Keep the manual in a safe place for future reference. Downloaded From DvDPlayer-Manual.
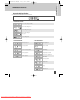
DC-G8GD2P-JL (DESUK) 2008.3.18 10:40 AM ˘ ` b Contents Product Information DVD Operation Important Safeguards ............................................... 1 Advantages of This Product Are .... .......................... 4 Read Carefully before Using ...................................... 5 Identification of Controls .......................................... 6 Remote Control ....................................................... 10 Playing a desired scene ...........................................
DC-G8GD2P-JL (DESUK) 2008.3.18 10:40 AM ˘ ` 1 Product information Important Safeguards CAUTION RISK OF ELECTRIC SHOCK DO NOT OPEN CAUTION: TO REDUCE THE RISK OF ELECTRIC SHOCK, DO NOT REMOVE COVER (OR BACK). NO USERSERVICEABLE PARTS INSIDE. REFER SERVICING TO QUALIFIED SERVICE PERSONNEL.
DC-G8GD2P-JL (DESUK) 2008.3.18 10:40 AM ˘ ` 2 Important Safeguards This set has been designed and manufactured to assure personal safety. Improper use can result in electric shock or fire hazard. The safeguards incorporated in this unit will protect you if you observe the following procedures for installation, use and servicing. This unit is fully transistorised and does not contain any parts that can be repaired by the user.
DC-G8GD2P-JL (DESUK) 2008.3.18 10:40 AM ˘ ` 3 or when the unit is left unattended and unused for long periods of time, unplug it from the wall outlet and disconnect the antenna or cable system. This will prevent damage to the unit due to lightning and power line surges. 13 DISC TRAY Keep your fingers well clear of the disc tray as it is closing. E. If the unit has been dropped or the cabinet has been damaged.
DC-G8GD2P-JL (DESUK) 2008.3.18 10:40 AM ˘ ` 4 Advantages of This Product Are ...
DC-G8GD2P-JL (DESUK) 2008.3.18 10:40 AM ˘ ` 5 Product information Read Carefully before Using Cautions in use of DVD-Video player are described below. Please read carefully before using a DVD-Video player. ✔ Installation place and handling • When you place this player near other devices, they may interact poorly together. • When you place DVD-Video player above or below a TV, it may cause flickering of pictures or failure (tape is not ejected).
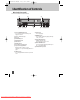
DC-G8GD2P-JL (DESUK) 2008.3.18 10:40 AM ˘ ` 6 Identification of Controls Main body (front panel) ! @ $ % ^&* # ( ! Power (STANDBY/ON) button Use to power the device on/off if AC power supply is connected. @ Place to insert videotape # Disc tray $ VIDEO INPUT jack % AUDIO INPUT jacks ^ EJECT button & RECORD button * Programme Down/Up button ( Operation Display Window Display operation of device. For more information, see “Operation Display Window” on page 7.
DC-G8GD2P-JL (DESUK) 2008.3.
DC-G8GD2P-JL (DESUK) 2008.3.18 10:40 AM ˘ ` 8 Identification of Controls Main body (Rear Panel) @ ! * ! Power Cord It is a jack for supplying power to the unit. Connect to outlet in a wall.
DC-G8GD2P-JL (DESUK) 2008.3.18 10:40 AM ˘ ` 9 Product information Identification of Controls Instructions in using REMOTE • Operate remote control within 7m from the unit. • Do not press 2(two) buttons at the same time. • Excessive sun light falling on the remote receiver may cause the remote control to become inoperative. • Do not keep in the place with much dust and humidity.
DC-G8GD2P-JL (DESUK) 2008.3.
DC-G8GD2P-JL (DESUK) 2008.3.18 10:40 AM ˘ ` 11 Setting up your player To enable you to set up your new DVDP+VCR, it must be connected it to your TV using either a SCART cable or a COMPOSITE and associated AUDIO cable. ■ Before you start, unplug all the equipment from the mains supply. Installation Now connect the supplied RF cable to your player and TV as shown below. Then use either option 1 or 2.
DC-G8GD2P-JL (DESUK) 2008.3.18 10:40 AM ˘ ` 12 Setting up your player (Option 2) - Connecting your player using a composite cable and associated stereo audio cables. (not supplied) Television Yellow 200-240V~, 50/60 Hz Red White Yellow Aerial If you use this method to connect your player to the TV, then you will have to select the relevant AV input on your TV to watch the playback from the VCR or DVD.
DC-G8GD2P-JL (DESUK) 2008.3.18 10:40 AM ˘ ` 13 Connecting your player to the Hi-Fi system ■ Before you start, unplug all the equipment from the mains supply. Option 1 Installation Television Aerial Hi-Fi Plug a phono cable into the “Audio L/R” sockets on the back panel and into the audio sockets on any audio amplifier, if needed. If your amplifier does not have this connection, see page 15.
DC-G8GD2P-JL (DESUK) 2008.3.18 10:40 AM ˘ ` 14 How to connect your player to another player ■ Before you start, unplug all the equipment from the mains supply. How to connect 1) Insert the tape you wish to record on into the first player and press [INPUT] until “AV1” appears on the front display. 2) Insert the tape you wish to copy from into the second player. Press the [PLAY] button on the second player. 3) Press the [RECORD] button on the first player. The player will start recording.
DC-G8GD2P-JL (DESUK) 2008.3.18 10:40 AM ˘ ` 15 Connecting Dolby Digital Amp with Digital Audio Out Jack Installation How to connect REAR PANEL OF DVD-VIDEO CONNECTING CABLE (Not supplied) (L) AUDIO IN (R) Home Theatre Receiver with Dolby Digital decoding capability 1 Select COAXIAL to connect to amp of Dolby Digital. * If you want to know about “Dolby Digital”, please refer to [About DVD] in 53-55p. Manufactured under license from Dolby Laboratories.
DC-G8GD2P-JL (DESUK) 2008.3.18 10:40 AM ˘ ` 16 2nd scart socket 2nd scart socket As your video has the AV2 input, shown in the diagram below, you can connect other equipment as seen on pages 12-15. 2nd scart INPUT ONLY INPUT+OUTPUT When connecting other equipment please refer to their manuals for further information. This video manual recommends the set up as shown on page 12.
DC-G8GD2P-JL (DESUK) 2008.3.18 10:40 AM ˘ ` 17 Initial Installation ■ Switch the TV on. ■ You can also start "AUTO SET" in the SETUP "PR PRESET" ➝ "AUTO SET". ■ To tune in new stations (manual tuning) and to enter station names see page 24-25. Setting up the player 1 You should see this picture the first time you switch on the TV and player. AUTO SET 2 OK for "AUTO SET!". "AUTO SET" tunes in all the stations you can receive in your country. CH 25 PLEASE WAIT... Clock is automatically set.
DC-G8GD2P-JL (DESUK) 2008.3.18 10:40 AM ˘ ` 18 Setting time and date Setting time and date ■ Press [VCR] button on the remote control to change into VCR Mode and follow the procedure below. 1 Call up the player’s "SETUP" menu, choose "VCR SETUP", then "CLOCK SET". CLOCK SET TIME - - : - DATE - - / - - /- - - 0-9:SETUP (HOUR) /➝:CORRECT SETUP:END ➝ 2 Move to the position you want to change and type in the new values. Wait a few seconds after typing a one-digit number.
DC-G8GD2P-JL (DESUK) 2008.3.18 10:40 AM ˘ ` 19 OSD ON & OFF OSD (On Screen Display) ON & OFF This player is set to “OSD (On Screen Display) ON” mode before shipping and you can change it to OFF mode. 1 SETUP Call up the player’s "SETUP" menu. TIMER PROGRAM PR PRESET VCR SETUP TAPE CONTROL PR+/-:SELECT OK:CONFIRM VCR SETUP CLOCK SET 16:9 SET OSD ON/OFF AUTO CLOCK PR+/-:SELECT OK:CONFIRM 3 Select “OSD ON/OFF”. If you want OSD OFF mode, select it and press [OK] button to confirm.
DC-G8GD2P-JL (DESUK) 2008.3.18 10:40 AM ˘ ` 20 DVD Playback 1 2 3 Press [ ] button to power on. Press [DVD] button of REMOTE to select DVD mode. Press [OPEN/CLOSE] button to open the disc tray. Place a disc firmly on the disc tray, ensuring the disc’s label is uppermost. Insert the disc and press [OPEN/CLOSE] button to close the tray. The disc tray will close and after initialisation, Playback or Stop function starts to operate. To play the disc, press [PLAY/PAUSE] button.
DC-G8GD2P-JL (DESUK) 2008.3.18 10:40 AM ˘ ` 21 VCR Playback 1 Press [ ] button to power on. Press [VCR] button of remote control to change to VCR mode. 2 Insert the desired tape. If you want to playback, press [PLAY/PAUSE] button. 3 If the picture is is flickering, adjust [TRACKING +/-] button. To stop it, press [ ] button. 5 Press [EJECT] button on the front part of the unit or [OPEN/CLOSE] button on remote control to eject the tape.
DC-G8GD2P-JL (DESUK) 2008.3.18 10:40 AM ˘ ` 22 Recording To Record With VCR 1 2 3 Press [ ] button to power on. • Press [VCR] button of remote control to change to VCR mode. Insert a recordable tape. Insert a tape with recording tab. With [CHANNEL], [NUMBER] and [INPUT] buttons, select the desired broadcasting channel or external input unit to be recorded. Select the desired speed (SP or LP) with [SPEED] button. 4 5 6 Press [REC] button. Then, it starts recording.
DC-G8GD2P-JL (DESUK) 2008.3.18 10:40 AM ˘ ` 23 Recording To Copy From DVD To Videotape 1 2 3 Insert the desired DVD disc. When the DVD disc is copyright protected, you can’t copy it. If DVD disc is not copy protected then insert a blank tape. Press [REC] button during playing of DVD. DVD plays and VCR starts recording. If you press STOP [ ] button in DVD mode, DVD and VCR will stop at the same time.
DC-G8GD2P-JL (DESUK) 2008.3.18 10:40 AM ˘ ` 24 Tuning in New Stations ■ The TV and player are switched on. ■ To see the picture from your player, press the input or AV (Audio/Video) button on the TV. Tuning 1 To complete the set-up of your video recorder when the auto set has not stored all of the channels or when you wish to store a new channel. Call up the video’s "SETUP" menu, choose "PR PRESET". PR PRESET AUTO SET MANUAL SET PR ERASE PR ALIGN PR+/-:SELECT OK:CONFIRM Select "MANUAL SET".
DC-G8GD2P-JL (DESUK) 2008.3.18 10:40 AM ˘ ` 25 Tuning in New Stations Station names ■ If your player is showing no station name or is showing a station name incorrectly, you can correct this. 1 2 Call up this menu (see the previous page), if it isn't displayed. Select NAME position. Press the [0] button to change the given name. Or press the [1] button to create the station name. Either select the name from the stored list or create the station name by entering 4 letters/digits.
DC-G8GD2P-JL (DESUK) 2008.3.18 10:40 AM ˘ ` 26 Tuning in New Stations Sorting programme locations If the location numbers used for programmes stored in your TV and player are different, you can change them on the player. To do this, move the stations to the right numbers, until they are arranged the way you want. 2 Call up the player’s "SETUP" menu, choose "PR PRESET" then "PR ALIGN". Select the programme to swap. Confirm by pressing OK button. Move the station to the desired location number.
DC-G8GD2P-JL (DESUK) 2008.3.18 10:40 AM ˘ ` 27 Timer Recording ■ For timer recordings, clock, date, and stations must be set correctly. ■ Load a cassette with its safety tab in place and with sufficient free space for the recording. Normal timer recording 1 Call up the player’s "SETUP" menu and, choose "TIMER PROGRAM". Decide if you want to record "ONCE", "WEEKLY" or "DAILY"... ... and confirm.
DC-G8GD2P-JL (DESUK) 2008.3.18 10:40 AM ˘ ` 28 Timer Recording Timer Review – changing and erasing Call up the player’s "SETUP" menu, choose "TIMER PROGRAM".
DC-G8GD2P-JL (DESUK) 2008.3.18 10:40 AM ˘ ` 29 More Functions ■ The counter counts in real time from the point you load the cassette. This does not have to be its beginning! The counter does not count unrecorded parts of the tape. ■ If you rewind beyond the zero position, the counter counts in negative values (e.g. – 0:01:15). Clock / counter display STOP SP Each time you press [DISPLAY] button, 1x: Time and date+current status ➝ Time and date 2x: Counter+current status ➝ counter 3x: disappear.
DC-G8GD2P-JL (DESUK) 2008.3.18 10:40 AM ˘ ` 30 More Functions Accessing counter zero position REW SP GO TO ZERO The player will wind to the position 0:00:00 and stop. 0:02:13 Resetting the counter to zero COUNTER RESET Reset the counter. 0:00:00 16 : 9 Wide Screen Format Playing back / Recording Using this player you can play and record programmes having 16:9 Wide-Screen format.
DC-G8GD2P-JL (DESUK) 2008.3.18 10:40 AM ˘ ` 31 More Functions Child lock Press the [ ] button for about 5 seconds. No buttons on the front panel can be operated now and LOCK INDICATOR (“ be displayed on the window display. Keep your remote control in a safe place. ”) will To release child lock, press any button on the remote control. Cassettes PAL Use only good quality tape cassettes with the VHS logo.
DC-G8GD2P-JL (DESUK) 2008.3.18 10:40 AM ˘ ` 32 More Functions ■ The player records the complete sound signal transmitted by the TV station. The Hi-Fi system In addition to the normal stereo sound track of VHS video recorders, your player is equipped with a high-quality Hi-Fi sound system.
DC-G8GD2P-JL (DESUK) 2008.3.18 10:40 AM ˘ ` 33 Copying and Assembling ■ Switch off all components when connecting or disconnecting cables. Copying Other VCR Decoder for Pay-TV Camcorder Video Player Satellite Receiver VCR Operation TV (other VCR) Audio Amp. devices (output only) To copy to your player from another video machine, connect the two machines with a cable between their EURO AV (SCART) sockets and select as programme "AV 1/AV 2" or “F.
DC-G8GD2P-JL (DESUK) 2008.3.18 10:40 AM ˘ ` 34 Copying and Assembling Assembling Should you wish to assemble your own film, from camcorder footage for example, use the assembly technique for smooth edit points: • The symbol is lit in VCR mode and goes out in TV mode. • This symbol means the cassette is in. • This symbol means a timer recording is set. For the best results, the source cassette from which you are recording should already be playing back when you start recording.
DC-G8GD2P-JL (DESUK) 2008.3.18 10:40 AM ˘ ` 35 Playing a desired scene To skip scenes in a disc To move to next chapter (or track), press [√√❚ NEXT] button. The current chapter (or track) moves to the next chapter (or track). Press [❚ œœ PREV] button. The current scene moves to the previous chapter (or track) or first scene of current chapter (or track). Moving directly to a desired title ■ Some movie discs may contain multiple titles.
DC-G8GD2P-JL (DESUK) 2008.3.18 10:40 AM ˘ ` 36 Playing a desired scene Repeating a defined period Each time you press [REPEAT] button in playback mode, repeat playback starts as below. - MP3 REPEAT TRACK ➝ ➝ ➝ ➝ TITLE TRACK ➝ CHAPTER DISC REPEAT FOLDER ➝ OFF ➝ ➝ DISC ➝ - VCD/CD - - DVD - REPEAT OFF ➝ OFF • • • • • • CHAPTER : Current chapter will play repeatedly. TITLE : Current title will play repeatedly. DISC : Current disc will play repeatedly.
DC-G8GD2P-JL (DESUK) 2008.3.18 10:40 AM ˘ ` 37 Playing a desired scene Searching DVD with a title number, chapter number or a time 1 If you want to search with a title number or chapter number, press the [SEARCH] button once. TT 01/02 CH /20 - TT: Title - CH: Chapter 2 If you want to search with a chapter number or title number, please select TT or CH using the [ √ ,œ ] button. Then enter the new chapter/title number to be searched using the [NUMBER] buttons.
DC-G8GD2P-JL (DESUK) 2008.3.18 10:40 AM ˘ ` 38 Playing a desired scene Searching VCD with a track number, disc time or track time 1 If you want to search wth a disc time, press [SEARCH] button one time. If PBC is off, the screen will like the figure on the right. Please enter the new time to be searched using the [NUMBER] button. PLAY starts from the selected position. DISC GO TO : - -: - - TRACK GO TO : - -: - - * If PBC is on, pressing the disc time converts PBC to OFF mode automatically.
DC-G8GD2P-JL (DESUK) 2008.3.18 10:40 AM ˘ ` 39 Confirming the current PLAYING TIME Confirming the current playing time of DVD disc While playing a DVD, press [DISPLAY] button. It shows the current playing time. Each time you press the [DISPLAY] button in playback mode, the DISPLAY changes as below.
DC-G8GD2P-JL (DESUK) 2008.3.18 10:40 AM ˘ ` 40 Confirming the current PLAYING TIME Confirming the current playing time of VCD disc While playing a VCD disc, press [DISPLAY] button. It shows the current playing time. Each time you press the [DISPLAY] button in playback mode, the DISPLAY changes as below. TRACK ELAPSED TRACK 01/20 0:00:57 TRACK REMAIN TRACK 01/20 0:05:57 40 Downloaded From DvDPlayer-Manual.
DC-G8GD2P-JL (DESUK) 2008.3.18 10:40 AM ˘ ` 41 Selecting an AUDIO language and SUBTITLE language Selecting an audio language ■ The user may select an audio language and subtitle language if a disc includes Multi-language. Keep pressing the [AUDIO] button till the user’s preferred language appears in playback mode. Certain discs may not support audio select or subtitle select.
DC-G8GD2P-JL (DESUK) 2008.3.18 10:40 AM ˘ ` 42 Selecting ZOOM and Multi Angle Using a zoom function ■ The user can enlarge the current screen about 2 , 3 or 4 times. • During zoom mode, subtitle language can’t be seen. Keep pressing the [ZOOM] button till the preferred zoom appears. Every time the user presses the [ZOOM] button, the zoom magnification changes 2 times (X2) ➝ 3 times (X3) ➝ 4 times (X4) ➝ OFF ➝ 2 times (X2) ➝ ... in sequence.
DC-G8GD2P-JL (DESUK) 2008.3.18 10:40 AM ˘ ` 43 About MP3 and JPG discs Playing a disc containing MP3 files This unit will play MP3 files recorded on CD-R and CD-RW discs. Turn on your television and select the AV input connected to this DVD player. 1 Press the [DVD] button and press the [OPEN/CLOSE] button, the disc tray opens. Put a MP3 recording on the disc tray with the label side up. Press the [OPEN/CLOSE] button, the disc tray closes.
DC-G8GD2P-JL (DESUK) 2008.3.18 10:40 AM ˘ ` 44 About MP3 and JPG discs The ability of this unit to read MP3 discs is dependent on the following: • The Bit Rate must be within 64-256 kbps. • The maximum number of directories should not exceed 32. • The maximum depth level of directories should not exceed 4. • In the case that the file is recorded with a variable bit rate (VBR) in one file (Example: 54256kbps) sound breakup sound breaking may occur during playback.
DC-G8GD2P-JL (DESUK) 2008.3.18 10:40 AM ˘ ` 45 About MP3 and JPG discs Playing a disc containing JPG (PHOTO) files This unit will play JPG files recorded on CD-R and CD-RW discs. 1 2 Select the desired folder. Move the cursor to the desired folder by pressing […†] and press [ENTER] to confirm. Select the folder. Move the cursor to the desired folder by pressing [œ √…†] button and press [ENTER] button to confirm.
DC-G8GD2P-JL (DESUK) 2008.3.18 10:40 AM ˘ ` 46 Displaying menus on a disc To display menus on a disc ■ If a disc includes menus, the user may display them. 1 Press [MENU] button. • In the case of a DVD disc, it shows the menus on the disc by pressing the SELECT button. Also they are different according to the discs and on some discs there is no menu. • If it is a VCD2.0, select PBC ON mode by pressing [TITLE/PBC] button. * CD and VCD1.1 do not support the function.
DC-G8GD2P-JL (DESUK) 2008.3.18 10:40 AM ˘ ` 47 Language Setup ■ A user can set OSD language, Audio, Subtitle and Disc Menu. 1 While in STOP or RESUME STOP mode, press [SETUP] button. LANGUAGE OSD LANGUAGE AUDIO SUBTITLE VIDEO DISC MENU ENGLISH AUTO OFF AUTO AUDIO “OSD” means “On Screen Display”. OTHERS ENTER 2 Selecting an OSD language. Select an OSD language to be displayed on DVD menus with [ENTER].
DC-G8GD2P-JL (DESUK) 2008.3.18 10:40 AM ˘ ` 48 Language Setup 5 Selecting Disc Menu language. Set your preferred DISC MENU language with [ENTER]. If the DISC MENU language is set and recorded on the DISC, it is automatically played back in the set language every time it is played. LANGUAGE OSD LANGUAGE AUDIO SUBTITLE VIDEO DISC MENU AUDIO OTHERS ENTER OTHERS - - - - : Another language can be selected. You can input a 4-digit language code.
DC-G8GD2P-JL (DESUK) 2008.3.18 10:40 AM ˘ ` 49 Video Setup ■ A user can set up a connected TV and screen size condition. 1 While in STOP or RESUME STOP mode, press [SETUP] button. LANGUAGE TV ASPECT 4:3 LB VIDEO AUDIO OTHERS ENTER 2 Selecting TV Aspect. Set your preferred TV ASPECT ratio with [ENTER] button. LANGUAGE TV ASPECT VIDEO SETUP 4:3 PS 4:3 LB ✓ 16:9 WIDE AUDIO If a user selects “4:3 PS”, the user can watch only a centre of the original scene of “16:9”.
DC-G8GD2P-JL (DESUK) 2008.3.18 10:40 AM ˘ ` 50 Audio Setup ■ A user may select an audio menu according to the speaker set being used. 1 While in STOP or RESUME STOP mode, press [SETUP] button. LANGUAGE DIGITAL OUT DYNAMIC RANGE BITSTREAM VIDEO AUDIO OTHERS ENTER 2 Select a Digital Output. Set audio output to coaxial. You can set the outgoing digital signal to BITSTREAM or LPCM: • BITSTREAM : The raw audio signal recorded on the disc goes to the digital audio output.
DC-G8GD2P-JL (DESUK) 2008.3.18 10:40 AM ˘ ` 51 Other Setup 1 While in STOP or RESUME STOP mode, press [SETUP] button. LANGUAGE OSD SCREEN SAVER DEFAULTS VIDEO PARENTAL PASSWORD AUDIO ON ON RESET 8 ADULT CHANGE OTHERS ENTER 2 Select character display window. Select "On" to make the OSD (On Screen Display) language appear on screen. LANGUAGE OSD SCREEN SAVER DEFAULTS VIDEO PARENTAL PASSWORD AUDIO SETUP ON ✓ OFF OTHERS ENTER 3 4 Select screensaver.
DC-G8GD2P-JL (DESUK) 2008.3.18 10:40 AM ˘ ` 52 Other Setup 6 Changing a password. To change your password, move the cursor to “PASSWORD” and press [√]. Then press the [ENTER] button. Enter “OLD PASSWORD”, “NEW PASSWORD”, and “CONFIRM PASSWORD”. And press the [ENTER] button. Now your password is changed.
DC-G8GD2P-JL (DESUK) 2008.3.18 10:40 AM ˘ ` 53 About DVD Playable Discs • DVD, Video CD(Version 1.1, 2.0), S-VCD and Audio CD Disc type DVD Video CD CD CD-ROM Playable Possible Possible Possible Possible Restriction Region number 2 or Region number All Version 1.0/1.1/2.
DC-G8GD2P-JL (DESUK) 2008.3.18 10:40 AM ˘ ` 54 About DVD Terms related to DVD DVD A DVD (abbreviation of Digital Versatile Disc or Digital Video Disc) can include 135 minutes of video information. And for audio, it can hold up to 8 kinds of languages and 32 kinds of subtitle languages. By using MPEG-2 video compression and digital 3D surround sound, DVD realizes highdefinition video and quality sound like a movie theatre.
DC-G8GD2P-JL (DESUK) 2008.3.18 10:40 AM ˘ ` 55 About DVD Handling Disc • • • • Keep the disc clean and in good condition. Handle with care. Do not put sticky paper or tape on it. Do not expose a disc to direct sunlight or other forms of heating. After using the disc, please replace it in its case. Cleaning Disc • Before using the disc, please wipe it from its centre outwards, using a clean, soft cloth.
DC-G8GD2P-JL (DESUK) 2008.3.18 10:40 AM ˘ ` 56 Basic information about VCR and Videotape Terms related with VCR AFT Automatic fine tuning, a circuit that automatically adjusts TV reception for optimum reception/picture. CABLE Cable television. Index Search A feature of this VCR that automatically records an index mark each time recording begins. It helps you locate a particular segment of the tape quickly and easily.
DC-G8GD2P-JL (DESUK) 2008.3.18 10:40 AM ˘ ` 57 Trouble Shooting guide (VCR) Symptom Checks ➤ Please check whether the power plug is inserted in to the mains socket . ➤ Please check whether a videotape is inserted in. ➤ Switch off and reinsert plug into mains socket. “Power On” does not work. • It does not work even in “Power On”. • A videotape is not recognised. ➤ Please check whether the power plug is inserted in to the mains socket. ➤ Please check whether a videotape was inserted.
DC-G8GD2P-JL (DESUK) 2008.3.18 10:40 AM ˘ ` 58 Trouble Shooting guide (VCR) Symptom Checks • Recording a TV program is impossible. ➤ For recording, you should use videotape with a tab. Ensure tab is NOT removed ➤ Please check whether the timer recording info is right. ➤ Are RF cables input/antenna inputs connected correctly and scart plugs fully home? • After pressing “REC”, the videotape is ejected automatically. ➤ Please check whether the clock is right.
DC-G8GD2P-JL (DESUK) 2008.3.18 10:40 AM ˘ ` 59 Trouble Shooting guide (DVD) Symptom Checks • The recorder does not play. ➤ If a DVD is from overseas, it may not be played. Please check a DVD’s region code whether it has the relative region code 2 or All. ➤ Please check whether a DVD is inserted in an upright direction (Label up). ➤ If it is a CD-ROM for PC or DVD-ROM, it will not work. • No sound comes through. ➤ During play mode if “SLOW” or “PAUSE” selected. (There will be no sound output.
DC-G8GD2P-JL (DESUK) 2008.3.18 10:40 AM ˘ ` 60 Specifications Supply Voltage 200-240V~, 50/60Hz Power Consumption MAX.: 20W OPERATION: 14W STANDBY: 4W Weight 4.6kg Dimension (W x H x D) 435mmx93mmx255mm (without foot), 435mmx98mmx255mm (with foot) Operating temperature +5°C~40°C Installation condition Horizontal / Relative humidity under 80% Laser output 5mW (continuous wave max.