
Quick Start Guide


Dahua HD Pinhole Network Camera Quick Start Guide
10
Refer to the following installation steps:
1. Open the accessories bag and take out the fixing enclosure (with fixing foam).
2. Stick the fixing enclosure on the installation surface.
3. Embed the square front end into the fixing enclosure.
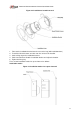
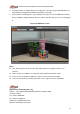
Installation Mode 2:
Figure 2-4 Installation mode 2 for square front end
Refer to the following installation steps:
1. Dig the holes for installation expansion bolts on the installation surface.
2. Take out the expansion bolts from the accessories bag and nail them into the holes you just
dug.
3. Open the accessories bag and take out the screws; tighten the three screws and fix the
device on the installation surface where the bolts are located.
4. Take out the decoration enclosure from the accessories bag, aim the device and press it
hard to install.
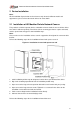
2.2 Installation of HD All-in-one Pinhole Network Camera
Note:
The pinhole camera mainly adopts ceiling installation. The installation surface has to be thick
enough to sustain at least 3X weight of the camera.