
Quick Installation Guide
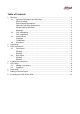
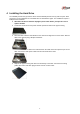
Table Of Contents

7
4 Installing the Hard Drive
The N52A4P provides two (2) SATA III Ports and the N54A4P provides four (4) SATA III ports. Each
port device can accommodate an 8 TB HDD rated at 7200 RPM or higher. The installation requires a
Phillips-head screwdriver.
1. Shut down the device and then unplug the power cable before you open the case to
replace the HDD
2. Loosen the screws on the rear panel and side panels and remove the upper housing.
3. Place the HDD under the HDD bracket in the chassis and align the four screw holes. Affix the
HDD to the chassis using a Philips screwdriver.
4. Connect the HDD data cable to the maim board on the NVR and to the respective port on the
HDD. Connect the HDD power cable from the main board to the HDD.
5. Replace the upper housing and affix to the main body of the NVR. Connect the incoming
power cable to the NVR then plug the other end into a mains outlet.