
Installation manual


3P130767-4K English 9
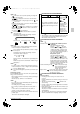
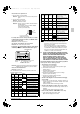
Browse to Monday by pressing the “ ” button.
The “ ” icon appears, “ ” will blink and one of the
“ ” icons, one of the “ ”
icons might be displayed but all other fields remain blank,
indicating that no actions are programmed for Monday.
Enter the program mode by holding down the “ ” button
for 5 seconds, the “ ” icon will now blink too.
Press the “ ” button to activate the first programmed
action.
A blinking “ ” is displayed indicating that the first pro-
grammed action for Monday is being programmed; The
set temperature and clock display are blinking.
Enter the time when the action must start using the
“ ” & “ ” buttons (min. step = 10 minutes).
Press the “ ” button to display the next programmed
action. If a second action is programmed for Monday,
“ ” will still be blinking and “ ” will appear.
Assuming that 5 actions were programmed for Monday, a
total of 5 presses will be required to display all pro-
grammed actions.
Enter the time when the action must stop using the
“ ” & “ ” buttons (min. step = 10 minutes).
Press the “ ” button. “ ” icon displays.
This icon means the unit will stop at the set time.
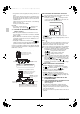
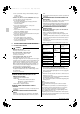
When all data for the schedule timer actions for Monday
are entered, you must confirm the programmed actions.
Make sure the last schedule timer action you want to
keep is selected (schedule timer actions with a higher
number will be deleted).
Now you must choose between 2 options:
1. CONFIRM AND COPY TO NEXT DAY
The schedule timer action programmed for the current
day are also valid for the next day: use the “confirm last
action and copy actions to next day” function by pressing
the “ ” and “ ” buttons simultaneously for 5 sec-
onds. “DAY OF THE WEEK INDICATOR” will change
blinking from “ ” to “ ”.
2. CONFIRM ONLY
The schedule timer action programmed for the current
day are only valid for the selected day: use the “confirm
last action and go to next day” function by pressing the
“ ” button for 5 seconds.
Program mode is quit and depending on the choice
made, the programmed actions are saved for Monday
(and possibly Tuesday).
PROGRAMMING THE OTHER DAYS OF THE WEEK
Programming the other days of the week is identical to program-
ming the first day of the week. “ ” is blinking to indicate the
selected day, “ ” and “ ” are steady if actions were copied
from Monday to Tuesday, only “ ” is displayed if no actions
were copied from Monday to Tuesday.
NOTE) The schedule timer will not:
• control fan speed,
• control air flow direction,
• control ventilation mode,
• control ventilation amount,
• change the operation mode for a scheduled setpoint.
The parameters listed above can be set manually, without inter-
fering with the schedule timer.
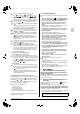
3.4 OPTIMUM OPERATION
Observe the following precautions to ensure the system oper-
ates.
• When the display shows “ ”, ask a qualified service
person to clean the filters (Refer to “4 MAINTENANCE”).
• Do not operate the Heat Reclaim Ventilator unit in
Bypass mode when the room air is under heating in
winter or when the outside temperature is 30°C or
higher.
This may cause condensation to form on the main unit or on
discharge grill, or around air supply opening.
• Keep the indoor unit and the remote controller at least
1 m away from televisions, radios, stereos, and other
similar equipments.
This may cause distorted picture or noise.
• Turn off the main power supply switch when it is not
used for long periods of time. When the main power
switch is turned on, some watts of electricity is being
used even if the system is not operating.
Turn off the main power supply switch for saving energy.
When reoperating, turn on the main power supply switch
6 hours before operation for smooth running.
• Use city water or clean water and take steps to prevent
condensation from forming. (VKM-GBMV1 series only)
• The life of humidifier become shorter when the supply
water is hard water. (VKM-GBMV1 series only)
Use a water softener.
• Do not install the remote controller where the indoor
temperature and humidity, respectively, are out of the
range of 0-35°C and RH 40-80%.
This may cause malfunction.
• Do not install the remote controller where direct sun-
light may fall on it.
This may cause discoloration or deformation.
NOTE
• When the solenoid valve fails, the remote controller does not
display any error code.
Usage under that status will lead to insufficient humidification
and increased tap water consumption.
The solenoid valve should be checked at the beginning of the
heating season. (VKM-GBMV1 series only)
4 MAINTENANCE
(for a qualified service person only)
ONLY A QUALIFIED SERVICE PERSON IS ALLOWED TO
PERFORM MAINTENANCE
DO NOT CHECK OPENING INSIDE THE UNIT BY YOURSELF.
• Working at high places can cause accidents. Ask your local
dealer for maintenance.
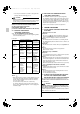
4.1 WHEN TO PERFORM MAINTENANCE OF THE
AIR FILTER
Clean the air filter when the display shows “ ” (TIME TO
CLEAN AIR FILTER).
It will display that it will operate for a set amount of time.
AT LEAST ONCE EVERY YEARS (FOR GENERAL OFFICE USE)
(CLEAN THE AIR FILTER MORE FREQUENTLY IF NECESSARY.)
• Ask your local dealer to clean the air filter.
• Increase the frequency of cleaning if the unit is installed in a
room where the air is extremely contaminated.
1
2
3
4
5
6
7
8
9
For remote controllers which display the filter sign, turn on the
power after maintenance, and press the filter sign reset button.
01_EN_3P130767-4K.fm 9 ページ 2013年3月21日 木曜日 午前11時50分