
FTXS Installation Manual


English
■English 5
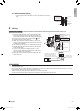
3. How to set the different addresses
When2indoorunitsareinstalledinoneroom,
the2wirelessremotecontrollerscanbesetfor
differentaddresses.
1)Removethemetalplateelectricalwiring
cover.
(RefertotheWhen connecting to an HA
system.)
2)Cuttheaddressjumper(JA)ontheprinted
circuitboard.
3)Cuttheaddressjumper(JA)intheremote
controller.
ADDRESS
JA
ADDRESS
JA
EXIST
1
CUT 2
Jumper
ADDRESS:JA
EXIST
1
CUT
2
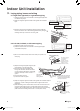
4. When connecting to an HA system
(wired remote controller, central remote controller etc.)
1)Removethefrontgrille.(6screws)
2)Removetheelectricalwiringbox.(1screw)
3)Removethemetalplateelectricalwiringcover.(4tabs)
4)AttachtheconnectioncordtotheS21connectorandpulltheharnessoutthroughthenotchedpartinthegure.
5)Replacetheelectricalwiringcoverasitwas,andpulltheharnessaround,asshowninthegure.
3) Remove the metal plate
electrical wiring cover.
4) Attach the connection cord
to the S21 connector and
pull the harness out through
the notched part in the
figure.
5) Replace the electrical
wiring cover as it was,
and pull the harness
around, as shown in
the figure.
Screw
Pull
Pull
Slide
Ta b
Ta b
Slide
Metal plate
electrical cover
Main body
HA connector
(S21)
HA connector
(S21)
Lay the HA cord as
shown in the figure.
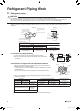
Refrigerant Piping Work
With a multi indoor unit
, install as described in the installation manual supplied with the Multi outdoor unit.
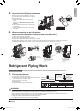
1. Flaring the pipe end
1)Cutthepipeendwithapipecutter.
2)Removeburrswiththecutsurfacefacingdownwardso
thatthechipsdonotenterthepipe.
3)Putthearenutonthepipe.
4)Flarethepipe.
5)Checkthatthearingisproperlymade.
Set exactly at the position shown below.
A
Flaring
Die
A
0-0.020 inch (0-0.5mm)
Clutch-type
Flare tool for R410A
0.039-0.059 inch (1.0-1.5mm)
Clutch-type (Rigid-type)
0.059-0.079 inch (1.5-2.0mm)
Wing-nut type (Imperial-type)
Conventional flare tool
(Cut exactly at
right angles.)
Remove burrs.
Check
Flare’s inner surface
must be flaw-free.
The pipe end must
be evenly flared in a
perfect circle.
Make sure that the
flare nut is fitted.
WARNING
•Donotusemineraloilonaredpart.
•Preventmineraloilfromgettingintothesystemasthiswouldreducethelifetimeoftheunits.
•Neverusepipingwhichhasbeenusedforpreviousinstallations.Onlyusepartswhicharedeliveredwiththeunit.
•NeverinstalladriertothisR410Aunitinordertoguaranteeitslifetime.
•Thedryingmaterialmaydissolveanddamagethesystem.
•Incompletearingmaycauserefrigerantgasleakage.
01_EN_3P297301-2.indd 5 10/18/2011 2:00:49 PM