
BPMKS049A3U Installation Manual


8 English
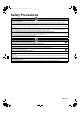
Installation of the Unit
1.
Replacing the printed circuit board
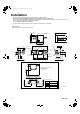
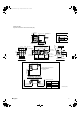
• This unit has 2 different installation types:
(1) ceiling-suspended type and (2) wall-mounted type.
• Choose the proper installation pattern according to the
location of installation.
• The installation location for the printed circuit board can
be changed.
If the installation location of the printed circuit board
needs to be changed because of the installation
conditions, perform the following:
CAUTION
• Before doing any wiring on site, replace the printed circuit board.
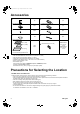
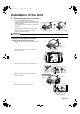
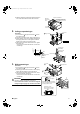
Procedure for changing the installation
location of the printed circuit board
1) Remove the screws and pull off the electrical wiring box
cover.
2) Remove 4 screws shown in the figure, remove the
printed circuit board.
3) Remove the binding band (A) which holds the wires.
4) Remove the printed circuit board, and reattach as
shown in the figure.
5) Reattach the binding band to position (B).
Printed circuit board
Printed
circuit board
As-shipped condition After-location is changed
Indoor
unit side
pipe
To opposite
side
Screw (M4)
Electrical wiring box
cover
44P
44
Remove 4 screws. (M4)
Printed circuit board
Binding band
Press on the protrusion
and pull out.
(A)
(B)
Printed circuit board
Lift the tabs.
To opposite side
Top surface of the unit
(A)
(B)
Binding band
01_EN_3P329626-1.fm Page 8 Friday, November 9, 2012 11:10 AM