
FVXS Operation Manual


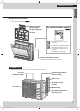


Table Of Contents
- Features
- Contents
- Safety Considerations
- Names of Parts
- Preparation Before Operation
- AUTO · DRY · COOL · HEAT · FANOperation
- Adjusting the Airflow Rate
- Adjusting the Airflow Direction
- POWERFUL Operation
- ECONO Operation
- OUTDOOR UNIT QUIET Operation
- ON/OFF TIMER Operation
- WEEKLY TIMER Operation
- Note for Multi System
- Care and Cleaning
- FAQ
- Troubleshooting
- Quick Reference

9
Read Before Operation
Preparation Before Operation
To insert the batteries
1. Slide the front cover to take it off.
2. Insert 2dry batteries AAA.LR03 (alkaline).
3. Replace the front cover.
To fi x the remote controller holder to a wall
1. Choose a place where the signals reach the
unit.
2. Attach the holder to a wall, a pillar, or similar
location with the screws supplied with the
holder.
3. Place the remote controller in the remote
controller holder.
Fahrenheit/Celsius display switch
Press and (TIMER button)
simultaneously for about 5seconds.
• The temperature will be displayed in Celsius when it is presently displayed in
Fahrenheit, and vice versa.
• The switch operation is only possible when the temperature is being displayed.
Position and
correctly!
+
–
2
3
1
Remote
controller holder
Remote controller
Screws
NOTE
Notes on batteries
• When replacing the batteries, use batteries of the same type, and replace bothold batteries together.
• The batteries will last for about 1 year. However, if the remote controller display begins to fade and the possible transmission range becomes
shorter within a year, replace both batteries with new, size AAA.LR03 (alkaline) batteries.
• The batteries supplied with the remote controller are for initial operation. The batteries may run out in less than 1 year.
Note on remote controller
• Do not drop the remote controller. Do not get it wet.
01_EN_3P379751-5C.indd 9 11/9/2015 13:35:29