
Specifications

SiBE04-624 Installation Manual
System Configuration 103
8
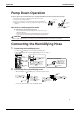
Pump Down Operation
In order to protect the environment, be sure to pump down when relocating or disposing of the unit.
1) Remove the valve cap from liquid stop valve and gas stop valve.
2) Carry out forced cooling operation.
3)
After five to ten minutes, close the liquid stop valve with a hexagonal wrench.
4)
After two to three minutes, close the gas stop valve and stop forced cooling
operation.
How to force cooling operation mode
Using the indoor unit operation/stop button
Press the indoor unit operation/stop button for at least five seconds.
(Operation will start.)
• Forced cooling operation will stop automatically after around 15 minutes.
To force a test run to stop, press the indoor unit operation/stop button.
CAUTION
After closing the liquid stop valve, close the gas stop valve within three minutes, then stop the forced operation.
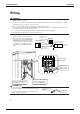
Connecting the Humidifying Hose
1.
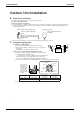
Connecting the humidifying hose.
1) Connect the humidifying hose to the outdoor humidifying duct.
2) Apply a binding band to prevent the humidifying hose from coming off.
2.
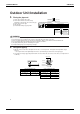
Connecting the cut humidifying hoses.
• When installing the cut humidifying hoses, follow the instructions below.
• Use not more than 2 elbows to ensure humidifying capacity.
Liquid stop valve
Valve cap
Hexagonal
wrench
Close
Gas stop valve
C
F
C
Outdoor
humidifying duct
Turn the binding part of
the binding band to
the outdoor unit side.
(It is easier to attach the
stop valve cover.)
Binding part of binding band
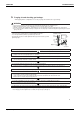
Attach the humidifying
hose, making sure there
is no gap.
Apply the binding band
at 10mm from the top of
the humidifying hose
to prevent the hose from
coming off.
Humidifying
hose
C
Humidifying
hose
C
Binding bandF
C
C
F
F
C
Apply the binding
band at 10mm from the
rim of the joint to
prevent the humidifying
hose from coming off.
Insert each humidifying
hose to the rim of the joint
so that there are no gaps.
Apply the binding band
at 10mm from the rim of the
elbow to prevent the
humidifying hose from
coming off.
Insert each humidifying
hose to the rim of the elbow
so that there are no gaps.
C
C
C
C
F
ElbowE
F
JointD
D
D
E
E