
Specifications

SiBE04-624 Instruction
System Configuration 109
4
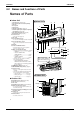
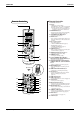
Remote Controller
1.
Transmitter / Receiver
2.
Display:
•
It displays the current settings.
(In this illustration, each section is shown with all
its displays ON for the purpose of explanation.)
* The protection sheet is on the display to pro-
tect against scratch. Remove it before use.
3.
INFORMATION button:
•
Displays the indoor temperature and humidity
and the outdoor temperature. (page 16.)
4.
COUNTDOWN OFF TIMER button:
•
Sets time to stop. (page 12.)
5.
ON/OFF button:
•
Stops operation selected with the direct opera-
tion button. Another press will restart the same
operation.
6.
Direct operation button:
•
AUTO button (page 9.)
•
“URURU” HUMIDIFYING button (page 8.)
•
HEATING button (page 8.)
•
“SARARA” DRYING button (page 7.)
•
COOLING button (page 7.)
7.
POWERFUL button:
•
Makes cooling or heating more powerful. (Can-
celed in 20 minutes.) (page 13.)
8.
TEMPERATURE adjustment buttons:
•
It changes the temperature setting.
9.
HUMIDITY buttons:
•
It changes the humidity setting.
10.
FLASH STREAMER AIR PURIFYING /
FRESH AIR SUPPLY VENTILATION button:
•
Cleans the room air. (page 11.)
11.
AIRFLOW DIRECTION / AIRFLOW RATE /
COMFORT AIRFLOW / COOLING BREEZE
button:
•
Adjusts air direction and volume. (page 10.)
12.
MOISTURIZING button:
•
Keeps humidity high to moisturizes your skin.
(page 9.)
13.
HOME LEAVE VENTILATION button:
•
Ventilates the room during home leaving.
14.
SET UP button:
•
Sets the unit operation and remote controller
display according to your preference.
(page 14.)
15.
TIMER SELECT button
16.
TIMER Setting button:
•
Sets the time for timer-on or timer-off. (page 12.)
17.
CLOCK button:
•
Sets the present time. (page 6.)
18.
MOLD SHOCK OUT button:
•
Continuously runs the dehumidifying operation
to keep the room air dry and clean. (page 16.)
19.
MOLD PROOF button:
•
Dries the inside of the unit to prevent mold and
odor growth. (page 15.)
20.
COMFORT SLEEP button:
•
Controls the room temperature to support com-
fort sleep and pleasant wake-up. (page 13.)
21.
RESET button:
•
Cleaning indicator reset. (page 17.)
22.
CANCEL button
Remote Controller
1
3
11
7
Open the lid
<
ARC447A1
>
2
4
6
8
14
15
17
16
5
9
10
13
12
22
18
19
20
21