OPERATION MANUAL Unit and options for air to water heat pump system EDHQ011BB6V3 EDHQ014BB6V3 EDHQ016BB6V3 EDHQ011BB6W1 EDHQ014BB6W1 EDHQ016BB6W1 EDLQ011BB6V3 EDLQ014BB6V3 EDLQ016BB6V3 EDLQ011BB6W1 EDLQ014BB6W1 EDLQ016BB6W1 EBHQ011BB6V3 EBHQ014BB6V3 EBHQ016BB6V3 EBHQ011BB6W1 EBHQ014BB6W1 EBHQ016BB6W1 EBLQ011BB6V3 EBLQ014BB6V3 EBLQ016BB6V3 EBLQ011BB6W1 EBLQ014BB6W1 EBLQ016BB6W1
EDHQ011~016BB6V3 EDLQ011~016BB6V3 EBHQ011~016BB6V3 EBLQ011~016BB6V3 CONTENTS EDHQ011~016BB6W1 EDLQ011~016BB6W1 EBHQ011~016BB6W1 EBLQ011~016BB6W1 Unit and options for air to water heat pump system Page Operation manual 1. DEFINITIONS 1. Definitions.................................................................................. 1 1.1. 1.2. Meaning of warnings and symbols................................................. 1 Meaning of used terms ..........................................................
Applicable legislation: 3. All international, European, national and local directives, laws, regulations and/or codes which are relevant and applicable for a certain product or domain. 3.1. Accessories: Thank you for purchasing this unit. Equipment which is delivered with the unit and which needs to be installed according to instructions in the documentation. The unit is used for both heating and cooling applications.
. OPERATING THE UNIT 4.2. Operating the digital controller Operating the unit comes down to operating the digital controller. 4.1. Introduction CAUTION The heat pump system is designed to provide you a comfortable indoor climate for many years at low energy consumption. Never let the digital controller get wet. This may cause an electric shock or fire. To get the most comfort with the lowest energy consumption out of your system, it is very important to observe the items listed below.
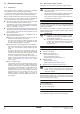
4.3. Name and function of buttons and icons 8 5 6 24 15 18 3 16 2 17 7 14 21 19 11 9 12 10 23 22 20 13 34 29 25 27 30 26 33 32 28 31 HEATING/COOLING ON/OFF BUTTON y The ON/OFF button starts or stops the heating or cooling function of the unit. When the unit is connected with an external room thermostat, this button is not operable and the icon e is shown. Pressing the ON/OFF button consecutively too many times may cause malfunction of the system (maximum 20 times per hour).
26. DOMESTIC WATER HEATING BUTTON v This button enables or disables heating of the domestic water. This button is not used when the domestic hot water tank is not installed. INFORMATION Remark that pushing the y button has no influence on the domestic water heating. Domestic water heating is only switched on or off by means of the v button. 27. WEATHER DEPENDENT SET POINT BUTTON ba This button enables or disables the weather dependent set point function which is available in space heating/cooling operation.
4.5. Description of the operation modes Only for [4-03]=4 or 5 In this mode, the unit will heat up the domestic hot water tank. Space heating operation (h) In this mode, heating will be activated as required by the water temperature set point. The set point can be set manually (refer to "Manual operation" on page 7) or weather dependent (refer to "Selecting weather dependent set point operation" on page 8). There are several modes for heating up the domestic water tank: 1.
Quiet mode operation (s) INFORMATION In heating mode (h) or cooling mode (c), the water temperature set point can also be weather dependent (icon a is shown). Quiet mode operation means that the unit works at reduced capacity so that the sound produced by the unit drops. This implies that the heating (cooling) capacity will also drop. Beware of this when a certain level of heating (cooling) is required indoors.
Selecting weather dependent set point operation 1 Press the ba button to select weather dependent set point operation. Icon a appears on the display as well as the calculated water temperature set point based on the outdoor temperature. 2 Use the bi or bj button to display the actual shift value and subsequently, to set the correct value. INFORMATION The shift value only appears on the display after pressing one of the buttons bi or bj.
INFORMATION ■ ■ ■ The programmed actions are not stored according to their timing but according to the time of programming. This means that the action that was programmed first gets action number 1, even though it is executed after other programmed action numbers. When the schedule timer switches space heating or space cooling x, the controller will also be switched off. Note that this has no influence on domestic water heating. [4-03]=4 or 5.
Programming Programming space heating or domestic water heating Programming space heating or domestic water heating is carried out as follows: INFORMATION Returning to previous steps in the programming procedure without saving modified settings is done by pressing the pr button. 1 Press the < button. The actual mode is blinking. 2 Use the pi and pj buttons to select the mode you want to program (space heating h or domestic water heating w) 3 Press the < button to confirm the selected mode.
Programming space cooling, quiet mode, or booster heater mode(1) Programming space cooling, quiet mode, or booster heater mode(1) is carried out as follows: INFORMATION Returning to previous steps in the programming procedure without saving modified settings is done by pressing the pr button. 1 Press the < button. The actual mode is blinking. 2 Use the pi and pj buttons to select the mode you want to program (space cooling c, quiet mode s, or booster heating m(1)). The selected mode is blinking.
Consulting programmed actions To copy programmed actions to the next day, proceed as follows: 1 Press the < button. The actual mode is blinking. 2 Use the pi and pj buttons to select the mode you want to program. Consulting space heating or domestic water heating actions Consulting space heating or domestic water heating is carried out as follows. The selected mode is blinking. You can leave programming by pressing the pr button.
5. FIELD SETTINGS 5 Save the new value by pressing the pr button. 6 Repeat step 2 through 4 to change other field settings as required. 7 When finished, press the z button to exit FIELD SET MODE. NOTICE The default values mentioned in "Field settings table" on page 18 are the values from factory. The actual initial values shall be selected according to your application. These values shall be confirmed by your installer. CAUTION ■ The field settings [2] depends on the applicable legislation.
[1] Weather dependent set point [2] Disinfection function The weather dependent set point field settings define the parameters for the weather dependent operation of the unit. When weather dependent operation is active the water temperature is determined automatically depending on the outdoor temperature: low outdoor temperatures will result in warmer water and vice versa. During weather dependent operation, the user has the possibility to shift up or down the target water temperature by a maximum of 5°C.
Only for tank without electrical booster heater (EKHTS) Scheduled/continuous domestic hot water reheat According to local and national regulations, it may be required to disinfect the domestic hot water tank at a higher temperature (>60°C). In that case Daikin suggests to install a shunt pump and a heater element parallel on the domestic hot water tank according to the figure below.
INFORMATION ■ ■ Make sure the domestic water is only heated up to the domestic hot water temperature you require. Start with a low domestic hot water storage temperature set point, and only increase if you feel that the domestic hot water supply temperature is not sufficient for your needs (this depends on your water using pattern). Make sure the domestic water is not heated unnecessary. Start with activating automatic storage during night (default setting).
[A] Quiet mode [E] Unit information readout This field setting allows to select the desired quiet mode. Two quiet modes are available: quiet mode A and quiet mode B. ■ [E-00] Readout of the software version (example: 23) In quiet mode A, priority is given to the unit operating quietly under all circumstances. Fan and compressor speed (and thus performance) will be limited to a certain percentage of the speed at normal operation. In certain cases, this might result in reduced performance.
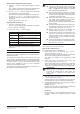
Field settings table Installer setting at variance with default value First code 0 Second code 2 Value Default value Range Step Unit User permission level 3 2/3 1 — 00 Low ambient temperature (Lo_A) –10 –20~5 1 °C High ambient temperature (Hi_A) 15 10~20 1 °C 02 Set point at low ambient temperature (Lo_Ti) 40 25~55 1 °C 03 Set point at high ambient temperature (Hi_Ti) 25 25~55 1 °C 05 Weather dependent for cooling function enable/disable 0 (OFF) 0/1 — — 06 Low amb
Installer setting at variance with default value First code 6 Second code Setting name Date Value Date Value Default value Range Step Unit — — — — 1 (ON) 0/1 1 — 1:00 0:00~23:00 1:00 hour 0 (OFF) 0/1/2 1 — Installation related setting 00 Installation related setting 01 Installation related setting 02 Not applicable. Do not change the default value.
Installer setting at variance with default value First code C d E F Second code Setting name Date Value Date Value Default value Range Step Unit 0 0/1 1 — — — — — 0 (OFF) 0/1/2/3/4 1 — — — — — — — — — Solar kit 00 Solar priority mode setting 01 Installation related setting 02 Installation related setting 03 Installation related setting 04 Installation related setting 05 Not applicable. Do not change the default setting.
6. MAINTENANCE 6.1. 6.3. NOTICE Important information regarding the refrigerant used During longer periods of standstill, e.g. during summer with a heating only application, it is very important NOT TO SWITCH OFF THE POWER SUPPLY towards the unit. This product contains fluorinated greenhouse gases covered by the Kyoto Protocol. Switching off the power supply stops the automatic repetitive movement of the pump in order to prevent it from getting jammed.
8. DISPOSAL REQUIREMENTS Dismantling of the unit, treatment of the refrigerant, of oil and of other parts must be done in accordance with the applicable legislation. Your product is marked with this symbol. This means that electrical and electronic products shall not be mixed with unsorted household waste.
Copyright 2011 Daikin *4PW67905-1 A 0000000T* 4PW67905-1A 2013.