Daikin ENVi Thermostat Installation Manual
SAFETY CONSIDERATIONS Read these SAFETY CONSIDERATIONS for Installation carefully before installing the Daikin ENVi thermostat kit. After completing the installation, make sure that the unit operates properly. Instruct the customer on how to operate and maintain the thermostat. Inform customers that they should store this Installation Manual with the Operation Manual for future reference. Always use a licensed installer or contractor to install this product.
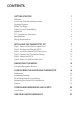
CONTENTS GETTING STARTED 1 Welcome Contractor Thermostat Registration Package Contents Before You Begin Daikin System Compatibility Approvals FCC Compliance Statement Specifications Wiring Requirements 1 1 2 3 4 4 4 6 7 INSTALLING THE THERMOSTAT KIT 7 Step 1. Power Off the Daikin Indoor Unit Step 2. Position and Wire the DPCA Step 3. Install the Daikin ENVi Thermostat Step 4. Connect the Thermostat Wiring Step 5. Mount the DPCA Step 6.
GETTING STARTED Welcome The Daikin ENVi thermostat kit has been designed to ensure the installation process is simple and efficient. This step-by-step Installation Manual will walk you through all aspects of the installation. To ensure an on-going service relationship with your customers, please register all of your Daikin ENVi thermostats in your Contractor Portal. Contractor Thermostat Registration Use the serial number sticker (included in package) for Contractor Portal registration.
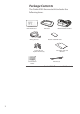
Package Contents The Daikin ENVi thermostat kit includes the following items.
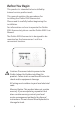
Before You Begin This product is intended to be installed by trained service professionals. This manual explains the procedures for installing the Daikin ENVi thermostat. Please read it carefully before beginning the installation. For information on how to operate the Daikin ENVi thermostat, please see the Daikin ENVi User Manual. The Daikin ENVi thermostat is designed to be mounted on the homeowner’s wall in a convenient location.
Daikin System Compatibility The Daikin ENVi thermostat is designed to operate only with the Daikin Heat Pump and Cooling Indoor Units where the BRC944 wired remote controller is applicable. The Daikin ENVi thermostat supports the following systems: Single-Split system Multi-Split system (2 to 8 ports) SkyAir FTXS Indoor Units Applicable indoor unit models: FTXS, FTXN (09/12 requires KRP980B1 interface adapter), CTXS, FDXS and CDXS The Daikin ENVi thermostat can also support a single-stage auxiliary heater.
pursuant to Part 15 of the FCC Rules. These limits are designed to provide reasonable protection against harmful interference in a residential installation. This equipment generates, uses, and can radiate radio frequency energy and, if not installed and used in accordance with the instruction manual, may cause harmful interference to radio communications. However, there is no guarantee that interference will not occur in a particular installation.
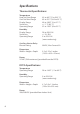
Specifications Thermostat Specifications Temperature Heat Set Point Range Cool Set Point Range Display Range Sensitivity Operating Range Humidity Display Range Sensitivity Operating Range Auxiliary Heater Relay Electric Rating Dimensions Width x Height x Depth 45 to 80 °F (7 to 26.5 °C) 65 to 95 °F (18.5 to 35 °C) 40 to 100 °F (5 to 37 °C) +/- 1 °F (0.5 °C) 32 to 130 °F (0 to 55 °C) 20 to 90% R.H. +/- 5% R.H. 5 to 95% R.H. (non-condensing) 30VAC, Max Current 3A 5.5 x 3.25 x 1 inches (139.5 x 82.
Wiring Requirements The Daikin ENVi thermostat uses 4-wire low-voltage cable to connect to the Daikin Power and Communication Adapter (DPCA) which in turn connects to the Indoor Unit. The maximum wire length between the Daikin ENVi thermostat and the DPCA is as follows: 18 AWG: 1250 ft/380 m 20 AWG: 800 ft/240 m 22 AWG: 500 ft/150 m INSTALLING THE THERMOSTAT KIT There are 5 steps to install the Daikin ENVi thermostat kit: Step 1. Power Off the Daikin Indoor Unit Step 2. Position and Wire the DPCA Step 3.
Step 2. Position and Wire the DPCA The Daikin Power and Communication Adapter (DPCA) provides an interface between the thermostat and Indoor Unit. To install the DPCA: 1. Position the DPCA in a suitable location, away from water and near the Indoor Unit (for example, a backside cavity of a wall-mounted unit). The DPCA is not plenum rated and should be mounted in a non-plenum space. 2. Connect the DPCA power cable to the Indoor Unit power supply terminals.
Power Cable Power cable to terminal block on Indoor Unit Indoor Unit Terminal Block 1 2 3 L1 L2 Wires to outdoor unit are not shown G Black Red Green DPCA P1 Terminal 4-wire low-voltage cable to thermostat (not included) Cover P2 Terminal Wire harness to Indoor Unit (included) 1 2 3 4 5 P2 Wire Harness To terminal S21 on Indoor Unit main control board DPCA Wiring Connectors 9
Step 3. Install the Daikin ENVi Thermostat The ideal location for the thermostat is approximately 5 ft (1.5 m) above floor level in the main living area. Do not install the thermostat: Close to sources of heat such as incandescent lights Near supply heating/cooling sources In direct sunlight On exterior, non-insulated or poorly insulated walls In the kitchen or other areas of potentially high heat and/or humidity In an area that could restrict air flow To install the thermostat: 1.
D- D+ C R AUX AUX R The solid color indicates mounting holes 4. Move the backplate out of the way and make holes where indicated in the previous step. The mounting holes can accommodate a #6 pan-head screw. It is recommended to use the included fasteners to ensure proper fitting of the front housing. 5. Use the included drywall plugs (or other suitable anchors) to ensure the thermostat can be mounted securely to the wall. 6.
Step 4. Connect the Thermostat Wiring Use the field-supplied 4-wire low-voltage cable to connect the thermostat to the DPCA. To connect the thermostat to the DPCA: 1. Connect the wires as shown: P1 Terminal on DPCA Optional Auxiliary Heater DD+ 24VAC C C R Daikin ENVi Thermostat D- D+ C R AUX AUX R 2. Attach the Daikin ENVi thermostat to the backplate. Ensure that the pins on the thermostat align with the terminal block on the backplate.
Step 5. Mount the DPCA After you make the necessary wiring connections, mount the DPCA by using the adhesive sticker or mounting screws as needed. Step 6. Power On Daikin Indoor Unit After you’ve completed the wiring, you can apply power to the Daikin Indoor Unit. The Daikin ENVi thermostat receives power from the equipment and will automatically power on. After you power on the Indoor Unit: 1. Verify the green LED on the DPCA has turned on. Upon verification, re-attach the DPCA cover. 2.
NAVIGATING THE MENUS The Daikin ENVi thermostat has an easy-to-read color screen that displays all the information you need to configure the thermostat. Use the navigation buttons on the right to quickly change the temperature, access features, and configure settings. Using the Navigation Buttons The navigation buttons let you select options and control the Daikin ENVi thermostat. OK ▲ (up) On the Home screen, press ▲ to increase the temperature set point by 1°F (0.5°C). For menus, press ▲ to move up.
MENU Pressing MENU displays a list of all available options. If a menu is currently displayed, pressing MENU will cancel any unsaved changes and return to the Home screen. BACK On a menu screen, press BACK to go back to the previous screen. MENU BACK On-Screen Keyboard If you need to type in any information, an onscreen keyboard will appear. To enter a letter or number, move to the character by pressing the arrow keys and then press OK to select it.
CONFIGURING THE DAIKIN ENVi THERMOSTAT The first step after installing the Daikin ENVi thermostat is to configure the thermostat settings for the Indoor Unit. Preferences This section describes the user preferences that should be configured during installation. For a complete description of all user preferences, see the Daikin ENVi User Manual. Intelligent Eye To configure the intelligent eye: From the Home screen, press MENU. Select Settings ▶ Preferences. Select Intelligent Eye.
Installation Settings The Installation Settings let you configure the equipment connected to the Daikin ENVi thermostat. Allow Auto Heat/Cool Enabling this option allows the user to select auto change-over as a system mode. Only visible if the Indoor Unit supports heat or an auxiliary heat source is configured. To configure the system settings: From the Home screen, press MENU. Select Settings ▶ Installation Settings. Configure the devices connected to the thermostat.
damage to the compressor. You can also set this value to determine when you want the auxiliary heat (if installed) to engage to help meet the set temperature. The temperature range is adjustable from –10 to 65 °F (–23.3 to 18.3 °C) or disabled by default. This feature uses the Internet to obtain the current outdoor temperature. If no Internet is available, the Outdoor Unit’s temperature sensor is used instead.
in longer cycle times. The temperature range is adjustable from 0.5 to 3 °F (0.3 to 1.7 °C) in 0.5°F (0.3°C) increments. The default offset is 0.5°F (0.3°C). If the Indoor Unit is AC only and an auxiliary heater is configured, this option appears under the Aux Heat Settings menu. Heat Dissipation Time The amount of time the fan will run after the heat set point has been reached and the call for heat has been turned off.
reached). Options are Auto (default) and 1 to 10 °F (0.6 to 5.6 °C). Only visible if Indoor Unit supports heat and an auxiliary heat source is also configured. Heat Pump to Aux Runtime The maximum amount of time the heat pump will run before engaging Aux Heat. Options are Auto (default), Disabled, and 10 to 180 minutes. Only visible if Indoor Unit supports heat and an auxiliary heat source is also configured. Aux Heat Settings The Aux Heat Settings configure an auxiliary heat source.
Above this level, the auxiliary heat will not be activated. The temperature is adjustable from 0 to 80 °F (-17.8 to 26.5 °C) in increments of 0.5°F (0.3°C). The default value is 70°F (21°C). Fan Configuration The Fan Configuration settings map the Indoor Unit’s internal fan speeds to the fan speed options displayed to the user on the thermostat. Heating Mode Speeds Configures fan speed when the user selects High, Medium or Low while the system is in heat mode.
Tstat Temp Correction Lets you program an offset between the real temperature at the thermostat and the displayed temperature. If you find that the temperature where the thermostat is located does not represent the room temperature, change the offset to compensate for the difference. The correct temperature is adjustable from +/- 10°F (+/-5 .6°C) in 0.5°F (0.3°C) increments. Installer Code To prevent accidental modifications to the installation settings, you can enable the following installer code: 3262.
Reset Contractor Info Resets any information about the Contractor who installed the Daikin ENVi thermostat. Rebooting the Daikin ENVi thermostat You can reboot the Daikin ENVi thermostat by pressing the physical hardware reset button, located through an opening in the bottom left corner of the Daikin ENVi thermostat. Rebooting will not alter programming or configuration options.
CONFIGURING REMINDERS AND ALERTS To configure Reminders and Alerts From the Home screen, press MENU. Select Reminders and Alerts. Configure the Reminder and Alert settings as required. The Daikin ENVi thermostat can generate periodic maintenance reminders that help the homeowner know when to perform periodic maintenance.
Low Temp Limit Sets the temperature at which the thermostat will generate a Low Temperature Limit alert. The range can be: Disabled – No alert will be generated. Enabled –Set temperature range of 35 to 68 °F (1.5 to 20 °C). High Temp Limit Sets the temperature at which the thermostat will generate a High Temperature Limit alert. The range can be: Disabled – No alert will be generated. Enabled – Set temperature range of 60 to 104 °F (15.5 to 40 °C).
List of Alerts Below is a complete list of alerts. Depending on your configuration, some of these may not apply. Low Temp Limit Temperature in the home is too low. High Temp Limit Temperature in the home is too high. Heat Not Responding The system has failed to heat the home. Cool Not Responding The system has failed to cool the home. System Service HVAC system due for regular maintenance. Auxiliary Heat Run Time Auxiliary heat source is running too often.
ONE-YEAR LIMITED WARRANTY Daikin AC (Americas), Inc., (“Daikin AC”) warrants that for a period of one (1) year from the date of purchase by the end-user (“Customer”), the Daikin ENVi thermostat (the “Product”) shall be free of defects in materials and workmanship under normal use and service. During the limited warranty period, Daikin AC shall, at its option, repair or replace any defective Products, at no charge.
The limited warranty is for repair or replacement of parts or Product only. Except to that limited extent, Daikin AC will not under any circumstances be liable for any loss, cost, damage, or expense of any kind arising out of a breach of this limited warranty or otherwise.
www.DaikinENVi.com Daikin AC (Americas), Inc.