
Specifications


EDUS281120_a Installation of outdoor unit
RZR-P, RZQ-P(9) 211
3P281953-2A
English 8
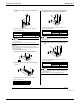
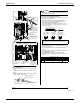
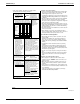
(D) When outdoor units are stacked
When an obstruction is present on the air outlet (1)
side
4
Z
40 or more
NOTE
Only two outdoor units can be stacked.1.
About 4 in. is required as the drain piping size for the upper 2.
outdoor unit.
Close the area Z (gap between the upper outdoor unit and 3.
the lower outdoor unit) so that the outlet air does not by-
pass there.
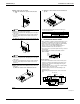
When an obstruction is present on the air inlet side(2)
4
Z
12 or more
NOTE
Only two outdoor units can be stacked.1.
About 4 in. is required as the drain piping size for the upper 2.
outdoor unit.
Close the area Z (gap between the upper outdoor unit and 3.
the lower outdoor unit) so that the outlet air does not by-
pass there.
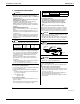
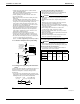
(E) When outdoor units are installed in rows (on the roof-
top, etc.)
When one outdoor unit is installed in each row(1)
4 or more
8 or more
80 or more
40 or more
When two or more outdoor units are installed side (2)
by side
A
L
60 or more
24 or more
120 or more
H
The dimensional relationship between H, L and A is as
shown in the table below.
LA
L ≤ H
0 < L ≤ 1/2H 10
1/2H < L ≤ H12
H < L
Installation is not allowed.
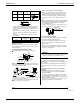
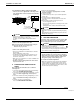
CAUTIONS ON INSTALLATION5.
Before installation, confi rm the strength and levelness of the •
foundation so that vibrations and noise are not generated.
Fix the outdoor unit securely on a rigid base with foundation •
bolts as shown in the foundation drawing below.
(Prepare 4 sets of commercially available M12-type or
equivalent foundation bolts, nuts and washers.)
Use resin washers to prevent the paint from being scratched •
off and rusting.
The foundation bolts should be protruded by 15/16 in.•
(Refer to fi gure)
15/16
Resin
washer
〈〈Drain treatment〉〉
In a location where drain from the outdoor unit may cause •
troubles (for example, where drainage may splash on gen-
eral passersby), perform the drain piping work using the
drain plug (optional).
For drain treatment, space of at least 4 in. is required under •
the bottom frame of the outdoor unit.
In the drain piping work, make sure that drainage is dis-•
charged securely.
(When routing the piping downward, check for water leak-
age.)
5 1/2
1 7/8
5 1/2
24 3/8
Air outlet side
(13 5/8-13 7/8)
13 3/4
11 3/8
8 5/8
4 5/8
Bottom view
(unit: inch)
Drain hole
16 5/8
24 1/8