
Service Manual
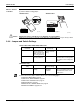
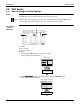
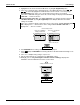
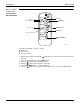
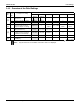
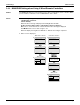
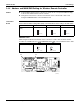

Table Of Contents
- Cover
- Table of contents
- Part 1 List of Functions
- Part 2 Specifications
- Part 3 Printed Circuit Board Connector Wiring Diagram
- Part 4 Refrigerant Circuit
- Part 5 Functions and Control
- Part 6 Test Operation and Field Settings
- Part 7 Remote Controller
- Part 8 Troubleshooting
- 1. Troubleshooting with LED
- 2. Service Diagnosis
- 3. Error Codes and Description
- 4. Troubleshooting for CTXG, CTXS, FTXS, CDXS, FDXS, FVXS Series
- 5. Troubleshooting for FFQ Series
- 6. Troubleshooting for Branch Provider (BP) Unit
- 7. Troubleshooting for Outdoor Unit
- 8. Thermistor Resistance/Temperature Characteristics
- 9. Pressure Sensor
- 10. Method of Replacing Inverter’s Power Transistors Modules
- Part 9 Appendix

SiUS181631EA Field Settings
Test Operation and Field Settings 145
3. Highlight the mode, and select desired “Mode No.” by using
▲ ▼
(Up/Down) button.
4. In the case of setting per indoor unit during group control (When Mode No. such as , ,
, are selected), highlight the unit No.and select “Indoor unit No.” to be set by using
▲ ▼
(Up/Down) button. (In the case of group setting, this operation is not needed.)
In the case of individual setting per indoor unit, current settings are displayed. And, SECOND
CODE NO. “ - ” means no function.
5. Highlight SECOND CODE NO. of the FIRST CODE NO. to be changed, and select desired
“SECOND CODE NO.” by using
▲ ▼
(Up/Down) button. Multiple identical mode number
settings are available.
In the case of setting for all indoor units in the remote control group, available SECOND CODE
NO. is displayed as “
∗
” which means it can be changed. When SECOND CODE NO. is
displayed as “ - ”, there is no function.
6. Press Menu/OK button. Setting confirmation screen is displayed.
7. Select and press Menu/OK button. Setting details are determined and field settings screen
returns.
8. In the case of multiple setting changes, repeat 3 to 7.
9. After all setting changes are completed, press Cancel button twice.
10.Backlight goes out, and [Checking the connection. Please stand by.] is displayed for
initialization. After the initialization, the basic screen returns.
20 22
23 25
<Service settings screen>
3
4
5
Unit No
0
1
–
01
5
–––
9
–––
13
–––
2
–
02
6
–––
10
–––
14
–––
3
–
01
7
–––
11
–––
15
–––
Field Settings
0
–
01
4
–––
8
–––
12
–––
Setting
Mode
20
3
5
Mode
10
Unit No
0
1
–
5
–––
9
–––
13
–––
2
–
6
–––
10
–––
14
–––
3
–
7
–––
11
–––
15
–––
Field Settings
0
–
01
4
–––
8
–––
12
–––
Setting
Press Menu/OK button.
FIRST CODE (SW) NO.
SECOND CODE NO.
In the case of group total
setting
In the case of individual
setting per indoor unit
Yes
<Setting confirmation screen>
6
7
Setting
Save the settings?
Field Settings
Yes No
Press Menu/OK button.
Setting confirmation