
Operating instructions


IM 1193 / Page 6 of 32
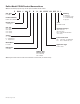
Figure 2: Louver frame dimensions
42
3
/16"
(1072mm)
16
3
/16"
(411mm)
3
3
/4"
(92mm)
44
3
/16"
(1122mm)
18
3
/16"
(1072mm)
Note: WallSleeveroughopeningwhenusingaLouver
Framemustbe16-5/8"x42-5/8"
Installing Wall Sleeve Extension
Wall sleeve extensions are shipped in a separate carton and
tagged to match the proper unit. Be sure to check tagging of
the extension against that of the unit. Install the wall sleeve
extension as follows:
1. Position the extension with standard wall sleeve so
proper alignment with drain and mounting holes is
achieved.
2. Place a bead of caulk around the perimeter of the wall
sleeve and another bead around the mating side of the
wall sleeve extension so that the joint is watertight. Do
not permit caulking to block the weep holes. Be sure to
use a resilient caulking such as silicone.
3. Assemble the wall sleeve extension to the wall sleeve.
Clean out weep holes to assure proper drainage.
4. Continue wall sleeve installation according to
instructions on page 8.
Figure 3: Wall sleeve extension
Wall Sleeve Extension
6
1
/
8
"
9
9
/
16
"
42"
Room Side
Air Splitters
As Required
24
5
/16"
16"
24
5
/16"
WARNING
Residential and institutional cleaning compounds can
cause permanent damage to the packaged terminal
unit. To avoid damage to unit controls and heat transfer
surfaces, do not spray cleaning compounds onto the
discharge grille, return air opening, or unit controls.
Normal cleaning can be accomplished by wiping the
unit surface with a damp cloth. When using cleaning
compounds on carpets, oors or walls, turn the unit off
to avoid drawing potentially damaging vapors into the
package terminal unit.
Wall Opening Requirements
When roughing in the opening for the wall sleeve, make
certain there is sufcient clearance from the walls and oor.
The wall sleeve should be positioned a minimum of 1-5/8"
in from the room side nished wall to accommodate the
room cabinet and the hydronic heat section mounting. A
minimum distance of 3" above the nished oor is required
for return air, although when using a louver frame in panel
wall or thin wall construction, the opening must start 4"
above the nished oor (including carpeting) to provide
proper return air. Louver frames should be used for panel
wall and thin wall applications to assure positive anchoring
to the wall (See Figure 2). When using a louver frame, the
opening must measure 16-5/8" × 42-5/8".
The rough opening for the wall sleeve should measure 16-
1/4" high × 42-1/4" wide. Before installing the unit, check
the wall opening to be sure the wall sleeve will slide into the
opening unobstructed and there is allowance for a 1/8" to
1/4" pitch inside to outside for proper sleeve drainage. For
masonry walls, a lintel must be used to provide support over
each opening.
Installing Louver Frame
When a louver frame is used, it must be installed prior to, or
at the same time, as the wall sleeve, and it must be level and
square.
1. Apply caulking compound on the surfaces of the louver
frame’s four anges which will come in contact with the
wall. Add caulking as required for weather tight seal.
2. Insert the sleeve of the louver frame into the wall
opening from the exterior of the building and apply
rm pressure so that the caulked frame anges are snug
against the exterior of the building. Secure the louver
frame to the wall if desired.
3. Secure the louver frame to the wall through the sides and
top. Never secure the frame through the bottom as it may
cause leaks.
If the louver frame is to be installed in a panel wall, it should
be installed at the same time as the wall sleeve.
CAUTION
DO NOT drill holes in the bottom of the wall sleeve as it will
cause leaks.