
Manual

3
OPERATION STEPS
Step 1. Put “ON SAFE” Step 5. CLOSE BOLT
Step 2. OPEN BOLT Step 6. AIM
Step 3. PUMP Step 7. Take “OFF SAFE”
Step 4. LOAD Step 8. FIRE
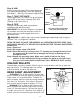
Step 1. Put “ON SAFE”
Push trigger safety from left to right until no red is showing. In this position, the pistol (in
proper working condition) cannot be fired by pulling the trigger.
CAUTION: Even when the safety is
“ON SAFE” you should continue to
handle the pistol safely. Don’t point the gun
at anything that you don’t intend to shoot.
NOTE: The safety is not automatic. It will
only do its job when you do yours. With the
index finger out of the trigger area, move
the safety lever to the “ON SAFE” position.
REMEMBER, THE BEST SAFETY IS
GOOD GUN HANDLING.
Step 2. OPEN BOLT
Lift up and pull straight back on the bolt
handle. The gun cannot fire with the bolt
open. NOTE: BOLT MUST BE OPEN TO
PUMP-UP GUN.
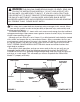
Step 3. PUMP
With the bolt open, pump gun only once.
Any additional pumping will not increase
velocity. Be careful to keep fingers out of
pumping mechanism when closing the
pump lever. (See PINCH POINTS in Fig. 2)
WARNING: After gun has been
pumped up one, do not attempt to pump
again or open pump lever as the lever
is under pressure and could fly open,
possible causing injury.
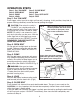
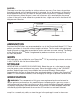
Step 4. LOAD
With the bolt open, load one pellet (solid
end forward) into the feed track. (Fig 3)
Step 5. CLOSE BOLT
Push the bolt fully forward, then push bolt handle down. The gun is now ready to fire.
CAUTION: It is very important that the bolt be completely closed. Never close the bolt
while the trigger is being pulled.
If the gun does not fire when the trigger is pulled, open the bolt by pulling the bolt handle
all the way back and put “ON SAFE” immediately, then close the bolt completely and
continue to Step 6.
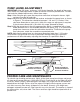
FIG. 2
PUMP LEVER
BARREL
PINCH
POINTS
When pumping, pull lever as far for-
ward as possible, then with curved
end of lever in open palm, close
lever in fast continuous motion.
Trigger finger should be extended
against the right side of the gun to
react against lever closing force.
FIG. 3
BOLT HANDLE
BOLT TIP