| Basic User Guide Document Number D09665 Revision 01 July, 2012 For In Vitro Diagnostic Use
Copyright© 2012 Dako North America, Inc. All rights reserved This document may not be copied in whole or in part or reproduced in any other media without the express written permission of Dako, Inc. Please note that under copyright law, copying includes translation into another language. The Artisan™ Link Special Stains System and its associated components and reagents are covered under the following U.S.
Table of Contents | Artisan™ Link Basic User Guide Section 1 | Welcome to Artisan™ Link................................................................... 1 Intended Use .......................................................................................................................................... 1 Dako Artisan™ Link Special Stains System ........................................................................................... 1 Artisan™ Link Special Stains Instrument ..........................
Step 5: Complete the Case .................................................................................................................. 18 Next Steps ............................................................................................................................................ 18 Section 4 | Managing Slides and Reagents in Workflow Tab ............................. 19 Monitor Your Workflow ....................................................................................................
Perform an Advanced Search .............................................................................................................. 47 Generate Custom Reports.................................................................................................................... 49 Section 7 | Managing the Slide Display................................................................ 51 Customize Your General Preferences ......................................................................................
Appendix A | Symbol Definitions .......................................................................... 67 Appendix B | System Specifications .................................................................... 71 Appendix C | Specified Bulk Fluids List ............................................................... 73 Appendix D | Waste Source Routes...................................................................... 75 Water Waste ......................................................................
Slide Identification Information ..................................................................................................... 79 Slide Label .................................................................................................................................... 80 Slide Label Printer ........................................................................................................................ 80 Staining Instruments .............................................................
Section 1 | Welcome to Artisan™ Link Welcome to the Dako Artisan™ Link User Guide. This section provides an overview of the Artisan™ Link Special Stains System as well as guidelines on how to effectively use the Artisan™ Link. You should have already received training from a Dako representative. Dako provides three documents with the Artisan™ Link system: the Basic User Guide, the DakoLink Advanced User Guide, and the Quick Reference.
Artisan™ Link provides walk away automation for special stains, controlling all procedural requirements and includes the following hardware: Patented reaction chamber Slide carousel with a 48 slide capacity Reagent carousel with up to 50 reagents The Artisan™ Link software monitors and runs the staining instruments from the workstation PC. Each workstation has access to a database with historical slide information for the entire installation.
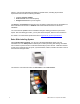
For systems specification, refer to Appendix A | Symbol Definitions. Artisan™ Link Reagents Dako Artisan™ Link special stains system uses Dako Artisan Ready-to-Use Reagents. The reagents are packaged in a patented reagent cartridge that provides precision dispensing of reagents. You can use the reagent cartridges right out of the box. Reagent bar-coding enables the inventory manager to track reagent usage and expiration dating.
Two Artisan™ Link Configurations Type of System Work Environment Artisan™ Link Stand-alone workstation, not on a network. Computer workstation serves as a client CPU used for staining. LIS Lab Information System (LIS), located anywhere in the laboratory can be connected to Artisan™ Link. Note: This Guide will walk you through the stand-alone system as a user. For advanced features and administrative tasks, refer to the DakoLink Advanced User Guide.
Artisan™ Link Components The Artisan™ Link Instrument is an integrated system with the following components: special stains instrument, workstation, slide label printer, and printer. Reagent Carousel Slide Carousel Workstation Side Label Printer Artisan™ Link Workstation The Artisan™ Link Workstation is a Microsoft Windows®-based PC and slide labeling system that runs the Artisan™ Link software. Multiple workstations can be deployed, each running DakoLink software.
Workstation PC A Windows-compatible PC runs the DakoLink software, which provides your primary control and interaction with the system. Each installation maintains a central database where all information is stored, including a detailed record for every stained slide. The database resides on a single server computer or workstation, no matter how many stainers and workstations are connected. This database server workstation can also run DakoLink software.
Waste Fluid Bottles Four waste fluid bottles are provided in both 1.7 L and 4 L capacity. The DakoLink software tracks waste to four separate containers. DakoLink Bar Code Scanner A hand held barcode scanner is provided that allows users to scan both reagent labels and slide labels to access the history provided for each type label.
Artisan™ Link Workflow There are four steps that comprise the flow of slides through the Artisan™ Link System. The four-step workflow is reflected in the DakoLink software with four tabs as shown below.
Section 2 | Getting Started You can access Artisan™ Link from any Link Workstation on the network. This section provides the basics for getting started within Artisan™ Link. It explains how to: Ensure that Artisan™ Link instrument is up-and-running Log into Artisan™ Link Log out of Artisan™ Link Exit the software Ensure that Artisan™ Link is Up-and-Running Before you access Artisan™ Link, you need to complete the following tasks in the following order: 1. Turn on the power supply box. 2.
Log Out If multiple users run the software, you should log out when you are done with your tasks. This prevents someone else from accidentally performing tasks under your user name. 1. Select User log out on the System menu. After you log out, the Log in dialog box appears for the next person to log in. When you logout, the Artisan™ Link continues to run. Note: The software might be configured to automatically log you out after a period of inactivity.
Section 3 | Adding Slides in the New Slides Tab The New Slides tab allows you to add slides for a case as well as specify the staining protocol and requirements for each slide. There are five basic steps to follow when entering slides for a new case: 1. 2. 3. 4. 5. Enter case and patient information Enter slide information Edit slides details, if necessary Print and apply slide labels Complete the case Before You Begin If the refrigerated reagents are not at room temperature: 1.
The Lab Manager or System Administrators can configure the Patient case entry boxes and the slide identification labels. Case information includes case number and patient information. For more information, refer to the DakoLink Advanced User Guide. Note: A required field is indicated by an asterisk. To enter case and patient information: 1. 2. 3. 4. Place your cursor in the Case number field and type the number. Tab to the next field. A blue border appears to indicate it is selected.
2. Click Special stains. The Protocol field will now list only the special stains protocols. Note: The new Special stains protocol filter selection remains as the default unless you change it later. 3. Click the drop-down arrow in the Protocol field. A list of special stains procedures displays. 4. Select the stain you want to use. Note: You may also type the first letters of the protocol into the Protocol field text box if you know the special stain you want to use. 6.
Step 3: Edit Slide Detail, if Necessary Once slides are added to the list, you can make changes to the data entered for the record, or delete the slide. You can: Edit the slide detail row Edit using the Slide processing details dialog box Delete one or more slides Note: Your administrator may not have given you privileges to edit slide details. Edit the Slide Detail Row 1. Open the View drop down menu and select Special Stains default.
Field Description / Action Slide notes Place your cursor in the field and type or edit comments about the slide. These comments appear on the slide report. Edit Using the Slide Processing Details Dialog Box 1. Double-click the slide number, or right-click the slide row and select Slide processing details. The Slide processing details dialog box displays: 2. Click the field you want to change and edit the information. Changes can be made to the following fields.
Field Description / Action Block Identifies the tissue block from which the sample was taken. Tissue Type Click the arrow to the right of the field to select the tissue type. Deparaffinization Select this field if the slide requires deparaffinized. Otherwise, leave it blank. Side drying Select this field if the slide requires both drying and deparaffinized. Otherwise, leave it blank. Slide notes Place your cursor in the field and type or edit comments about the slide.
Print All Labels Simultaneously 1. Hold down the Shift key and select (highlight) all of the slides that require a label. 2. Click the Print labels button. Print Labels for a Specific Slide 1. Select (highlight) the slide row in the slide list. 2. Click the Print labels button. A label prints for the selected slide. Apply Labels to Slides 1. Apply the labels to the slides. Note: Labels must be on slides for the instrument to perform.
Step 5: Complete the Case The next step is to complete your work and create a record for each slide in the database. Note: The Case complete button will not be active until all labels are printed. The button turns green when all labels are printed. Note: If you select one of the other “tabs” in the DakoLink before you completed the case, you may receive a warning depending on the general preferences you have set. 1. Click Case complete to save your work and create the slide records in the database.
Section 4 | Managing Slides and Reagents in Workflow Tab The Workflow screen displays slide records for slides that were entered in the New Slides screen, are awaiting assignment to an Artisan™ Link, or have been assigned to an Artisan™ Link. You can use this screen to plan and organize your workflow as well as follow the progression of the slides through the staining process. When slides begin staining, their slide records can also be viewed on the Instruments tab.
Monitor Your Workflow You can use the workflow buttons across the top of the Workflow screen to monitor your slides and make efficient use of your instruments. There are two categories of buttons: • • The first four buttons display slides according to protocol category. The second set of four buttons indicates where the slides are in the staining process. Display Workflow Categories You may select one or more than one category. • To select a category, click the category button.
Workflow Process As the slides move through the staining process, they automatically move into the next workflow state as illustrated below. As a result, you can use the Workflow screen to track the progress and location of your slides. Note: When the staining run is complete, the slide records move from the Workflow tab to the Completed tab. Plan Slides for a Stainer As part of the planning process, you may select slides for a specific stainer from the slides on the Workflow screen.
Sort the Slides Use the Workflow buttons to sort the slides according to workflow state and/or protocol category. This will make it easier to select the slides you want to include in the planning process. For example, you may want to click the following buttons: My Slides, Special Stains, and Ready for Staining. Select a Planned Instrument 1. Select (highlight) or scan to select the slides you want to plan for an instrument. There is a 24 slide limit. 2. Right click on the row. A drop down menu displays.
Clear a Planned Instrument 1. Select (highlight) the slides you want to remove from the planned instrument. 2. Right click in the row. A drop down menu displays. 3. Select Clear planned instrument. The name of the instrument is removed from the Planned instrument column for the selected slides. Determine the Required Reagents Before placing reagents onto the stainer, you must determine which reagents are required.
The Reagents required dialog box displays the required reagents for the slides and what is currently available on each stainer as well as the bulk fluids required for the selected group of slides. It includes the following information: Column Description Code Indicates the Dako unique product identifier. Reagent Lists the name of the required reagent. Volume Lists the quantity of the reagent required for the run.
1. On the Workflow tab, select (highlight) the group of slides for which you want to determine the required reagents. 2. Click the Reagents button to display the Reagents required dialog box for the selected slides. 3. Click the Print button. The Required Reagents report displays. 4. On the report, click the Printer icon to print the report. 5. Click Close to return to the Reagents required dialog box. 6. Click Close to return to the Workflow tab screen.
To print a report: 4. Select one of the following Print report options available for special stains. 5. Option Report generated…… List Lists the slide records displayed in the on-screen list in a oneslide-per-row format. If you select specific slide records in the onscreen list, the List Report will contain only the selected records. Detail Lists the slides displayed in the on-screen list in a one-slide-perrow format that includes detail data for each record. Includes complete protocol and slide log.
8. When prompted, save the file to a specific location. Note: If you selected View export file, the saved Excel spreadsheet displays. 9. Click the Close button in the Reports dialog box when done. Sample Reports Samples are shown below for a Slide Detail Report and a Case Status Report.
28 Dako Artisan™ Link | Basic User Guide
Delete Slides You can delete one or more slides from the workflow list. CAUTION Labeled slides that have been deleted cannot be run and will be rejected if placed on an instrument. 1. Select (highlight) the slide(s) you want to delete. 2. Click the Delete slides button. You are prompted to confirm your decision. 3. Click Yes. The slide is deleted from the list, but the slide record remains in the database. Or, click No to cancel the deletion.
Section 5 | Starting the Run in the Instrument Tab Once the Artisan™ Link is loaded, you can use the Instruments tab to start and monitor the run. When you start the run, the instrument scans the DataMatrix on the slide label. As a result of the scan, the system changes the workflow status on the Workflow tab, lists the scanned slides on the Instruments tab, and records the position of the slide location.
2. To view stainer information for the selected stainer, right-click anywhere within the Instruments column. The following menu displays. 3. Select Stainer information. The Stainer information dialog box displays. Note: The Show in list check box must be selected for the stainer to appear in the list. View a List of Slides on the Stainer 1. To view a list of the slides currently running on the stainer, use the Workflow screen. 32 • Open the Workflow tab.
Note: If you do not have an Instrument column, you can customize your slide lists to display a specific column header. See Section 7: Managing the Slide Display. Manage Bulk Liquids and Waste Fluids Four classes of bulk fluid liquids are used for slide washing and reagent dilution steps: water soluble, alcohol, trace metal, and combined dye. In addition, four waste fluid bottles are provided in both 1.7 L and 4 L capacity.
4. In the Artisan Link Bulk Fluid dialog box, click the Change button. The field becomes active, and ready to be edited. 5. In the Fluid Type field, use the drop down arrow to select the correct fluid. Note: If you do not need to use all of the wash solution bottles, simply select None. The Artisan™ Link will not use the bottle.
6. Click Save to accept the change or Cancel to cancel the change. 7. Repeat these steps for each of the bulk liquid bottles used in the run. For the current approved bulk fluids, refer to Appendix C | Specified Bulk Fluids List. Fill and Prime Bulk Liquid Bottles After you have assigned the bulk liquid bottle positions to use, you are ready to enter the amount of reagents in each of the bottles. 1.
The drop list for the waste fluid bottle displays the following items: Water Soluble Alcohol Trace Metal Combined Dye 2. Select the waste fluid type for the bottle. The selected type displays in the field. 3. In the field below the type name, select the correct volume for the waste bottle (4L or 1.7 L). Hint: The water soluble and combined dye bottles use the 4 liter bottles. The size of the bottle depends on the lab use. 4.
Load Slides with Drying and Clearing On Board When using the Drying and Clearing on board feature, the slides should be loaded onto the carousel dry. • Slides should be well drained of any excess water obtained from the water bath. • Water can be drained by allowing the slides to sit vertically for 15 minutes. You can load slides on any slide platform on the slide carousel. To correctly place the slides onto the Artisan™ Link, do the following: 1.
Note: The slides should soak in wash solution for 5-10 minutes prior to loading onto Artisan™ Link. 1. One at a time, remove slides from wash solution. 2. Carefully dry moisture from the back of the slide with a paper towel or absorbent gauze. Be sure to wipe the back of the frosted end of the slide as well. 3. Place the slide with the tissue side up and the slide label end towards you within the guide rails of the slide position. 4.
To prime the reagent packs: 1. Remove the dispense tip cover. 2. Press the dispenser tip button while holding the reagent pack over a secondary waste container (e.g., a plastic container). 3. Press until a full stream of reagent flows from the pack. This removes any air that may be trapped in the dispenser tip. Load Reagents onto the Reagent Carousel Now you are ready to load the reagents onto the Artisan™ Link 1.
For a list of the current Dako Reagents, refer to the Dako website: http://www.dako.com. IMPORTANT Be sure to select the correct country on the website. The selection button is in the upper right-hand corner. Reagents can have different regulatory approval statuses in different countries. You must use only those reagents that follow the regulations required in your country.
Note: If insufficient reagents are present, you will receive an error message displaying what is missing. Once the reagents have been addressed, click on OK and resume the run. Note: Opening the carousel door will abort the run. Remove Completed Slides When the run is complete The reagent and slide carousel turn green. If a Reagent Pack has been used completely, the position on the carousel turns yellow. A message displays below the reagent map, stating Run complete and Elapsed time.
2. Pull the slide clip gently towards the front of the instrument. 3. Pinch the plastic tab on the front of the slide clip and lift up. 4. Throw the slide clip into the trash. Note: Never reuse slide clips. 5. Place air-dried slides into a slide coverslipping rack. 6. Place the rack in Xylene or a Xylene substitute. 7. Coverslip the slides. Note: Reagent packs cannot be stored permanently on the Carousel. Please remove reagent packs when not in use.
Color Legend for Instruments Tab The following color legend is used to monitor the system on the Instruments tab.
Section 6 | Generating Reports in the Completed Tab The Completed tab allows you to access the historical data for all processed slides. It works like an Internet search page. You specify search criteria, such as a date range or case number, and then press Search. The software displays a list of all slides in the database that meet your criteria.
Perform a Basic Search Note The search criteria are used in combination to select slide records. For example, if you enter "Robert" in the Name field and select GMS in the Protocol field, only slide records with GMS protocols and "Robert" in the name field are displayed. 1. Access the Completed tab. 2. In the Date completed section, complete one of the options. A date is required. IMPORTANT Use caution when using the Any date option.
Option Action…… Show only slides you programmed Select the check box to limit the search to slide records that were added in the New Slides screen when you were logged in as the user 4. In the Slide criteria section, complete one of the options: Option Action….. Protocol Use the Protocol Selector to choose a protocol. Slides processed with the selected protocol will be retrieved. IHC Report not printed Not applicable for Artisan™ Link. Used with Autostainer Link only. 5.
3. Select a field from the list of fields on the left and drag it to the Search criteria list on the right. (You can also double-click the field name to add it to the list.) 4. Specify an operator and a value to apply to the selected field. This will narrow the search. Field Description Operator Indicates the operation to be performed, e.g. =, < (less than), etc. Value Criteria used by the operator In the example below, Completed successfully was dragged under Search criteria.
Generate Custom Reports Once the search criteria is entered and displayed on the screen, you can generate a detailed report to preview, print, save, or export. 1. Enter the search criteria (basic or advanced) you want to use in the report. In the following example, the Date Completed has been filled in. IMPORTANT To avoid impacting system performance, it is advisable to limit your search so that the total number of slide records in the slide list does not exceed approximately 1,000. 2.
Section 7 | Managing the Slide Display Within the system, you can: Customize your general preferences Show only slides you programmed Customize slide column headings Customize Your General Preferences You can use the User Configuration dialog box to customize the four tab screens to meet your specific preferences. Note: Your administrator may not have given you privileges to access the User Configuration dialog box. 1. On the System menu, select User configuration.
General preferences Description Show balloon hints Applies to all tabs. Context sensitive help activated when you hover the cursor over any column, button, or object. Warn before tab change while adding slides Applies to New Slides tab. A warning displays if you attempt to access another tab and you have not completed the case. Display advisory message when restoring Pan Not relevant for Artisan™ Link. View reports on screen before printing Applies to all tabs.
Choose Column Headings to Display You can customize slide lists to display specific information by adding or removing columns from the list. When you add a column, the data represented by that column becomes visible in your list. To add or remove columns: 1. Right-click the slide list and select Customize columns. The Customization window appears. 2. To add a column to the list: Select the name of the column in the Customization window.
Change Column Heading Order You can change the order in which columns appear in lists. This is accomplished by dragging a column header to the location where you want it to appear. 1. Click and hold down the mouse button on the column header you want to move. 2. While continuing to hold down the mouse button, drag the column header to a new location. Look for the two green arrows to indicate where the column will be relocated. 3. Release the mouse button. The column appears in the new location.
Add a Custom Default Slide List View 1. Click the View button. A drop down menu displays. 2. Select the Manage views option. The Slide list views dialog box displays. 3. In the Name field, type the name of the custom view. (See Customize Slide Column Headings for details on how to create a custom view.) 4. Click New. The view is added to the list. You may now select is as a default view. Delete a Custom Default Slide List View 1. Click the View button. A drop down menu displays. 2.
Section 8 | Processing Unlabeled Slides The system can process slides if the slide label printer is temporarily out-of-order, you run out of slide labels, or if your laboratory does not want to use slide labels printed by the system. IMPORTANT This mode of operation is not recommended. This mode requires you to place slides in specific positions in a rack and place the rack in a specific stainer. Mistakes made using this method cannot be detected because there is no label to scan when the run starts.
5. In the Rack field, click the drop down menu arrow and select the rack you want to use. 6. In the Workflow Tab, highlight the stain or stains to be performed. 7. Right click each highlighted stain and drag it to the rack. Note: To delete manually placed slides, drag the slides back to the workflow list. 8. Once the slide rack is assigned, click the Print Rack button to print the slide placement. 9. Place the slides on the slide carousel according to the slide rack print out.
Section 9 | Cleaning and Maintenance Artisan™ Link Instrument Cleaning Cycle The software monitors the number of slides since the last cleaning cycle. You are prompted to run the cleaning cycle when it is necessary. Use the Artisan Instrument Reagent Cleaning pack (Code AR314) to clean the instrument. Start the Cleaning Process 1. Press the OK button in the cleaning cycle alert displayed in the Alerts list.
Note: The Cleaning dialog can also be accessed through the Artisan Control Software (ArtiCS). The ArtiCS can be opened by double clicking on the small Dako logo in the Windows system tray. The Artisan Control Software dialog box displays. From the Artisan Control Software (ArtiCS) display, click the Clean… button to open the Cleaning dialog box. Once the Cleaning Dialog box is displayed: 1. Follow the directions listed under Artisan Cleaning Procedure Instructions. 2.
Perform Waste Valve Rinse After a run has finished, the waste valve rinse procedure automatically cleans the valves that control waste management in the Artisan™ Link. Your lab manager or system administrator sets this up for you in System Configuration. The waste valve rinse prevents salt deposits from forming and keeps the waste lines and valves free of contamination. Note: Dako recommends that you activate the check box, automatically perform waste valve rinse after use.
Clean the Slide Platform Materials needed: Gauze and 1X Wash Solution To ensure proper contact between the slides and the slide heater plates, follow the protocol below. Clean the slide platform after you unload all slides and shut down the Artisan™ Link. Wipe each slide heater plate using a large gauze pad dampened in 1X Wash Solution. Dry each slide heater plate with a dry gauze pad.
CAUTION Frequent accumulation of liquids in the spill tray indicates a leak or aspiration problem with the instrument. If you observe such accumulation, contact Dako’s Technical Service Group. 1. Carefully pull the spill tray out from the bottom of the instrument for inspection. 2. Completely remove the tray. 3. If any liquid has collected in the spill tray, use dry gauze to absorb it. 4. Wipe with gauze dampened with deionized water or 1X Wash Solution to clean the tray.
Section 10 | Training Checklist You can use the following checklist to review and practice all the steps in the Artisan™ Link workflow. If you have questions about terms, refer to the Glossary of terms, located in Appendix E | Glossary. If you have questions about concepts, refer to the appropriate section. Accessing Artisan™ Link Double-click on DakoLink icon. Log in using User Name and Password. Customizing Artisan™ Link In the System menu, select User configuration. Select Preferences.
Managing Slides and Reagents in the Workflow Tab Select My Slides and Special Stains buttons. Delete slides. Scan selected Slide Label using the Hand Held Scanner. Check for Required reagents. Scan/add required reagents label using the Hand Held Scanner. Print reagent report (or Reagents Workflow Planning Report) Print slide detail report. Starting the Run in the Instrument Tab Load slides onto the slide carousel. Select instrument. Assign bulk liquids.
Appendix A | Symbol Definitions Instrument Serial Number Dako Model Number Date of Manufacture Alternating Current Input In-vitro Diagnostic Medical Device Caution, Consult Accompanying Documents Identification of Authorized Representative in the European Community Identification of Manufacturer Xn: Harmful – Substances and preparations which may cause death or acute or chronic damage to health when inhaled, swallowed, or absorbed via the skin.
T: Toxic – Substances and preparations which in low quantities cause death or acute or chronic damage to health when inhaled, swallowed, or absorbed via the skin. F: Highly Flammable – Liquid substances and preparations having a very low flash point. N: Dangerous for the Environment – Substances and preparations which, were they to enter into the environment, would present or might present an immediate or delayed danger for one or more components of the environment.
NFPA (National Fire Protection Agency) Hazard Ratings Each color coded diamond represents a different hazard in addition to a degree of hazard through a numbering system as defined below. Blue Diamond – Health Hazard 4 – Severe: Deadly, even the slightest exposure to this substance would be life threatening. 3 – Serious: Extreme danger. Serious injury would result from exposure to this substance. 2 – Moderate: Dangerous. Exposure to this substance would be hazardous to health.
70 Dako Artisan™ Link | Basic User Guide
Appendix B | System Specifications Item Description Artisan™ Link Stainer dimensions 26” (65cm) high x 26.
72 Dako Artisan™ Link | Basic User Guide
Appendix C | Specified Bulk Fluids List Dako specifies the following wash solution and solvents for use with Artisan™ Link instruments: Wash Solution AR 102 100% Reagent Alcohol 95% Reagent Alcohol Dako Artisan™ Link | Basic User Guide 73
74 Dako Artisan™ Link | Basic User Guide
Appendix D | Waste Source Routes This chart represents typical use of the Artisan™ Link and the route of waste flow. However, it is the responsibility of the Safety or Laboratory Manager at the facility of instrument operation to determine the actual waste constituents and the amounts to ensure proper compliance with waste disposal regulations.
Waste Source Route Alcohol Waste Absolute Alcohol Acid Alcohol Alkaline Alcohol 76 Dako Artisan™ Link | Basic User Guide
Appendix E | Glossary Artisan™ Link Artisan™ Link is a system with the appropriate reagents to automate special stains. Artisan™ Link Robot The Artisan™ Link Robot includes a reagent carousel that holds up to 50 Reagent Packs and a slide carousel that holds up to 48 slides. Each slide position has a heater plate that can be individually activated per procedure. Six one liter bulk liquid bottles are provided for Wash Buffer, 95% Alcohol and 100% Alcohol.
Completed Tab After slides are stained, you can generate custom reports of their slide records on the Completed Tab, including detailed run logs. DakoLink The DakoLink software manages and monitors all the Dako staining instruments on the network. Dako Glass Slide Labeling System Generates chemical-resistant, self-adhesive, customizable labels designed for use in high stress, chemically rigorous laboratory environments with up to five lines of text and a 2D barcode.
Workflow Tab A list of slides that are waiting to be placed on instruments for staining, are assigned to a specific stainer for staining, or are currently in staining, Protocols Synonymous with procedures in Artisan™ Link Power Supply Supplies power to the Artisan™ Link Instrument. Reagent A solution applied to a slide from a reagent pack during slide staining. Reagent Carousel Motorized, rotating assembly that holds up to 50 reagent packs.
Slide Label A chemical resistant, self-adhesive customizable label for use in high-stress, chemically rigorous laboratory environment Slide Label Printer Printer that prints the chemical resistant labels Staining Instruments The Artisan™ Link can include multiple staining instruments, up to three staining instruments per workstation, including one or more Artisan™ Link and/or Autostainer Link Instruments. Both types of instruments use the DakoLink software.
Appendix G | Index A Add Slides New Slides tab, 11 Artisan™ Link, 73 Components, 2, 3 Configurations, 2, 3 Reagents, 2, 3 Robot, 2, 3 Special Stains System, 2, 3 Workflow, 2, 3 Workstation, 6 B Bar Code, 7, 41 Bar Code Scanner, 7 Bio-Hazard, 81 C Cleaning, 61 Automated procedure, 61 Drip Ring, 64 Routine maintenance, 63 Slide Platform, 64 Spill Tray, 64 waste valve rinse, 63 Completed Tab Search, 51 Search / display completed slides, 49 Customize Slide column headings, 54 Warnings, 54 D Delete Slides, 31
S Search Advanced search, 49 Basic search, 48 Set Default Cursor in New Slides tab, 54 General Preferences, 53 Label printing, 54 Show my slides only, 54 Slide carousel, 39 Drying and clearing onbaord, 39 Slide Information Available fields, 14 Slide Label Print, 17 Slide Lists 82 Change column heading order, 56 Customize column headings, 55 Set default slide list view, 56 Slide Processing Details Screen, 15 Slide Record, 17 Slide Report, 27 Symbol Definitions, 68, 69 System Specifications, 73 T Tissue Ty