
User Manual


Dako Artisan™ Link | Basic User Guide 35
6. Click Save to accept the change or Cancel to cancel the change.
7. Repeat these steps for each of the bulk liquid bottles used in the run.
For the current approved bulk fluids, refer to
Appendix C | Specified Bulk Fluids List.
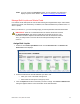
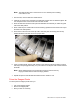
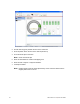
Fill and Prime Bulk Liquid Bottles
After you have assigned the bulk liquid bottle positions to use, you are ready to enter the amount
of reagents in each of the bottles.
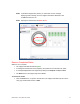
1. To Fill the bottles:
On the Artisan Link Bulk Fluids screen, click the Fill button under one bottle or
Click the Fill all button for all bottles.
The software will fill in each of the bulk liquid bottles with a green color
Note: The amount of fluid shown in the bulk liquid bottles will always default to
90%, unless your administrator or manager has set a different default value.
This will cause the instrument to switch to the next bulk fluid bottle or alert
you of low fluid without actually running out of fluid. If you have less than a
full bottle of reagent, simply drag the fluid level up or down using your
mouse to achieve the correct amount.
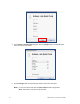
2. To Prime the bottles:
On the Artisan Link Bulk Fluids screen, click the Prime button under one bottle
Or, Click the Prime All button to prime all of the containers.
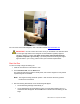
IMPORTANT Always prime your bulk liquid fluids after filling a bulk liquid
container. This will eliminate any air that may be trapped in the line that could
cause an inaccurate dispenser of bulk fluid reagent.
3. After the priming is complete, click the OK button to go back to the Instruments Tab.
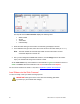
Assign Waste Fluid Bottles
You are now ready to assign the waste fluid bottles.
1. Click the drop down button for a bottle: