
User guide


62 Dako Autostainer | User Guide
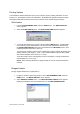
3. To print all reagent labels, select the PRINT ALL button.
To print only selected reagents, select desired reagents by positioning the mouse pointer
over a reagent and clicking the left mouse button. To select more than one reagent,
repeat this step.
To de-select a selected reagent, position the mouse pointer over the highlighted reagent
and click with the left mouse button. The reagent will become un-highlighted, or de-
selected.
Once all desired reagents are highlighted, select the OK button.
Printing reagent labels not from a program.
1. From the PROGRAMMING GRID, select the PRINT button. The WHICH REPORT?
screen appears.
2. Select REAGENT LABELS button. The PRINT REAGENT LABELS screen appears.
3. Select the OTHER REAGENTS button. Another PRINT REAGENT LABELS screen
appears displaying all reagents available from the reagent list.
To print all reagent labels, select the PRINT ALL button.
To print only selected reagents, select desired reagents by positioning the mouse
pointer over a reagent and clicking the left mouse button. To select more than one
reagent, repeat this step.
To de-select a selected reagent, position the mouse pointer over the highlighted reagent
and click with the left mouse button. The reagent will become un-highlighted, or de-
selected.
4. Once all desired reagents are highlighted, select the OK button.
The Main Grid Report
1. From the PROGRAMMING GRID, select the Print button. The WHICH REPORT? screen
appears.
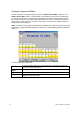
2. Select the PROGRAM GRID button.
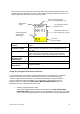
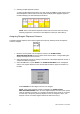
The Program Grid Report is a printout of the Programming Grid. All slide information,
protocol headings, and specific reagents are displayed in this report. All rinses and
switch(es) are represented by corresponding icons for easy identification of each step.
Each Program Grid Report also contains institution information (institution name, address,
and department), user, date printed, number of slide ID’s, number of case #’s, and the
Autostainer serial number.