
Installation Instructions


INSTALLATION INSTRUCTIONS
Wall Mounted
HANG TRACK
SHELVING HARDWARE
ATTACHING UPRIGHT HANG BRACKETS TO UPRIGHTS
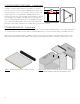
Hang tracks are installed into wall studs to securely mount the closet to the wall. The hang
track height will determine how far the closet hangs off the ground. A hang track installed
at 84" (to the center of the holes) off the ground will result in a full length upright (86½") just
touching the ground. The top shelf will be 2½" above the hang track. Use this to determine
where to mount the hang track. Install the hang track with the lips facing upwards.
Next, attach the hang brackets onto the uprights. These are attached using the small euro
screws included with your hang brackets. The brackets are attached to the uprights using
the 2 pre-drilled holes next to the notch in the upright. The ‘arm’ on the hang bracket
should face towards the notch. Only one hang bracket needs to be installed on an upright.
Uprights that sit against your walls limit which side the hang brackets can be installed on
the uprights.
Before hanging the uprights onto the hang tracks, open the shelf packs and prepare the
shelves for installation. Each Shelf Pack contains Plastic Cam Locks that are inserted into
the bottom side of the shelves (A rubber mallet works great for installing these - gently tap
in the plastic cam locks into your shelving and set aside) & metal cam lock dowels that
are screwed into the pre-drilled holes
in the uprights using a Phillips head
screwdriver.
Install the metal dowels into the uprights
at the locations the shelves will be
installed (one common place is the top
row of pre-drilled holes in the uprights).
Installing the metal dowels into the
uprights prior to hanging the uprights onto the hang track is easier than when the uprights
are 7' in the air! If you have drawers in the design, install drawer
glides at this time as well.
Uprights are now ready to place on your hang track. Lift the
uprights onto the center ‘lip’ of the hang track.
Hang tracks must be installed with the Tap Mount Screws (213-8116). These must be fastened to structural
members in the wall (wood studs). For tracks that need to be cut-to-size, a chop saw suitable for cutting steel or a
hack saw are recommended.
• For Example, if the hang track is installed at 90" off the ground, the a 86½" upright will
be 6" off the ground
• For Example, if the hang track is installed at 93½", the top shelf will be at 96"
5INSTALLATION GUIDE
i36x40
The wall mount bracket pack
contains a left and right bracket.
Install one bracket onto each
upright in the holes shown. The
brackets will be concealed on the
inside of the nished kit.
Tip: Included with the wall mount bracket pack are two cover
caps to conceal the bracket hardware. Set these cover
caps aside until the kit assembly is complete.
Using a screwdriver, turn the screw
at the back of the wall mount
bracket to fully extend the hook
arm.
3
4
7INSTALLATION GUIDE
i36x40
Align the cam locks from the cam
lock pack over the pre-drilled holes
in the shelves, making sure the
open ends match up. Firmly press
the cam locks into the holes.
7
Lower the shelves with installed cam locks onto the installed cam
dowels on the uprights. Once seated, secure the shelves with a
screwdriver by turning the cam lock a half turn in the clockwise
direction.
8
Tip: The Cam Locks are designed to be turned with the screw driver at a slight
angle as to avoid hitting your knuckles on the vertical panel.
Important: Cam Locks cannot be removed once installed,
ensure proper orientation. Refer to illustrations below.
5
4
3
2
1
6INSTALLATION GUIDE
i36x40
Use the cam lock bolts from
the cam lock bolt pack to
install into both uprights using
a screwdriver at the locations
shown in the illustration at right.
5
Lift and hang both uprights onto
the hang rail. The uprights
must hook into the center portion
of the hang rail as shown in
image A.
6
Important: Hanging the uprights on the top portion of the rail
(shown in image B) could result in the failure of the kit!
2