
Installation Instructions


7INSTALLATION GUIDE
i36x40
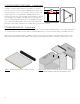
Prepare shelves for installation.
Use cam locks from the cam
lock pack. Press cam locks
into the pre drilled holes on
bottom face of shelf.
7
Lower the shelves with installed cam locks onto the installed
dowels on the vertical panels. Once seated, secure the
shelves with a screw driver by turning the cam a half turn in
the clockwise direction.
8
Tip: The Cam Locks are designed to be turned with the screw driver at a slight
angle as to avoid hitting your knuckles on the vertical panel.
Important: Cam Locks cannot be removed once installed,
ensure proper orientation. Refer to illustrations below.
5INSTALLATION GUIDE
i36x40
To hang the uprights on the
hang rail, remove the wall
mount brackets from the wall
mount bracket pack and
attach them to the uprights
using the provided screws at the location
shown in the illustration.
Good to know: The wall mount bracket pack contains a
left and a right handed bracket. The brackets should be
installed so they are concealed inside the completed starter
kit.
Tip: Included with the wall mount bracket pack are two cover
caps to conceal the bracket hardware. Set these cover
caps aside until the kit assembly is complete.
Using a screwdriver, turn the
screw at the back of the wall
mount bracket to extend the
hook arm.
3
4
8INSTALLATION GUIDE
i36x40
Install wardrobe rod supports
using the pre drilled holes in the
uprights. Insert the wardrobe
rod into the wardrobe rod
supports.
Place a level on top of
the assembled closet
and determine if any
adjustment is necessary.
Use a screwdriver to
adjust the height of each upright. Once
level, attach cover caps
9
10
Tip: Wardrobe rod supports are designed to be adjustable
and can be moved to any height you desire.
INSTALLING SHELVES
CUSTOM LENGTH SHELVING - If Applicable
FINAL TOUCHES
Shelving can now be installed onto the uprights. Lower the shelves with installed cam locks onto the installed
dowels on the uprights. Once seated, secure the shelves with a screw driver by turning the cam a half turn in the
clockwise direction.
Some of your shelving may need to be cut to a custom length in order to create a wall-
to-wall closet solution. To create a smooth, clean cut on your shelves, apply painter’s
tape to the area you intend to cut & cut your shelves using a circular saw using a high
tooth count (80 teeth is optimal) blade. Once shelves are cut to the custom length, use
L-brackets to attach the cut edge to the upright. These brackets are designed to attach
to the pre-drilled holes in the closet uprights using the euro screws provided. Wood
screws are also provided in the package to attach the L-bracket to the underside of your
custom cut shelf.
Prior to installing drawers, doors, wardrobe rods, lights, or any other accessories, fine-tune your closet fit by
turning the adjustment screws on the upright hang brackets.
The back adjustment screw will push and pull the
upright away from the wall. Adjust this screw till the
upright is flush with the wall it rests on.
The bottom adjustment screw will raise and lower
each upright. Adjust each of the upright hang
brackets to level all the shelving in your closet. A
level closet will make installing drawers and doors
much easier to install.
Tip: The Cam Locks are designed to
be turned with the screw driver at a
slight angle as to avoid hitting your
knuckles on the upright.
3