
Installation Instructions


PLANNING & PREPARATION
Use your order form to layout your uprights, shelves, and hardware in front of the location they will be installed.
This will help to verify all of the items needed, as well as help to visualize the completed project.
INSTALLATION
Floor Standing Closets can be assembled either in place or assembled on the ground.
Assembling in place is easiest with two people to install. For spaces that have less than 90” of headroom,
assembling in place is the only option. Assembling this way also only requires single components to be picked up
at a time, making it the lighter installation method.
ASSEMBLED IN PLACE
• Requires at least 2 people to install
• For areas with ceilings shorter than 90" high
• Single components installed at a time
• For smaller closets or closets without floor space
Assembling on the ground and tilting into place requires ample headroom space (minimum of 90"). Assembling this
way makes installing shelves on to the uprights easier with a single person, but can be heavy to tilt into place. The
closet can be built in sections and tilted into place section by section, to keep the weight down.
ASSEMBLED ON GROUND
• Can be assembled by one person
• Requires at least 90” of ceiling height for tipping up
• Will require tilting into place (can be heavy)
• For closets with ample floor space
SHELVING HARDWARE
Before assembling the closet, open the shelf packs and prepare the
shelves for installation to the uprights. Each Shelf Pack contains
Plastic Cam Locks that are inserted into the bottom side of the
shelves (A rubber mallet works great for installing these - gently tap
in the plastic cam locks into shelving and set aside) & metal cam lock
dowels that are screwed into the pre-drilled holes of the uprights
using a Phillips head screwdriver.
INSTALLING SHELVES
Install the metal cam lock dowels into the uprights at the locations
where shelving will be installed (one common place is the top row of
the predrilled holes in the uprights). Lower the shelves with installed
cam locks onto the installed dowels on the uprights. Once seated,
secure the shelves with a screw driver by turning the cam a half turn in
the clockwise direction.
Tip: The Cam Locks are designed to be turned with the screw driver at
a slight angle as to avoid hitting your knuckles on the upright.
Once the uprights are up against the wall, secure every section to the wall using an L-bracket
into a wall stud and on the top of the shelf, so the bracket is out of sight.
INSTALLATION INSTRUCTIONS
Floor Standing
7INSTALLATION GUIDE
i36x40
Align the cam locks from the cam
lock pack over the pre-drilled holes
in the shelves, making sure the
open ends match up. Firmly press
the cam locks into the holes.
7
Lower the shelves with installed cam locks onto the installed cam
dowels on the uprights. Once seated, secure the shelves with a
screwdriver by turning the cam lock a half turn in the clockwise
direction.
8
Tip: The Cam Locks are designed to be turned with the screw driver at a slight
angle as to avoid hitting your knuckles on the vertical panel.
Important: Cam Locks cannot be removed once installed,
ensure proper orientation. Refer to illustrations below.
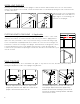
7INSTALLATION GUIDE
i36x40
Prepare shelves for installation.
Use cam locks from the cam
lock pack. Press cam locks
into the pre drilled holes on
bottom face of shelf.
7
Lower the shelves with installed cam locks onto the installed
dowels on the vertical panels. Once seated, secure the
shelves with a screw driver by turning the cam a half turn in
the clockwise direction.
8
Tip: The Cam Locks are designed to be turned with the screw driver at a slight
angle as to avoid hitting your knuckles on the vertical panel.
Important: Cam Locks cannot be removed once installed,
ensure proper orientation. Refer to illustrations below.
5