
User Manual

Manual # 650473
WARNING: This product can expose you to chemicals including lead, which is known to the State of
California to cause cancer and birth defects or other reproductive harm. For more information go to
www.P65Warnings.ca.gov
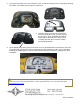
3. Place the VHX system over the back of the
bezel and crimp the seven (7) tabs back over
the clear lens. Then, attach the provided 36”
CAT5 cable to the back of the VHX system.
Carefully route the other end to the control
box mounting location.
2. The stock bezel will be reused; un-crimp the seven (7) tabs that clamp over the stock gauge housing.
The rubber seal should remain inside the stock bezel.
4. Tip the bottom of the VHX system in the dash to ensure the bottom tabs lay behind the dash and
secure the VHX system to the dash using the two (2) stock mounting screws. You are now done
mounting the VHX display; refer to the main manual for wiring instructions to complete the VHX
installation.