
Installation Manual


MAN 650314:J
29
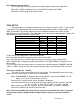
By default the available messages for each message display are:
Speed/LCD1 message displays DESCRIPTION .
ODOMETER Odometer mileage (0-999,999)
A MILES Trip A odometer mileage (0-9999.9)
B MILES Trip B odometer mileage (0-9999.9)
KM/H Alternate speed unit conversion
GEAR (with optional GSS-2000) Gear shift position indicator
SERVIC (when enabled) Miles since last service (0-9,999, or ---- when past due)
ENGINE Check engine indicator
BRAKE Brake warning indicator
4W DRV 4 wheel drive indication
WAIT Diesel wait to start indicator
NOTE: In normal operation you have to use switch 1 (SW1) to reset trip meters, and
service counter. A press and hold will zero the current reading, if it can be reset. A press
and hold will also clear warning messages such as ENGINE, BRAKE, etc.
Tach/LCD2 Message displays DESCRIPTION .
CLOCK 12 hour clock display (press and hold switch to set)
HOURS Hours system has been on with tach signal (0-999.9)
HI SPEED High speed recall (0-255)
0-60 MPH 0-60 mph time in seconds (0-25.5)
1/4¼ MI SPD Vehicle speed at end of ¼ mile
1/4 MI TIME Time to travel ¼ mile from standing start
RPM Digital tach readout on message display
HIGH RPM High rpm recall (0-18,000)
BIM displays(optional) BIM messages will display on message 2 display by default
NOTE: A press and hold of SW2 will zero the current reading, if it can be reset.
Also, press and hold of the switch while the clock is displayed will enter clock set mode.
If you have the system powered up in normal mode you can scroll through the various
display screens with the press and release of the switches, SW1 or SW2. Whatever screen you
were on last will be recalled at the next power up. You can also select which screen you want
certain messages to appear on or if you want them displayed at all (covered under display setup).
If a warning limit or a change is sensed, the display screen may switch to that screen as a
warning indicator if it isn’t already being displayed. This is also true for systems that have the
optional gear position sensor installed; if the gear message isn’t displayed, whenever there is a
gear change the current gear screen will pop-up to indicate the gear change and after about three
seconds, revert back to the previous displayed message.
SETTING TIME ON CLOCK
When one of the screens is displaying the clock, press and hold the switch (SW1 if on
LCD1, or SW2 if on LCD2). The hours will begin flashing. Press and release the switch to change
the hour. Press and hold the switch to save hours. Tens of minutes will flash.
Press and release the switch to change tens of minutes. Press and hold to move on to
single minutes. Single minutes will flash.
Press and release the switch to change single minutes. Press and hold the switch to return
to normal operation.