
Service manual


INSTALLING THE DISPLAY SYSTEM
The first step in installing your new digital gauge kit will be to remove the instrumentation
cluster from your vehicle. The front plastic bezel must be removed first. Once this has been
taken off, you can begin removing the instrument cluster. There are four screws which hold the
instrument cluster in, two on each side. It may be necessary to move the heater vent duct or
radio to get to the screws.
Once the instrument cluster has been removed, take the four screws out which hold the
black hood onto the cluster. Remove the hood. Turn the gauge housing over so you can see
the back side. Unplug the four wire, black connector found in the center of the back side.
Remove the six large gray light bulbs. Do not remove any of the small gray bulbs, or the large
black bulb by the gear shift position indicator. The bulbs are taken out by rotating it counter-
clockwise 1/8 turn and then pulling it. Turn the housing back over so the front is facing you.
The gauges consist of a single panel which can be pulled out of the housing. Remove this since
they will no longer be used. The pin connections for the gauge panel holds it in very tightly so
some force will be required. Start by working gently along the outside edges. Once it is out,
you will see a small green circuit panel in the lower right side of the housing. Remove this also.
You are now ready to install the digital gauge panel. The screws sticking out of the back
side will insert into the housing to make connection with the vehicle senders and wiring. The
colored wires and flat gray cable coming out of the back side of the display panel will be routed
out the hole in the center of the housing. Carefully place the display panel into the housing and
press down evenly on the display panel until it hits the bottom and stops.
Place a washer and nut onto a screw sticking out of the back side of the housing. This
will help ensure that the display panel does not vibrate loose.
You are now ready to install the new lens onto the hood. Remove the two screws on the
top side of the instrument cluster hood which hold the curved plastic lens on. Set the clear
plastic lens aside. Place a bead of clear or black silicone RTV around the bottom inside edge of
the hood from the front side. The lens will be placed onto the front, inside lip of the hood and
the RTV will hold it into place. The RTV will need several hours to cure before the hood can be
placed back onto the instrument housing.
Once the RTV has cured, place the hood and curved plastic lens back onto the housing
and secure it using the six screws that were originally in it.
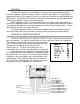
The wires coming out of the back of the housing will connect to the control box terminal
strip. See the following section for wire color and location. After connecting the wires, the
gauge housing is ready to go back into the dash. Reverse the disassembly procedure to put
your dash back together. The control box can be mounted up under the dash or against the fire
wall. The control box can be secured using screws, Velcro, or nylon cable ties. The system
uses the original vehicle senders so you are now ready to drive away.