
Operation Manual


8
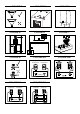
Connection in correct phase is a detail that is often ignored. The red (+) terminal of the amplifier
must be connected to the red (+) terminal of the loudspeaker. The black (-) terminal of the
amplifier must be connected to the black (-) terminal of the loudspeaker (see Figure 9A). Even
a single loudspeaker connected out-of-phase in a stereo or surround installation will make the
bass weaker and the stereo image unfocused.
For the optimal listening experience, the right loudspeaker (as seen from the listening position)
must be connected to the amplifier output terminals marked “R” or “Right”. The left loudspeaker
must be connected to the amplifier output terminals marked “L” or “Left”.
NOTE: Before connecting cables or changing any connections, ALWAYS turn off your amplifier.
NOTE: Make sure that bare conductors are tightly gripped by the terminals with no loose wires
which, could cause a short circuit and damage the amplifier (see Figure 8).
NOTE: If you are using DALI RUBICON in a surround system, follow the instructions included
with your surround amplifier.
4.1 SINGLE-WIRING vs. BI-WIRING/BI-AMPING
All DALI RUBICON speakers can be connected by means of a single speaker cable (see Figure
9A + 9B). However, DALI RUBICON 5, 6 and 8 are fitted with two pairs of terminals, allowing
you the option of running two sets of cables to each speaker. The top terminal pair is internally
connected to the crossover network’s high frequency section. The bottom terminal pair is
internally connected to the crossover network’s bass section.
NOTE: When bi-wiring or bi-amping, ALWAYS remove the metal jumpers between the terminals
before connecting cables (see Figure 9C + 9D).
For bi-wiring, connect two sets of loudspeaker cables, one to the top terminals and one to the
bottom terminals of the speakers. At the amplifier end, connect both sets of loudspeaker cables
to the same pair of terminals on the amplifier (see Figure 9C).
For bi-amping, connect two sets of loudspeaker cables, one to the top terminals and one to the
bottom terminals. At the amplifier end, connect one set of loudspeaker cables to one amplifier,
and connect the other set of cables to the second amplifier (see Figure 9D).
5.0 RUNNING-IN
Like any mechanical system, a loudspeaker requires a “running-in” period to perform at its best.
You will experience a gradual increase in sound quality during the first period of use. The break-in
period will vary depending on use and playback volume. You should expect up to 100 hours of
playback until maximum performance is reached. Unlike other mechanical systems, the life-span
of a loudspeaker is increased by normal, regular playback of music.
6.0 CLEANING & MAINTENANCE
Clean the cabinets with a soft, dry cloth. If the cabinets are dirty, wipe with a soft cloth dipped in
all-purpose cleaner and then well wrung out. Be very careful when wiping the speaker cones,
as they are very fragile. Grille fronts can be cleaned with a clothes brush and wiped with a well
wrung, lint-free cloth and mild all-purpose cleaner.