
User`s manual


405-00026-00iNspect Express User’s Manual
4 Rev 1600; 12 July 2010
3.Set up the Sensor
In the “Setup or Modify” area on the Navigation panel, only the Sensor button is active (after
“Start New Solution”. This step must be completed before any of the other Setup buttons can be
accessed. If you had loaded a previously saved Solution, all of the buttons would be active.
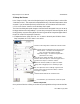
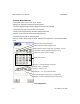
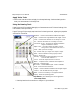
a. Click on the “Sensor” button to access the Setup Sensor panel.
The Control and Navigation panel changes to show the Sensor Setup panel. Here you can set up
the trigger and the sensor image settings. If you are using a conveyer or other moving parts, set up
the trigger delay, exposure and brightness with moving parts. Note: Images that appear dark to
the eye still contain all image edge information.
b. Complete the Sensor Setup, then click “Ok” to return to the main panel. With the Sensor
Setup completed, the “Tools” button is now active.
Select what causes the Appliance to snap an image:
Internal Timer – the slider sets the Appliance
clock, and the time between images.
Inspection Trigger – an external signal from a
photosensor or a relay.
Click the box to enable the slider, to set a delay
between when the object is under the trigger sensor
You can adjust the sensor settings to get the best
image. Invert reverses black and white, or makes
the image a negative.
Click OK when you are finished, to exit this panel.
and when the object is under the camera.
Define the duration (width) of a pulse and offset
(delay) after a triggerinput, for controlling a light.
Calibrate measurements to real-world units.
Location of the image files in Emulator or Demo mode.
Sensor Setup Panel
Once you have clicked on a slider, you can also use your keyboard arrow keys to move the slider.