
User`s manual


iNspect Express User’s Manual405-00026-00
7Rev 1600; 12 July 2010
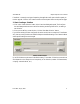
Using the Calibration Tool
Calibration is an option, not a requirement. Calibration corrects for field distortion or perspec-
tive, and changes the units reported. If you wish to only change units, you can use the Scale but-
ton in any length or distance measurement. If you do not use calibration or scale, measurements
are reported in pixels. If you perform calibration or scale, measurements are reported in real
units: cm, mm, or inches. Two “checkerboard” calibration patterns are included at the end of this
manual.
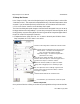
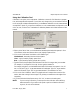
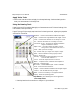
Calibration Panel
a. Place a grid of dots or lines, or a checkerboard of alternating black and white squares, in front
of the camera, at the same distance where your inspection parts will be.
b. Click on the “radio button” beside the correct Pattern Type:
Checkerboard – alternating black and white squares.
Lines – a grid formed by equally spaced lines.
Dots – a grid formed by equally spaced dots or points.
c. Type the size of a single square in the field next to Cell Size. Do not type units; just a number.
For example, if one square is 10 mm by 10 mm, type the number 10.
For example, using the 1 cm checkerboard at the end of this manual; one square is 1 cm, 10
mm, or 0.40 inch. Type “1” to get measurements in Centimeters. Type “10” to get measure-
ments in Millimeters. Type “400” to get measurements in Thousandths of an Inch.
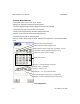
d. Click on the “Set Calibration” button. The Application will compute the correction infor-
mation, then draw a red grid on the image. This grid may not extend out to the edges of the
image area.
e. If you are finished with the Sensor setup, click “Ok” to return to the main panel.
NOTE If you are using Calibration, you must perform the calibration before defining
measurement tools. If you return to this panel to perform calibration after defin-
ing tools, all tools will be deleted.